Upgrade FRS to DFSR:
You might be searching on how to do this due to many reasons, Migrating your DCs to Windows 2016 or Windows 2019, The steps to do this type of migration is pretty easy and straightforward.
First Let’s explain a bit about what does FRS and DFSR do and what is the difference?
Windows Server 2003 and 2003 R2 uses File Replication Service (FRS) to replicate SYSVOL folder content to other domain controllers.
SYSVOL is a folder shared by domain controller to hold its logon scripts, group policies and other items related to AD.
All the domain controllers in the network will replicate the content of SYSVOL folder. The default path for SYSVOL folder is %SystemRoot%\SYSVOL. This folder path can be defined when you install the active directory.
How does DFS Works?
In Windows server 2008 and later Active Directory uses Distributed File System (DFS) for the replication. DFS Replication uses a compression algorithm known as remote differential compression (RDC). RDC detects changes to the data in a file and enables DFS Replication to replicate only the changed file blocks instead of the entire file.
Although FRS has been deprecated Since Windows server 2008 most people still looking to migrate to latest version.
Migration Starts Here
In this guide, I am going to explain how to do this kind of migration step by step.
I am going to run the migration on Windows 2008 R2 Servers. however the process is exactly the same on Windows 2012 R2.
To start, I need to check the service console to see which services are running the replication. From run type services.msc and enter
As you can see there, File Replication Service is running
In the same manner DFS service is also started and functioning, But that doesn’t mean that RFS is not being used.
Health Check
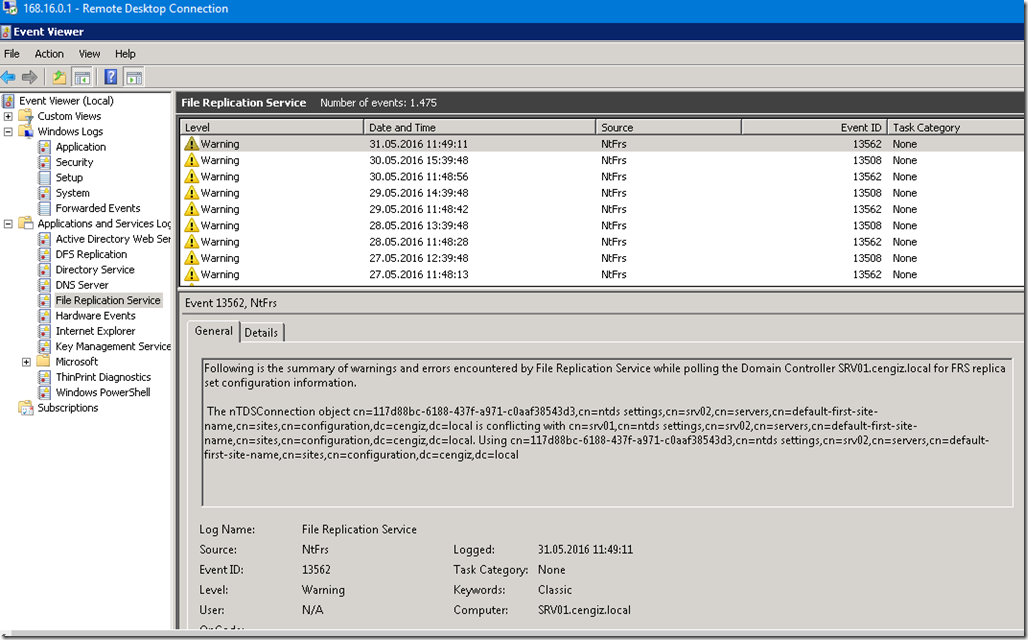
Before starting any migration, I prefer to do a check on Eventviewer just to make sure nothing critical is being reported. In the same way I would like to see if there any warning being reported.
Below you can see errors are being reported from File Replication Service by the Domain Controller SRV01, So the time is convenient to start this kind of migration as this would fix the errors being reported.
Prerequirements:
The first part of the process for migrating SYSVOL replication from File Replication Service (FRS) to Distributed File System (DFS) Replication is to raise the functional level of the domain to Windows Server 2008 and to set the global migration state to Prepared.
Make sure your Domain Function Level is raised to 2008 at least for this process to work.
Migration:
To start migration, Run Powershell as an administrator from the DC And type the following command to prepare DCs for the migration.
dfsrmig /getglobalstate
Preparing to migrate
dfsrmig /setglobalstate 1
When this is done, you might have to wait sometime (5 mins or less for small environments). When done waiting type dfsrmig /getglobalstate to verify that the global migration state is Prepared. The following output appears if the global migration state is Prepared.
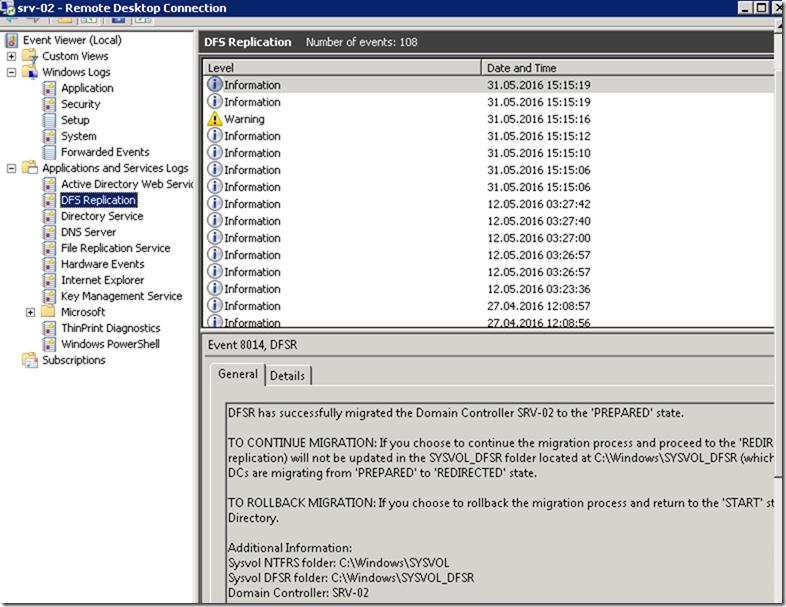
You will be able to see an event ID 8014 showing you the success of this command. Which means you can move to the next stage.
Migrate the domain to the Redirected state
From a command prompt or PowerShell window on a writeable domain controller (not a read-only domain controller) in the domain that you want to migrate, type dfsrmig /setglobalstate 2 to set the global migration state to Redirected.
2. Type dfsrmig /getglobalstate to verify that the global migration state is Redirected. The following output appears if the global migration state is Redirected.
After doing this, Checking event viewer you can see event ID 8017 showing you the current state, in my case it’s showing DFSR has successfully Migrated the DC to “Redirected” state. so it means we are good to go to the next step.
Migrating to the Eliminated State
Log on to a writeable domain controller (if you are not logged on already).
Open a command prompt window and then type dfsrmig /setglobalstate 3 to set the global migration state to Eliminated.
2. At a command prompt, type dfsrmig /getmigrationstate to verify that all the domain controllers are at the Redirected state. The following output appears when all domain controllers are at the Redirected state.
In the event viewer you can see the state of the DCs reporting that DC will now migrate to the “Eliminated” state. with event ID 8018
Once everything is finished, You will be able to confirm by two things, First on the Service console the File Replication Service should be disabled since it’s no longer going to be used.
Second thing is by using Command line or Powershel, Type Net Share an you can see the new Shares being published with new names “Sysvol_DFSR”.
Ref:
https://docs.microsoft.com/en-us/windows-server/storage/dfs-replication/migrate-sysvol-to-dfsr


![clip_image001[4] clip_image001[4]](https://www.moh10ly.com/wp-content/uploads/2019/11/clip_image0014_thumb.png)
![clip_image002[4] clip_image002[4]](https://www.moh10ly.com/wp-content/uploads/2019/11/clip_image0024_thumb.png)
![clip_image003[4] clip_image003[4]](https://www.moh10ly.com/wp-content/uploads/2019/11/clip_image0034_thumb.png)
![clip_image004[4] clip_image004[4]](https://www.moh10ly.com/wp-content/uploads/2019/11/clip_image0044_thumb.png)
![clip_image005[4] clip_image005[4]](https://www.moh10ly.com/wp-content/uploads/2019/11/clip_image0054_thumb.png)
![clip_image006[4] clip_image006[4]](https://www.moh10ly.com/wp-content/uploads/2019/11/clip_image0064_thumb.png)
![clip_image007[4] clip_image007[4]](https://www.moh10ly.com/wp-content/uploads/2019/11/clip_image0074_thumb.png)
![clip_image008[4] clip_image008[4]](https://www.moh10ly.com/wp-content/uploads/2019/11/clip_image0084_thumb.png)
![clip_image009[4] clip_image009[4]](https://www.moh10ly.com/wp-content/uploads/2019/11/clip_image0094_thumb.png)
![clip_image010[4] clip_image010[4]](https://www.moh10ly.com/wp-content/uploads/2019/11/clip_image0104_thumb.png)
![clip_image011[4] clip_image011[4]](https://www.moh10ly.com/wp-content/uploads/2019/11/clip_image0114_thumb.png)
![clip_image012[4] clip_image012[4]](https://www.moh10ly.com/wp-content/uploads/2019/11/clip_image0124_thumb.png)
![clip_image013[4] clip_image013[4]](https://www.moh10ly.com/wp-content/uploads/2019/11/clip_image0134_thumb.png)
![clip_image014[4] clip_image014[4]](https://www.moh10ly.com/wp-content/uploads/2019/11/clip_image0144_thumb.png)
![clip_image015[4] clip_image015[4]](https://www.moh10ly.com/wp-content/uploads/2019/11/clip_image0154_thumb.png)
![clip_image016[4] clip_image016[4]](https://www.moh10ly.com/wp-content/uploads/2019/11/clip_image0164_thumb.png)
![clip_image017[4] clip_image017[4]](https://www.moh10ly.com/wp-content/uploads/2019/11/clip_image0174_thumb.png)
![clip_image018[4] clip_image018[4]](https://www.moh10ly.com/wp-content/uploads/2019/11/clip_image0184_thumb.png)
![clip_image019[4] clip_image019[4]](https://www.moh10ly.com/wp-content/uploads/2019/11/clip_image0194_thumb.png)
![clip_image020[4] clip_image020[4]](https://www.moh10ly.com/wp-content/uploads/2019/11/clip_image0204_thumb.png)
![clip_image021[4] clip_image021[4]](https://www.moh10ly.com/wp-content/uploads/2019/11/clip_image0214_thumb.png)
![clip_image022[4] clip_image022[4]](https://www.moh10ly.com/wp-content/uploads/2019/11/clip_image0224_thumb.png)
![clip_image023[4] clip_image023[4]](https://www.moh10ly.com/wp-content/uploads/2019/11/clip_image0234_thumb.png)
![clip_image024[4] clip_image024[4]](https://www.moh10ly.com/wp-content/uploads/2019/11/clip_image0244_thumb.png)
![clip_image025[4] clip_image025[4]](https://www.moh10ly.com/wp-content/uploads/2019/11/clip_image0254_thumb.png)
![clip_image026[4] clip_image026[4]](https://www.moh10ly.com/wp-content/uploads/2019/11/clip_image0264_thumb.png)
![clip_image027[4] clip_image027[4]](https://www.moh10ly.com/wp-content/uploads/2019/11/clip_image0274_thumb.png)
![clip_image028[4] clip_image028[4]](https://www.moh10ly.com/wp-content/uploads/2019/11/clip_image0284_thumb.png)
![clip_image029[4] clip_image029[4]](https://www.moh10ly.com/wp-content/uploads/2019/11/clip_image0294_thumb.png)
![clip_image030[4] clip_image030[4]](https://www.moh10ly.com/wp-content/uploads/2019/11/clip_image0304_thumb.png)
![clip_image031[4] clip_image031[4]](https://www.moh10ly.com/wp-content/uploads/2019/11/clip_image0314_thumb.png)
![clip_image032[4] clip_image032[4]](https://www.moh10ly.com/wp-content/uploads/2019/11/clip_image0324_thumb.png)
![clip_image033[4] clip_image033[4]](https://www.moh10ly.com/wp-content/uploads/2019/11/clip_image0334_thumb.png)
![clip_image034[4] clip_image034[4]](https://www.moh10ly.com/wp-content/uploads/2019/11/clip_image0344_thumb.png)
![clip_image035[7] clip_image035[7]](https://www.moh10ly.com/wp-content/uploads/2019/11/clip_image0357_thumb.png)