Category Archives: Pfsense

Setup Squid Guard (Proxy Server) on Pfsense

Setup Squid Guard (Proxy Server) on Pfsense

In order to setup Squid Guard you should have two packages installed on your Pfsense for it to work properly.

First package should be Squid 3 (In case you’re publishing Exchange web services with it) or Squid if not.

Second Package would be Squid Guard-Squid3 for Squid 3 or in case you don’t have Squid 3 you can use the normal “Stable” Squid-Guard version for Squid. 

Squid Package

In my case I am using Squid 3 because I use its reverse proxy to publish Exchange web services so I will install SquidGaurd-Squid 3 to configure its proxy server.

I already downloaded and installed it but If you didn’t do so then you will have to navigate to >System > Packages >Available Packages and there you can find it and install it.

From the Services Menu drop down you will find those 3 below (Proxy Filter, Proxy Server and Reverse Proxy) 

First I will go to Proxy Server tick which Interfaces I want to enable the proxy on (LAN, DMZ) and Enable “Transparent Http Proxy” and “Allow users on interface” in the General tab page

If you scroll down you will find “Logging Settings” and other options that you don’t need to enable. Logging is required mostly for troubleshooting times.

Next I will go to “Local Cache” tab and change the Squid Hard Disk cache Settings in order to take more than 100 mb. I will make it 5000mb which is 5 GB to make internet browser faster for users who visit the same websites often.

After that you don’t need to do anything except saving changes in the end of the page below

Go to “ACLs” page and enable the Local networks that I have, I will write them in the “Allowed subnets” section and save the page. 

I am finished with the Proxy Server settings, I will go to Proxy Filter and I will scroll down to the end of the page to Enable Blacklist option and paste the link below then click Save to save the changes

http://www.shallalist.de/Downloads/shallalist.tar.gz

Go to Blacklist tab to download the black list from there then I will copy the link below and press on Download

http://www.shallalist.de/Downloads/shallalist.tar.gz

When I finish downloading I will go to “Common ACL” tab page and configure the Rules there which we have downloaded. As you can see below I have everything already configured but in order for you to configure it you will have to press on the > Green Start button first of all

After you press on the Green button It will show you the rules that you want to configure. I have already configured (Alcohol, Deny, Gambling, Hacking, Social net)…

Then next I will configure the Redirect mode and type my own customized message that will appear to the clients behind Pfsense and use safeSearch.

When done I will save this page and go to the General tab page and will click on Apply all changes and save the page.

Note:

you should see that SafeGuard service state “Started” in order for it to work. If for any reason the service is not started try to navigate to >Status > System logs  and check your logs here if there’s anything related to SafeGaurd or Squid.

Now I will go to the Client and check if my client with “Pfsense as their default gateway” will respond to the Safe Guard rules or not.

I tried opening Facebook or Twitter but both are not working and they gave me the same message which I have customized in Pfsense.  

Over all this had been easy setup and everything works perfectly

Hope this would be useful to you all.

Publishing Exchange on Pfsense

How to Publish Exchange on Pfsense (Old Version)

This page will guide you through the steps of publishing Microsoft Exchange web services on Pfsense’s last version 2.1.5. 
If you don’t have it already installed, you can check out my guide on how to install Pfsense and prepare it on your environment. 

Note:

Before starting you must know that if you’re going to use the same Public IP (WAN) for Pfsense for Exchange Web service then you must set Pfsense to use a non-standard HTTP/HTTPS port.

First thing, we will have to install Squid3 plugin to Pfsense

Installing Package

I will click on the Plus sign + next to the Squid3 package to install it.

Now I will go to the Reverse proxy after I check if it’s installed on the Services Menu

Will have to export the Certificate from our Exchange and import it to the Certificate store in Pfsense.

I’ll click on the + on the CAs to import the Certification Authority root certificate

 I opened the CA certificate in Notepad++ and copied it all then give it a name and clicked on Save

After clicking on Save here is what I got.

Add the Exchange’s personal certificate and Key and use Digicert’s tool to export the key as in the following screenshot

Now I’ll go back to Pfsense’s portal to the Certificate section to add the Exchange’s certificate, I will go to Certificates tab and click on the + sign to add the cert.

I will paste the certificate data and the key as well and save.

I added the Cert’s code data and the cert’s Key as well, and after I clicked on Save here’s what it looks like.

Now I will go on the reverse proxy tab and configure it for Exchange. First thing I should do is Enable HTTP and HTTPS ports and choose the certificate for Exchange.

NOTE: placing the standard ports e.g. (80, 443) for http and  https might work in earlier versions of Pfsense like 1.5 and 2.0 but not 2.1 and 2.2, in order for the reverse proxy to work on the new versions you’ll have to use the port field empty if you decide to use the standard ports. 

Here I have enabled all the ports and choose the right certificate, I will also import the Intermediate certificate in case it was needed.

I will go back to the Exchange Server where I have all the certificates and export the Intermediate Certificate

In order to know the intermediate Certificate, I will go to the MMC and click on the personal certificate and check it’s path. 

I will double click on the certificate and check its certification path

Opening the Intermediate certificate store.

 I will use MMC Wizard to export the Certificate with Base 64 Encoded option.

 After I exported

Now I will enable OWA and fill the information related to it as following.

Next I will go to the firewall (NAT) part to configure the required ports and IPS. Click on Firewall tab and NAT

I will only need to configure the port 25 and 443 since I have a certificate already and want to use HTTPS instead of http.

Here ıs what my firewall looks like right now.

Note: On Exchange server the default gateway should be the LAN IP of the Pfsense or at least there should be a persistent route to the local IP of Pfsense. 

I will save this rule and check if I can browse to OWA from my browser, note that I am connecting remotely and I have Exchange server hosted on hyper V from a different place.

WHOA, It works without any issues but still I’ll sign in and make sure I can still login without any problem.

Now I will check if I can send e-mail back and forth to Gmail and Exchange. starting by sending an e-mail from Exchange. I can get an e-mail to Gmail.

Now I am replying the e-mail from Gmail to Exchange.

Everything seems to be working as expected… 

Now it’s time to make sure that ActiveSync is working properly as well. I will first of all test active sync with Remote Connectivity Analyzer www.testexchangeconnectivity.com or https://testconnectivity.microsoft.com

I will have to go to Exchange Server tab and select “Exchange ActiveSync” option for testing and click continue down right the window 

Then here I will enter my credentials as you can see below

Test will take about 15-30 seconds to finish

Then here it will show the expected result.

detailed result of the test

Note: 

I have also tested it on my iPhone and it worked without any issue as well.

Pfsense and Active Directory Integration

In this tutorial. I will integrate my Active directory with Pfsense in order to authenticate Users from Active directory instead of using Pfsense’s User manager.

The process will give you more options and will make managing users much easier. so in order to do that follow the following steps.

First open your Pfsense Web UI and click on System – > user manager

Next go to Servers Tab

Click + in the right corner

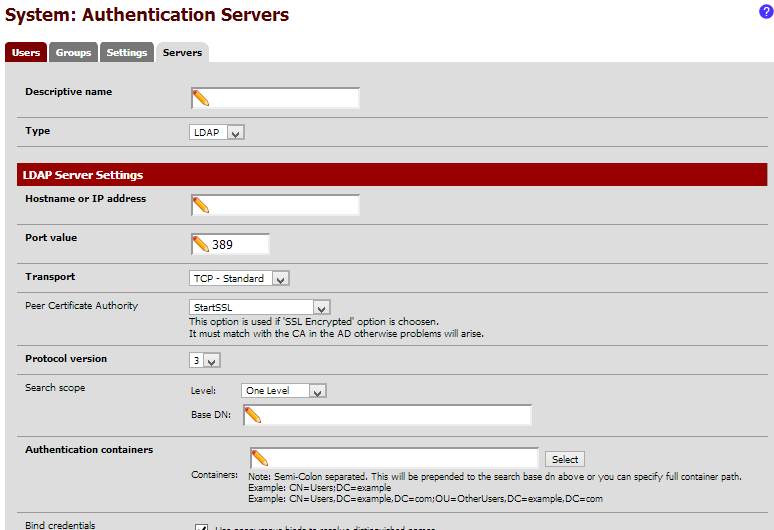
After you click on the + icon you will get the following page.

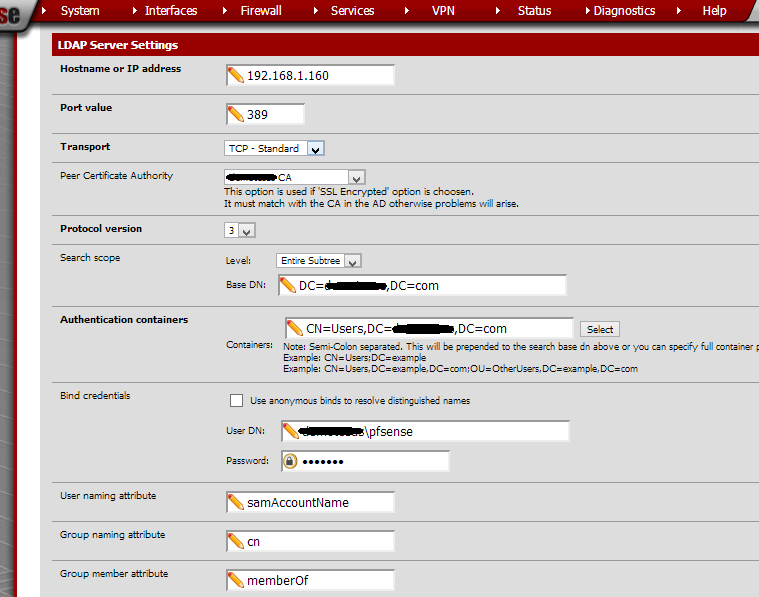
Fill these details accordingly, for help on how to fill these in check the below snapshot

Note: Make sure that your password is simple and contains only letters, no numbers or special characters e.g. Pfsense

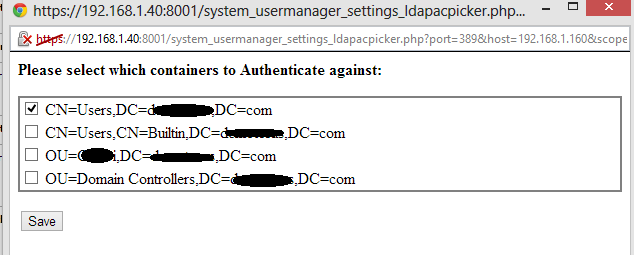
When done click on Select and the result will be that you will be able to view the following OU/CN.

Now create a group on AD e.g. “PF” and create the same identical group name on Pfsense. On AD add any user to this group.

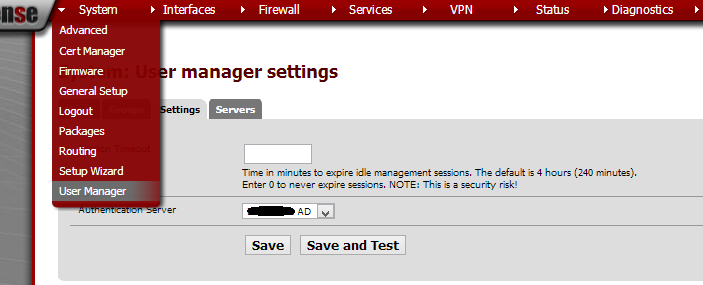
Then go back to pfsense – > system – > user manager -> goto Settings Tab – > from Authentication server select your AD and save

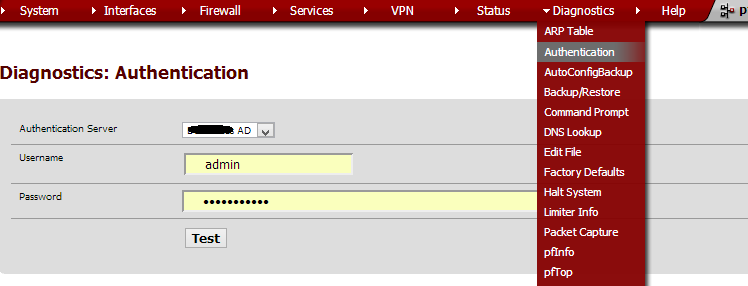
Now click on Diagnostic -> Authentication -> select your AD server

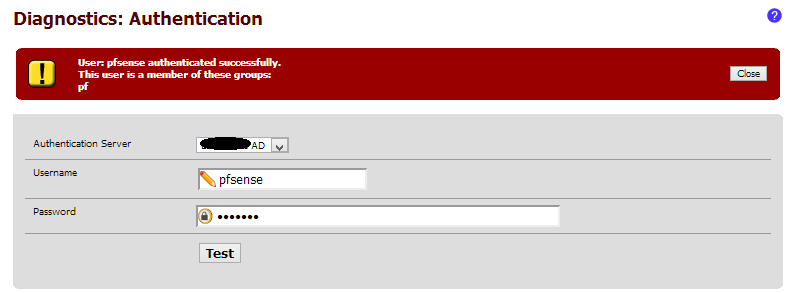
Type in your username and password for the user which you have added to the group pf in the AD and click test then you will see the result on top. “User: Pfsense authenticated successfully. this user is a member of these groups: pf

Hope this will help you find your way through Pfsense. 🙂

SquidGaurd Package installation issue

SQUIDGAURD PACKAGE INSTALLATION ISSUE

Symptoms:

After upgrading Pfsense from 2.1.5 to 2.2 I have got no SquidGaurd installed and when I tried to install it I get the following error on Pfsense

ERROR: No digital signature! If you are *SURE* you trust this PBI, re-install with –no-checksig option.

of squidguard-squid3-1.4_4-amd64 failed!

Installation of squidGuard-squid3 FAILED!

Beginning package installation for squidGuard-squid3 .

Downloading package configuration file… done.

Saving updated package information… done.

Downloading squidGuard-squid3 and its dependencies…

Checking for package installation…

 Downloading https://files.pfsense.org/packages/10/All/squidguard-squid3-1.4_4-amd64.pbi …  (extracting)

 ERROR: No digital signature! If you are *SURE* you trust this PBI, re-install with –no-checksig option.

of squidguard-squid3-1.4_4-amd64 failed!

Installation aborted.Removing package…

Starting package deletion for squidguard-squid3-1.4_4-amd64…done.

Removing squidGuard-squid3 components…

Tabs items… done.

Menu items… done.

Services… done.

Loading package instructions…

Include file squidguard.inc could not be found for inclusion.

Deinstall commands…

Not executing custom deinstall hook because an include is missing.

Removing package instructions…done.

Auxiliary files… done.

Package XML… done.

Configuration… done.

done.

Failed to install package.

Installation halted.

Reasons: as it indicates in the error above the reason why the package is not installed is due to not being digitally signed which might be something related to the new version.

Resolution:

In order to resolve this issue and successfully install SquidGaurd you will have to connect to your Pfsense from SSH (SSH Must be enabled and firewall rule must be configured) and do the following in order to install it by ignoring the Digital signature check.

Enter an option: 8

fetch https://files.pfsense.org/packages/10/All/squidguard-squid3-1.4_4-amd64.pbi

rm -rf /var/db/pbi/installed/squidguard-squid3-1.4_4-amd64.pbi

pbi_add -f –no-checksig squidguard-squid3-1.4_4-amd64.pbi

Now I will go to System > Packages and (re)install the package that failed.

And the result as below

Reference

https://doc.pfsense.org/index.php/Pbi_add:_Invalid_file_for_usercheck

Filter DNS traffic after blocking websites with Squid

Let’s assume that you have installed and configured Squid Proxy to block several categories of websites that you don’t want your users or clients to visit ..

In some places maybe interference on client machines or applying group policy on AD is not strict thing and might give the option to users to pass through proxy rules .. so I have considered the same thought and said after I have configured squid proxy to block certain websites (Porn, chat, social…etc) using the Wpad autodiscover method.. I said in case I change the DNS the user will pass through the proxy and find away to connect to those blocked websites.

Then I thought what if I can block external DNS queries and let all the DNS queries pass through the Pfsense or my internal DNS..

To do so I have configured my PFsense’s WAN DNS IP to Google (System>General Setup>

I have added my Local DNS to the DNS resolver (Pfsense Version 2.2)

Next I will go to the Rules and go to my LAN (DMZ in my case) and create 3 rules in total as following:

The rules in the figure below will allow any DNS query request from any source through only (Local Address of the Pfsense) and the second rule will allow DNS requests from the local DNS Server to any DNS server.

Third rule will blcok any DNS request from anywhere else.

Which in result will allow all clients to forcefully use the local DNS to resolve names and resolve IPs, but still even if the user changed his Local LAN/Wifi DNS IP to Google still he’ll be able to connect to the allowed websites from SQUID but he/she won’t be able to resolve FQDNs through (Nslookup command) for example.

I’m attaching screenshots to demonstrate how this is working flawlessly.

As you can see below I have opened google, Flickr, Facebook, gmail, searched for local time and it all worked according to the Squid rules and while still using (8.8.8.8)

Now I will change the DNS back to the local DNS IP and see if i can resolve internet addresses without an issue and connect as well, which worked fine too.

This is a simple article but I’m sure it could be very useful for those companies who want to block wide range of categories and force it on to their employees. or for families who want to avoid their kids from doing naughty stuff or watch violent websites.

Create your own Nameserver using TinyDns on Pfsense

If you ever thought of hosting your own Public DNS for your own domain then this article is going to be of help for you as I will go through the process of hosting my own Public DNS for my freely acquired domain www.moh10ly.cf

These free domain providers have poor Public DNS capabilities and usually lack of many DNS records e.g. (SRV, TXT, PTR) and that what made me personally want to go on and host my own public DNS for this domain.

I’m going to use Pfsense 2.1.5 for this demonstration but I guess 2.2 also works as well but haven’t tried TinyDns on it yet.

Ok so to configure your own nameserver, first you must have a public domain (domain.com) ..

In this example I will register a free domain from this registrar: www.freenom.com

The process for registration is pretty simple, you will have to follow the wizard and validate your email then sign in to

your portal to edit or configure your free domain.

I have already added a new domain for myself which is called ( moh10ly.cf )

To configure name servers, You must fulfill the following prerequisites:

  1. Public static IP.
  2. DNS Package on Pfsense
  3. Firewall that supports static NAT.

Next step: I will click on Manage domain to change the DNS configuration to point it to my own name server

When you get the following window, click on Management tools and choose “Register glue records”

Very important note:

Next add your Name servers (They don’t need to exist as we will create them later) but you will have to create 2 at least

and you can point them to the same Public IP address.

Scroll down and you will find an option to add the second dns, you can call it dns2 and point it to the same IP address.

Next save changes, then click on Management tools –> Name Servers and there if you couldn’t find the new name servers

you have configured then enter them here.

Save changes again

Now let’s go on Pfsense and setup our Public DNS (Name Server), You will have to go to “System>Packages>Available

Packages” and there download “dns-server” or “TinyDns”

When you have finished installing TinyDns you will find it under “Services” menu. Click on it

Once you are there, click on “Settings tab” and on the binding IP address place your Public IP which you’ll use for the name

servers. And make sure you use the WAN NIC to listen on.

Save and click on the “New domain wizard” to setup your domain

Click Next

On the next window configure your domain as in the following, make sure that it matches your configuration on registrar’s

domain.

Click Next and Finish

Once finished, go to the Add/ Edit record tab and there you will find 4 created records

Next create the root DNS record which is . And point it to the same public IP and any other records that you might have an

installed role for like Exchange, IIS ..etc

Now it’s time to configure the firewall to allow inbound queries on port 53. here’s the rule that I have created under

(Firewall\Rules) because I have only one Public IP address on WAN I won’t use a static NAT rule.

I will go back to TinyDns on Pfsense to see the incoming requests for name resolving from public clients.

Under the logs tab I could see the requests I was making from my PC using google as my DNS.. So everything works fine.

That’s it, the configuration of your own Name server is done.

Configuring Snort on Pfsense

Configuring Snort on Pfsense (will be Updated with the latest version soon)

If you would like to protect your system from any public attacks e.g. (Exploits, Transitive trust, Data driven, Infrastructure, DOS, Magic… Etc.) then you should consider deploying IDS or IPS system to detect and protect your network from any attacks.

Deploying Snort

In Pfsense the famous open source firewall, you have the capability to deploy Snort which is one of the most famous and old ID/PS systems around.

In order to do so you will have to go to Packages from System/Packages and install it

After clicking on the packages button, you will get a list of packages and among them snort will be listed there

Click on the + on the far right to start the installation process.

I’ll Click on Confirm to continue

After it’s been installed now you’ll be able to see it on the Services menu tab.

Click on Snort and let’s go configure it.

Before you start configuring Snort, you must know that in order to successfully get it to work you must be registered in at least one of the snort communities which publishes important rules that tells snort what to check.. Similar to the firewall’s rules.

Register on Snort’s Website

The websites are as following and you can find their settings under the Global settings tab in snort window

https://www.snort.org/users/sign_up

https://portal.emergingthreats.net/register

I will sign up to Snort free account and configure all of the snort supported rules in order to get the most of it. After signing up I’ll need to activate my account.

I have receieved the confirmation now and I’ll confirm my account now, Once confirmed Snort will provide you with a code called VRT Oinkmaster confirmation code.

When your account is activated, you will need to go to your profile by clicking on your activated e-mail top right and you will find it on the left side. Copy the code and paste it to your snort on pfsense. 

Just like this

So after I added the code this is how my Global Settings tab looks like  (I enabled all the other free rules as well)

Now I will go to Updates tab and start updating rules tab, After clicking update this is how it will look like: 

When finished this is how it’ll look like

Back to the updates tab you’ll notice that all the enabled rules have been updated .

If you are connecting to Pfsense from any location where you are planning to enable Snort Interface for then before you enable snort you must consider going to Pass Lists and add your IP (Either private if you’re planning to enable the LAN Interface or Public IP if you’re planning to include WAN Interface).

In order to create a Pass list, you will have to create an Alias and add the Ips you would like to include in the pass note that these IPS are never going to be checked or filtered by Snort.

In order to create an Alias List, click on Firewall Tab and scroll to Alias

Once in IP list page click on the + button far right to add the Ips that you would like to pass.

From type select the type of hosts that you’d like to include there, for me I’d like to include only a couple of Ips

Click Save and Apply then Close then go back to Snort’s Pass Lists and click on + to add new Pass list.

Select all the Networks, WAN IP, GATEWAY, DNS and finally the Alias that you have created and save. 

Once saved, this is how the pass lists is going to look like

Now we can go back to Snort Interfaces and enable the WAN Interface for snort. I’ll click on Snort Interfaces tab and click + to add the new interface

Below I will select block offenders in order to protect myself from DDoS attacks and other attempts to crack internet exposed servers e.g. (FTP, Http..etc) .

Here from Pass List I will select the list which I’ve created in the Pass List tab

As you can see below when the icon is red it means that the Snort is not running and you will have to press on the red icon to turn it on.

After enabling the WAN interface you will have to go define some rules and enable them.

Let’s define some rules for this interface e.g. FTP in order to do so I will click on the E next to the WAN description far right on the top snapshot.

We should go to WAN Categories and select different category in order to apply rules.

Note:

Enabling all rules might affect your VM or PM’s processor performance.

Now I will select all the rules from the rules list below and that will enable all the rules also that are included in the Snort GPLv2 Community. 

Once added, you will have to apply changes and then click on Apply …. And for any reason if the service did not start as in the below snapshot then you should navigate to Status tab and check the “System Logs”

In System logs I noticed the following error:

snort[13270]: FATAL ERROR: /usr/pbi/snort-amd64/etc/snort/snort_6026_de0/rules/snort.rules(427) Unknown rule option: ‘sd_pattern’.

After doing some digging on this error it seems that it’s caused by the rule “Sensitive Data” and after disabling all the rule set in this rule I was able to start Snort on WAN again.

To disable the rules simply click on the “Disable all rules in the current Category” 

When this is done, I will test snort if it’s working by simply try to hack into pfsense’s portal by using wrong passwords for let’s say 10/20 times and see if my IP will get blocked (I’ll use a different Public IP which is not in the pass lists)..

After trying about 7 attempts with wrong username and password I tried refreshing the page

Here is what I got

I will go check Snort blocked list and see if the IP that I tried connecting from is there note that the Public IP which I was trying to connect from was

As you can see below the IP has been blocked and the alert description says it as it is (http_inspection)

So that means that our snort works as it’s supposedly expected to.

Configure Pfsense SSH with RSA/KSA Keys

How to Configure Secure SSH access to Pfsense ?

In this post I will guide you through the configuration of how to enable SSH accessibility to Pfsense on a non-standard SSH with private keys in order to more strengthen the security of connecting to your firewall.
First thing I will open the web browser to Pfsense then from System tab menu I will click on Advanced

I will scroll down to Secure Shell and enable the secure shell and use different SSH port rather than the standard one 22 and also disable password login for secure shell in order to use configured keys for the user that I wanna allow to connect to SSH. 
After this option is enabled I will go to User Manager and create a new User by pressing on the + button far right 

Then I will want this user to be part of the admin groups in order to have the required privileges to be able to configure anything from the SSH window without any issue.

Then before I save this user I will scroll down and enable the Authorized Key option.

In order to configure a Key, I will need to use a tool to generate a public and private key for the authorization of the user.

Using Puttygen Tool

In my case I will use Puttygen tool which is free and available to download anywhere on the internet, I will also attach the tool down in this page for anyone to use.

I will run Putty Generator and change the Number of bits in it to make the key harder to crack. So I will put 2048 bits instead of 1024.

I will click on Generate and move my mouse within the putty generator window until the key is generated.

You will have to keep moving your mouse cursor within this window in order for this bar to finish generating your key.

As you can see below the Public and private keys are generated but you will have to type your own “Key Passphrase” as you will need it when you connect to the SSH session.

I will copy the Public key where it says “Public key for pasting into OpenSSH authorized_keys file” and paste it in pfsense in Authorized Keys window

Then Now I will save both Public and private key in a folder for my own use. Let’s create a folder called (Pfsense_SSH_Key) and save both keys in it 

I will need to only use the private key with an SSH tool to connect to Pfsense e.g. Putty.

Now I will get back to the user and add some effective Privileges that will allow the user to connect to the SSH, I will click on the + button 

And from the System Privileges I will add user – system – shell account access and SSH tunneling

Then save these settings and then save the user settings.

Then configure a Firewall rule with the new SSH port that I have configured in Advanced window, I will go to Firewall tab -> Rules then create a new rule that will allow my public IP address (my work IP address) to my Pfsense’s WAN Address (My Home IP address) on port 2222.

Testing Connectivity

Now I can test SSH connection using Putty tool (Not Putty generator) to see if this works as expected.

Type the IP address in the hostname field, then the port address that I configured for SSH and select SSH under Connection Type.

Before clicking on Open to open the connection I have to load the private key from SSH -> Auth

Now I will click on Open, it should give you a warning when it opens up

Click Yes and continue then type the Username that I setup and the passphrase that you set it up.

After successful login it will show the following and here you can startt

I am going to try and show the network configuration by typing Ifconfig …

So everything seems to be working as expected, If you want to provide more admin privileges to this particular user you will have to login as the admin and from the user’s “Effective Privileges” section add more system privileges to it.

Block Facebook on Pfsense using WPAD Autodiscover feature

How to Block Facebook on HTTPS on Squid proxy server without importing IPS/CIDR or configure Clients browsers for the Proxy settings using the WPAD Autodiscover for Squid feature

Note:

Before you begin reading this article, you must have the proxy filter configured to deny SocialNet in the blacklist in Service / Proxy Filter / Common ACL

In order to block Facebook or any other website on HTTPs protocol on pfsense (SQUID) without finding all the CIDR or IPs to block facebook or any other website’s IPs we will have to use the Squid proxy’s Autodiscover feature which uses Wpad file .. Let’s say similar to how Exchange uses Autodiscover’s XML file.

Prerequisites

  1. In order to block sites on HTTPS you will need to have SQUID Guard proxy installed and configured on Pfsense. If you don’t know how you can look it up here
  2. In order to use this feature you will have to disable the transparent mode on Squid server, To do so navigate to proxy server under the Services Menu then Proxy Server then un-tick the Transparent HTTP proxy.
  3. You will need to have the DHCP server up and running and you will need to create a DHCP option 252 that will provide the HTTP path to the files that we will create further on.
  4. DNS Server configured for the domain in order to add a required A record value for the wpad. The clients are going to look that up through the DHCP option mentioned in step 3.

Autodiscover Files

Then we will have to create the following files in Notepad and save each of them with a specific extension as in the below snapshot

The 3 files contain the same contents inside them “This is a single file with a JavaScript function which tells the browser how to find a proxy hostname and port” which is Squid Proxy server’s IP or Pfsense’s IP, I will open one of them and show you how I have configured this file.

Note: The IP 10.10.0.155 represents my proxy server (PFsense in this case) which has Squid installed and configured on it.

Once these files are saved, I will use a very simple HTTP server tool to host them on any of my servers on a specific port which clients can reach without any problem. My favorite tool is HFS which you can download from here

http://www.rejetto.com/hfs/

Web Server Configuration

After running the HFS appliaction I will run it on the port 8085 and load all the files as in the following snapshot

You can simply load the files by dragging and dropping them under the “Virtual File System” on the right pane.

DNS Configuration

Once this is done we will have to configure the WPAD record on our DNS server with A record pointing to the server where the files are hosted “In my case I have installed the HFS on the AD/DNS server” that has the IP 10.10.0.150

Next I will go the client and check if I can resolve this wpad … 

I have tried to resolve the name but apparently the nslookup is not finding the record that I have created although it’s in the DNS, I have tried ipconfig /flushdns, tried restarting the DNS service but nothing solved the problem

Lastly I went to the DNS logs and checked if there’s anything worth noticing there and here’s what I got Error event ID 7600

Googling online with this error got me to this Microsoft KB

http://support.microsoft.com/kb/2003485/en-us

All I had was to open registry editor and delete the wpad key from the GlobalQueryBlockList value as following

Here is what it looks like after deleting the wpad

Click Ok and make sure you Restart the DNS Server.

On the client I will flush the DNS cache and do another nslookup attempt.

DHCP Server configuration

the DHCP server’s options as required in the prerequisites earlier. I have my DHCP configured on Pfsense server and now I will configure the DHCP as following.

Here I have clicked on Advanced next to the “Additional BOOTP/DHCP options and in Number I entered the DHCP option that I would like to configure and chose String since it’s WPAD. And on the value side I entered the path for the Wpad URL where I ran the HFS application and made sure it’s accessible by clients.

Next I saved everything and will go to both the HFS to monitor clients activity if they are requesting the file or not and I will go the client and request Facebook on HTTPS.

Note:

In order for the autodiscover (Wpad) feature to work your Internet explorer/Firefox must be set to use the Audo detect settings.

On the HFS Server (My AD) I will look up for any logs that will be reported once I start browsing. Now it’s empty

I will go back to the client and browse Google for example.

Here, I have tried on the client side to open Facebook on https but it didn’t work but other websites are working just fine! 

What happened on the HFS server is that the client on Internet Explorer has requested the file “Proxy.pac” file for the settings which means that all of our settings are working properly.

Note:

The only thing I have done on the Proxy Filter to disable Facebook was to Socialnet which includes all the social media websites. In case you want to block only Facebook and leave twitter you will have to extract the blacklist and create your own facebook folder and text file to include all the facebook URLs and then upload it to your own FTP or web server.

http://www.shallalist.de/Downloads/shallalist.tar.gz

Reference:

https://doc.pfsense.org/index.php/WPAD_Autoconfigure_for_Squid

Configuring Secure FTP with Pfsense

Creating FTP over SSL secure server using Filezilla with Pfsense

1-     First step would be by creating the groups/users you want to create.

Second click settings and go to Passive Mode settings and configure it as below, where your Public IP needs to be of the firewall that NATs the connection.

Make sure that the FTP server’s Public IP reflects the Firewall IP that you’re configuring the FTP connection on.


2-    Now it’s time to configure the SSL/TLS settings

You first need to Generate a certificate in order for the connection to be secured and data to be encrypted. you can do that through the FileZilla server app it self too as you can see in the snapshot there’s an option where you can do that.

Just click Generate new certificate, fill in the information.. you can randomize it if you want just type in anything and click ok when finished and select the option according to the snapshot.

3- Firewall configuration:

In my case I’m using Open source software firewall which to be honest doesn’t vary that much from hardware firewall since they are all web based.

I’ll configure two NAT rules enabling FTP secured standard port which is (990) in my case to avoid attackers who usually target port 21. And enable FTP data port range for data exchanging between server and client which in this case needs to be a big range in order to not slow down the connection and for client to be able to open more than socket in case of big amount of data transferring.

First rule will enable incoming connection from any source to the internal LAN IP which host the FTP server on port 990 to establish the FTP secure connection.

FTP Secure Connection

Second rule will enable incoming connection from any source to the FTP server on LAN on data range port from 50000 to 51000.

In the destination IP , you need to set the WAN IP address which you have specified earlier in FTP Server’s Passive mode settings. 

Make sure when you setup your client you set the transfer mode to passive. and here’s the result:


For File Sharing Server over HTTP you can use HFS application

http://www.rejetto.com/hfs/