Category Archives: Microsoft

Messaging and Collaboration, Sharepoint.. etc

3- Migrate Users from Skype for Business 2015 to Teams


Hybrid Integration

In my last post about Skype for Business / Office 365 Skype for Business Online/Teams migration article I discussed the steps of how to create a hybrid environment between Skype for Business on-premises and went through the troubleshooting of each issue I have been through. In this article I am going to discuss the migration of users from on-premises to the cloud through UI and PowerShell.

Migrating users

This article will assume that you are planning to migrate users from Skype for Business Frontend 2015 Server and that you already have a hybrid configuration in place. If so then you’re going to fulfill the following prerequisites:

To check the currently installed PowerShell run the following cmdlet

$PSVersionTable

clip_image001

After you Download and install PowerShell 5.1 you might need to restart the server. In which case the PowerShell will show that it is updated to the required version.

image

After Installing the Skype Online Connector Module, We will be able to connect right after launching PowerShell

To do so type:

Import-Module SkypeOnlineConnector

image

Connecting to Office 365 (Teams Online or Skype for Business Online)

The process of connecting to Office 365 Online PowerShell sounds easy but with MFA enforced in your environment you’ll have a nightmare mix of errors when you try so.

I have came through a lot of errors trying to force the use of PowerShell with MFA user authentication but eventually came to realize that Microsoft still does not support MFA for some cmdlets like Move-CsUser for instance.

So In short, to connect you’ll need to have a global or Teams admin user with MFA disabled to do so.

To create a new Skype Online Session enter:

– Make sure you start the regular PowerShell as admin and not Skype for Business Management Shell.

If you run these commands from SfB Management Shell you’ll get an error

image

So first, We will import the Skype Online connector Module

Import-Module SkypeOnlineConnector

image

Then get the OverRidePowershell URI using the command:

Get-CsOnlinePowerShellEndPoint

image


Next, We will connect and authenticate to our tenant using the following cmdlet

$sfbsess = New-CsOnlineSession -Username User@domain.onmicrosoft.com -OverRidePowerShellUri https://admin4a.online.lync.com/OcsPowershellOAuth –Verbose

image

Moving Users to Teams

To Move users to Office 365, You need to first provide credentials of the User with MFA disabled and then use the command Move-CsUser

An Example:

$Creds = Get-Credential

image

Moving User

Move-CsUser –Identity user@domain.com –target “sipfed.online.lync.com” –hostedMigrationOverRideUri https://admin4a.online.lync.com/HostedMigration/hostedmigrationservice.svc –ProxyPool “YourFEPool.Domain.local” –Credential $Creds

image

Let’s check the status of the migrated user, The hosting provider attribute is what we care about as it tells us where the user is homed at.

image


Checking the user from Teams Portal

Users seems to be licensed, online and can now login using the Microsoft Teams app.

image

Bulk Enable Users and assign Tel URI numbers to them

In case you have a big number of users that you want to enable them online

# Please provide your O365 admin credential

$creds = Get-Credential

-PSSession (New-CsOnlineSession $cred) -AllowClobber

$csv = Import-csv “C:\Users\Mohammed\users.csv”

ForEach ($user in $csv) {

Write-host now enabling $user.alias

Move-CsUser –Identity $user.alias –target “sipfed.online.lync.com” –hostedMigrationOverRideUri https://admin4a.online.lync.com/HostedMigration/hostedmigrationservice.svc –ProxyPool “YourFEPool.Domain.local” –Credential $creds

}

The CSV File will look like this

Alias

user@domain.com

user2@domain.com


Moving User back to On-premises (From Office 365 to SfB 2015 )

On Frontend Server Launch PowerShell as Administrator then:

A- Import-Module MicrosoftTeams

B- Connect-MicrosoftTeams

After you connect you’ll get the following result:

Now that you’re connected to your tenant, Try to create a Skype for Business session with the following commands

C- $sfbsession = New-CsOnlineSession

D- Import-PsSession $Sfbsession

You should get the following result
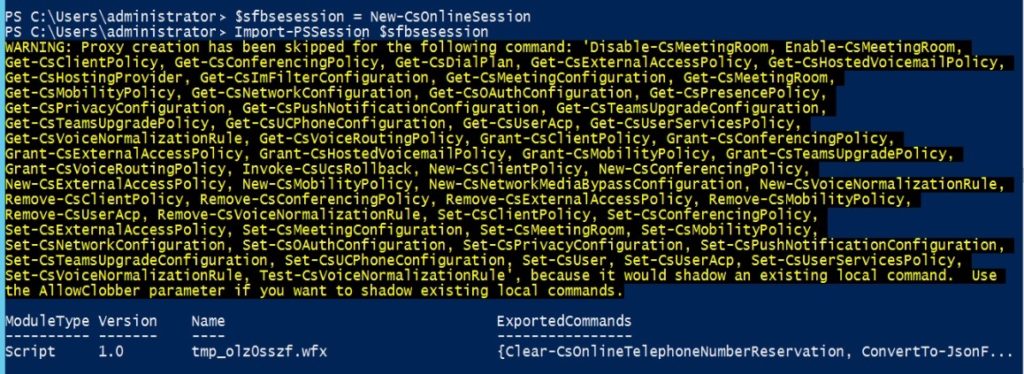
Type the following command to move the user back to On-premises environment:

Now last and most important note is that since I am using Skype for Business 2015 Server, I have to use the parameter -UseOAuth which uses modern authentication.

Move-csuser -Identity User@domain.com -target PoolHostname.Domain.Local -UseOAuth -Verbose

This should get it to work finally


Errors you might face

Error 1:

When you have your on-premises user enabled for dialin you will probably get the following error if you try to migrate them to Skype for Business online or teams.

Move-Csuser :: HostedMisrat ion fault: Error=(511), Description=(The user could not be moved because he or she is enabled for dial-in conferencing on-premises, but has not been an assigned an Audio Conferencing license in Office 365. Users must be licensed before they can be moved to Teams or Skype for Business Online.)

If you are sure do want to use migrate this user without an Audio Conferencing license, specify the

“BypassAudioConferencingCheck” switch. ) At line: 1 char: 1

clip_image001[4]

The Solution is to either provide an audio conferencing license  or as it is showing in the error itself as it says use the switch -BypassAudioConferencingCheck to ignore that.

Error 2:

When trying to import the session, I got the following error

the runspace state is not valid for this operation for PowerShell Online.

clip_image001[6]

Solution: To overcome this problem you’ll need to use the overridePowershellUri Parameter in the New-CsOnlineSession in order to connect to Skype online powershell.

To get your tenant’s PowerShell URI use the cmdlet Get-CsOnlinePowerShellEndPoint

What you need to use is the AbsoluteUri

clip_image001[8]

Error 3:

When you try to import the SkypeOnlineConnector module and then run the New-CsOnlineSession cmdlet from Skype for Business Management Shell you’ll get the following error after authenticating.

Sign in

Sorry, but we’re having trouble signing you in.

AADSTS50011: The reply URL specified in the request does not match the reply URLs configured for the application: ‘7716031e-6f8b-45a4-b82b-922b1af0fbb4’. More details: Reply address did not match because of case sensitivity.

Troubleshooting details

If you contact your administrator, send this info to them.
Copy info to clipboard  
  
Request Id:  f0f97265-4669-4e4f-bcf7-609469e92f00
 
Correlation Id:  829c8a2b-f697-416f-bfa6-4a794a229a13

Timestamp:  2021-01-10T23:00:10Z
 
Message:  AADSTS50011: The reply URL specified in the request does not match the reply URLs configured for the application: ‘7716031e-6f8b-45a4-b82b-922b1af0fbb4’. More details: Reply address did not match because of case sensitivity.
     

Advanced diagnostics: Disable
  
If you plan on getting support for an issue, turn this on and try to reproduce the error. This will collect additional information that will help troubleshoot the issue.

image

Solution:

Run the cmdlets from Windows PowerShell as admin not Skype for Business Management shell.

Error 4 

Get-CsOnlinePowerShellAccessInformation : Unable to get response from https://admin4a.online.lync.com/OcsPowershellOAuth.
At C:\Program Files\Common Files\Skype for Business Online\Modules\SkypeOnlineConnector\SkypeOnlineConnectorStartup.psm1:160 char:20
+ … pAuthInfo = Get-CsOnlinePowerShellAccessInformation -PowerShellEndpoi …
+ ~~~~~~~~~~~~~~~~~~~~~~~~~~~~~~~~~~~~~~~~~~~~~~~~~~~~~~~~~
+ CategoryInfo : NotSpecified: (:) [Get-CsOnlinePowerShellAccessInformation], Exception
+ FullyQualifiedErrorId : System.Exception,Microsoft.Rtc.Management.OnlineConnector.GetPowerShellAccessInformationCmdlet

Error 5

Move-CsUser
[Y] Yes [A] Yes to All [N] No [L] No to All [S] Suspend [?] Help (default is “Y”): y
move-csuser : The underlying connection was closed: An unexpected error occurred on a send.
At line:1 char:1
+ move-csuser -identity user@domain.com -target D2-POOL01.clou …
+ ~~~~~~~~~~~~~~~~~~~~~~~~~~~~~~~~~~~~~~~~~~~~~~~~~~~~~~~~~~~~~~~~~~~~~
+ CategoryInfo : InvalidOperation: (CN=user …domain,DC=net:OCSADUser) [Move-CsUser], WebException
+ FullyQualifiedErrorId : MoveError,Microsoft.Rtc.Management.AD.Cmdlets.MoveOcsUserCmdlet

Solution:

1- Make sure you have the proper Powershell version.

2- Make sure you enable TLS1.2 as default, for a quick solution use this PowerShell script 

[System.Net.ServicePointManager]::SecurityProtocol = [System.Net.SecurityProtocolType]::Tls12;

3- Use MFA enabled account by following these steps to login and move user.

A- Import-Module MicrosoftTeams

B- Connect-MicrosoftTeams

After you connect you’ll get the following result:

Now that you’re connected to your tenant, Try to create a Skype for Business session with the following commands

C- $sfbsession = New-CsOnlineSession

D- Import-PsSession $Sfbsession

You should get the following result

Now last and most important note is that since I am using Skype for Business 2015 Server, I have to use the parameter -UseOAuth which uses modern authentication.

This should get it to work finally

References:

https://docs.microsoft.com/en-us/microsoftteams/upgrade-to-teams-on-prem-overview

https://social.technet.microsoft.com/wiki/contents/articles/34339.skype-for-business-online-enable-your-tenant-for-modern-authentication.aspx

https://docs.microsoft.com/en-us/skypeforbusiness/hybrid/move-users-from-on-premises-to-skype-for-business-online

https://docs.microsoft.com/en-us/microsoftteams/teams-powershell-install

https://docs.microsoft.com/en-us/skypeforbusiness/troubleshoot/hybrid-move-sfb-online/move-csuser-hostedmigration-fault-507

https://docs.microsoft.com/en-us/powershell/module/skype/move-csuser?view=skype-ps

Resizing Plesk Linux (Ubuntu) server on Hyper-V with dynamic expansion

Change Production Environment VM (Plesk):

Having to change a production Environment Virtual Machine while hosting multiple website could be a nightmare especially when you have no space left and websites are on the edge of error.

I got a complaint from one of the webmasters of the websites that her password was not working so I went and changed it from Plesk however, it didn’t actually work.

When connected to the server I realized that there was no space left on the server

Ubuntu 18.04 is the server edition.

On my Hyper-V Host I went and checked if I can resize the VM while it’s on but unfortunately since the machine has Checkpoints. After switching off the machine and removing the Checkpoints I was able to resize the disk to 700GB and start it again.

In this article I will take you through the process or resizing the Linux Machine starting from Hyper-V all the way until your Plesk Server is able to provision this disk space.

Resize Linux / Ubuntu on Hyper-V

To Resize Ubuntu/Linux Server on HyperV

Edit Machine On Hyper-V, If the edit button is greyed out then you’ll need to switch off the VM to be able to expand the physical disk.

clip_image001

After expanding the disk (in my case I expand it to 712GB) since the current disk is 100% full already

clip_image002

clip_image003

Scan Physical Disk Space

After expansion on Hyper-V is successful, I will switch on the VM, then will need to rescan the already connected disk, first identify which disk you want to rescan. (in my case it is sda3)

ls /sys/class/scsi_disk/

In my example, I see a symlink named 2:0:0:0, so we rescan this scsi-disk.

clip_image004

echo ‘1’ > /sys/class/scsi_disk/2\:0\:0\:0/device/rescan

When trying to scan as a normal user or a superuser in normal mode, I get permission denied issue so I will go ahead and turn to Root mode

clip_image005

Scanning is finished

Change Volume Disk

Follow the instructions below in order to expand the machine’s disk and introduce the changes to Plesk.

Run Parted as a super user (Root or sudo su superuser)

Press P to list partitions and then choose the partition you want to expand.

In my case it’s going to be Partition 3

clip_image006

In order to resize the partition 3 I will type

Resizepart 3

And next to that you’ll have to put the value that you need to expand the disk (In my case I will type -0)

-0 value will give it provision the entire disk space from Hyper-V

clip_image007

After doing so, the new value of partition 3 will be updated

clip_image008

Quit

Resize Logical Volume

The file system meta information needs to indicate the size of disk, and resize2fs updates this. Thus, after expanding, run resize2fs /dev/sda3.

If resize2fs didn’t work for any reason try pvresize in Root Mode

pvresize /dev/sda3

To write changes to the Logical Volume run the following command

lvextend -l +100%FREE /dev/mapper/ubuntu–vg-ubuntu–lv

clip_image009

It’s recommended to do this in read mode, so I will quit the root and get back to my normal user

Let’s see the Volume Group using VGS command, as you can see it looks like the Volume group has already updated the size.

image

Now we need to check the Physical Volume. sda3 was upgraded from 268GB to 711 GB

image

Next we’ll need to check the Logical Volume and see if it is updated

To do this, type sudo lvdisplay

image

Let’s check if there’s any update on the Logical Volumes by using

sudo df –H

image

The disk I need to increase is /dev/mapper/ubuntu—vg-ubuntu—lv

Last step:

Extending Logical Volume

To do this I will type the command

Sudo resize2fs /dev/mapper/ubuntu—vg-ubuntu—lv

This should take care of the disk expansion

image

Once this command is successful, It should reflect on the disk size via command df -H

image

Hope this help someone, If for some reason your Plesk stopped working after this please try to move the tc.log file to another location and then restart mysql/mariadb

sudo mv /var/lib/mysql/tc.log /root/

sudo service mariadb start

Exchange 2016: Find remaining Folders of delete or non existing databases

Exchange Corner

Story

Let’s assume that you work for a company that has Exchange 2016 and has big amount of databases (50-100 DB).

You constantly delete databases to clear white space or for whatever reason but don’t usually keep on deleting folders or lost track of which database is deleted in your DB Folder.

Real Life Scenario

In the following PowerShell script I am going to demonstrate how to check which of the folders in my D drive (Database drive) has an existing Database and which do not have.

Databases Folder path

OutPut:

Script

The below script gets all folders in the drive path D:\Databases to check if they exist or not.


# Get deleted database that still has remaining non deleted folders
Add-PSSnapin Microsoft.Exchange.Management.PowerShell.SnapIn
$databases = Get-ChildItem D:\Databases\*  -Directory | select Name

foreach ($database in $databases)
{
        $DB = $database.Name
        if ((Get-MailboxDatabase -Identity $db -ErrorAction Ignore ))
            {
            write-host "Database $($db) exists on Exchange Server" -ForegroundColor Green
            }
                else
                {
                Write-Host "Database $($db) doesn't exist on Exchange Server " -ForegroundColor Red
                }
}

I did not add the part to delete the folder through the script as it is still a risky thing to automate and would rather do the deletion manually after double confirming it’s totally gone.

For more about Exchange Server related articles please visit Exchange section here

Hope this helps.

Changing RDWeb default Port on Windows Server 2019

Story:

When you install RDS on a server which already uses the port 443, you will get the following error when you try to access RDWeb main page.

Reason for this is the server you installed RDWeb on is most likely already using the port 443 or something else.

Error Message:

When trying to access RDWeb on the same server you’ll get the following error:

Service Unavailable

Http Error 503. The Service is unavailable

clip_image001

Troubleshooting

To Troubleshoot, Let’s see what is using the port 443.

Run CMD or PowerShell as an Administrator and type the following command

Netstat -anbo | findstr 443

clip_image002

Changing Port to 1443 or 8443

Let’s try changing the Port using the RD Gateway Manager

From the Gateway Manager click on the Properties on the right pane > Go to Transport Settings Tab and change the HTTPS port to 1443 or 8443

clip_image003

Changing Ports using Registry

Navigate to and make sure you first take a backup (Export the key)

[HKLM\SOFTWARE\Microsoft\Windows NT\CurrentVersion\TerminalServerGateway\Config\Core]

Change the following registry value

IsUdpEnabled REG_DWORD 0

clip_image004

Backup and change the following port value to the intended one

[HKLM\SOFTWARE\Microsoft\Windows NT\CurrentVersion\TerminalServerGateway\Config\Core]

HttpsPort REG_DWORD (8443)

Change the base to Decimal to type the write port number.

clip_image005

Restart Service

From PowerShell restart the service

net stop tsgateway
net start tsgateway

clip_image006

Let’s see the listening port 8443

From PowerShell type

Netstat -anbo | findstr 8443

Netstat -anbo | findstr 8443

clip_image007

Let’s go to the main page and see if it works..

Voila! Finally it worked

clip_image008

clip_image009

Brightmail does not deliver email to Distribution group members

The Story

Note: This article assumes you have Brightmail Gateway

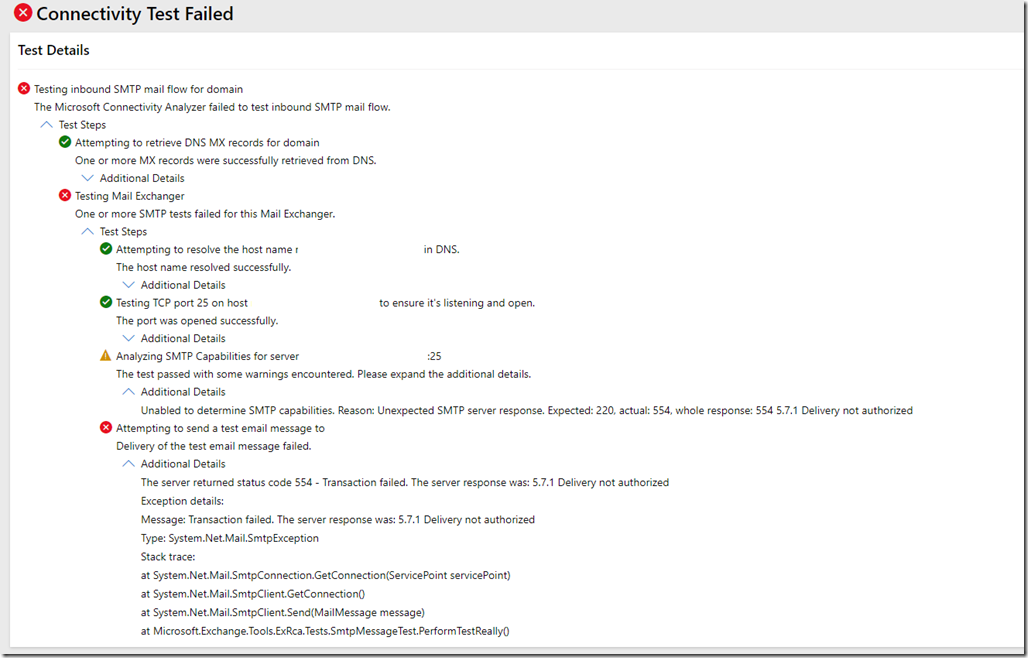
When you try to send an email to a particular Exchange Distribution group Group@domain.com the result is either users don’t exist or you might get the following error if you test with Microsoft Test connectivity online tool.

Error:

The server returned status code 554 – Transaction failed. The server response was: 5.7.1 Delivery not authorized

Other related errors

‘554 5.7.1: You are not allowed to connect’

clip_image001

Cause:

Because the group has been cached in the Symantec gateway with its old members, The result could be an error that users don’t exist or delivery is not authorized.

Solution:

To solve this problem, You need to go to Brightmail gateway Administration > Directory Integration and click on your AD Directory > Advanced and hit on Clear Cache.

This would cleared the cached group and take the most recently updated group and its members.

This should resolve the problem.

clip_image002

How to clear the DDS cache in Messaging Gateway

https://knowledge.broadcom.com/external/article?legacyId=tech132131

Skype for Business IM integration with Exchange 2016 OWA–Part 2

This article is a completion of Part 1, Click here to go to Part 1

Configuration Steps – Part 2

7. On Exchange: Enable OWA VD Instant Messaging
8. On Exchange: Enable Messaging on OWA Policy
9. On Exchange: Create Enterprise Application for Skype Pool.
10. On Exchange: Create new SettingOverride for Skype for Business.
11- Generate a new Certificate for Exchange IM
12. Assign the newly imported certificate to IIS Exchange Back End site
13. On Exchange: Restart the WebAppPool
14. Log out and sign back in to OWA to Check
15. Troubleshooting methods

    7- On Exchange Server: Enable OWA VD Instant Messaging

    Part of enabling IM integration between Exchange and SfB is to enable OWA Virtual Directory to allow this. The below cmdlet does the job for you on all your Exchange Servers

    From Exchange, Launch Exchange Management and run the following cmdlet

    Get-OwaVirtualDirectory | Set-OwaVirtualDirectory -InstantMessagingEnabled $true -InstantMessagingType Ocs

    clip_image001[6]_thumb

    8- On Exchange: Enable Messaging on OWA Policy

    Run the following to enable Messaging for Owa Policy

    Get-OwaMailboxPolicy | Set-OwaMailboxPolicy -InstantMessagingEnabled $true -InstantMessagingType Ocs

    clip_image001[6]_thumb[1]

    9- On Exchange: Create Enterprise Application for Skype Pool.

      From Exchange Management shell Run the following cmdlet

      Cd $exscripts

      .\Configure-EnterprisePartnerApplication.ps1 -AuthMetadataUrl “https://sbg-pool01.domain.com/metadata/json/1” -ApplicationType Lync

      The AuthMetadataUrl is going to be your local Skype for Business Pool URL. This URL should work in your Exchange server without any Certificate error. Meaning that the certificate assigned to your Skype for Business pool should already be imported to Exchange Servers to trust this URL.

      image_thumb[14]

        If your previous configuration is correct then you should see the “The Configuration has Succeeded” Message.

          10- On Exchange: Create new SettingOverride for Skype for Business.

          Notes:

          • To configure the same settings on all Exchange 2016 and Exchange 2019 servers in the Active Directory forest, don’t use the Server parameter.

          New-SettingOverride -Name “<UniqueOverrideName>” -Component OwaServer -Section IMSettings -Parameters @(“IMServerName=<Skype server/pool  name>”,”IMCertificateThumbprint=<Certificate Thumbprint>”) -Reason “<DescriptiveReason>” [-Server <ServerName>]

          The Thumbprint you use here will define if whether IM will work or not as this what secures the communication between Exchange and Skype. If you use the wrong certificate your Integration will fail and users wont be able to login to IM through OWA.

          11- Generate a new Certificate for Exchange IM

          IMPORTANT NOTE:

          In order for IM in OWA to work the certificate you will generate must have its common name set as mail.domain.com to match the configuration.

          Using Digicert tool on Exchange Server I will generate the CSR of the new certificate

          Click on Create CSR

          image_thumb[15]

          Choose SSL certificate type and make sure you choose Mail.domain.com as CN

          In the SANs type all of the involved servers (Skype for Business Frontends, Mailbox servers in FQDN and in Hostnames as in the screenshot below). and click on Generate

          image_thumb[16]

          • Go to your CA Server’s CertSRV URL and copy the CSR code there to generate the new certificate.
          • Import the new certificate to the current server, then export it in PFX format and import it to all the Exchange Servers you’re planning to use.

          image_thumb[18]

          • After importing the certificate I will verify that I can see the private key

          image_thumb[19]

          Click on the Details and copy the Thumbprint or from MMC right click the certificate > Properties give it a friendly name e.g. (IM) and then from Exchange Management shell you can copy the Thumbprint directly.

          Get-ExchangeCertificate | select thumbprint,friendlyName

          image_thumb[20]

          Now use the previous script to create the setting Override for OwaServer.

          Things you can change are in bold “Name, IM Servername Value, and the Thumbprint value”.

          New-SettingOverride -Name “IM Override” -Component OwaServer -Section IMSettings -Parameters @(“IMServerName=SBG-Pool01.domain.com“,”IMCertificateThumbprint= 28E4B1BA0F2FCB1535AF199F02A64EFC78367F2D“) -Reason “Configure IM”

          image_thumb[21]

          If you enter the server parameter to use a single server you can change that by using. Note that you must not use FQDN but rather only the server’s hostname.

          Get-SettingOverride | Set-SettingOverride -Server sbg-mx01,sbg-mx02

          image_thumb[22]

          This should generate an event ID 112 on Exchange servers involved in the deployment.

          clip_image001[9]_thumb

            12. Assign the newly imported certificate to IIS Exchange Back End site

            Once the certificate is in the server store, You will be able to easily find in from IIS and bind it to the Exchange Back End site.

            This is the most crucial step to get IM to work in OWA. Don’t worry about breaking up Exchange Sites or Powershell. If you have added Exchange Servers Hostnames and FQDNs in this certificate then you should be good.

            • Now Launch IIS
            • Click on Exchange Back End
            • Select Binding
            • Click on the 444 port and edit
            • Select the newly generated certificate that has the mail.domain.com as CN. (This certificate must also have all Exchange Servers hostnames and FQDNs set as SANs)

            image_thumb[23]

            image_thumb[24]

            Make sure you change the backend cert to the new on all the involved Exchange Servers.

            13. On Exchange: Restart the WebAppPool

            Restart-WebAppPool MSExchangeOWAAppPool

            image_thumb[25]

              14. Log out and sign back in to OWA to Check

              Log out of OWA and back in and check if you are able to Login to IM . It should normally sign you in automatically but in case of an error then you should see it.

              image_thumb[29]

              In case of an error you should see the following.

              image_thumb[27]

              If it works then you should see the presence

              image_thumb[28]

              15. Troubleshooting Methods

              If you follow the above steps correctly then it should work especially when applying the right certificate for your Exchange Back End IIS part however if you face an error then you should do the following steps to troubleshoot the error

              • Set the Eventlog for Instant Messaging on Exchange from Low to High

              Set-EventLogLevel -Identity “sbg-mx01\MSExchange OWA\InstantMessage” -Level High

              image_thumb[30]

              • Look in the following path for errors

              C:\Program Files\Microsoft\Exchange Server\V15\Logging\OWA\InstantMessaging

              • Check the Healthset of the OWA Instant Messaging.

              Get-ServerHealth -HealthSet OWA.Protocol.Dep -Server sbg-mx01 | Format-Table Name, AlertValue –Auto

              image_thumb[31]

              Get-MonitoringItemIdentity -Server sbg-mx01 -Identity OWA.Protocol.Dep | Format-Table Identity,ItemType,Name -Auto

                image_thumb[32]

                Ref

                https://docs.microsoft.com/en-us/exchange/plan-and-deploy/post-installation-tasks/configure-im-integration-with-owa?view=exchserver-2019

                https://docs.microsoft.com/en-us/exchange/high-availability/managed-availability/health-sets?view=exchserver-2019

                Skype for Business IM integration with Exchange 2016 OWA–Part 1

                The Story

                A good and detailed documentation is everything we need to implement any kind of project especially if it’s an integration between two different servers that perform different roles.

                And with PKI involved the complications multiply thus a good article write up is what we need.

                Previously I have tried a test lab with Skype for Business 2015/2019 IM Integration with Exchange 2016/2019 and the result was a complete failure and endless search for what’s missing to get IM to work from OWA?

                image

                ERROR

                Upon completion of the steps mentioned in Microsoft’s Official documentation and after restarting Exchange IIS or OWAAppPool you will see this when you try to login to OWA with your user

                There’s a problem with instant messaging. Please try again later.

                image

                MS Official Documentation

                In their Official documentation Microsoft says that the certificate in question must be trusted by all the servers involved meaning Skype for Business Frontend and Mailbox Servers.

                Meanwhile this is true, it still would not get the IM to login/work although it might drop the initialize event ID 112 in the event log.

                clip_image001

                Here is what MS says about the certificate.

                Exchange and Skype for Business integration requires server certificates that are trusted by all of the servers involved. The procedures in this topic assume that you already have the required certificates. For more information, see Plan to integrate Skype for Business Server 2015 and Exchange. The required IM certificate thumbprint refers to the Exchange Server certificate assigned to the IIS service.

                REF URL: https://docs.microsoft.com/en-us/exchange/plan-and-deploy/post-installation-tasks/configure-im-integration-with-owa?view=exchserver-2019#what-do-you-need-to-know-before-you-begin

                image

                Step by Step Deployment

                To do things the way that should get this to work, I will detail steps one by one so we can be sure to get the positive results we are all waiting for when dealing with Exchange and Skype for Business.

                Exchange IM URL 1: mail.domain.com

                Skype for Business Pool FQDN: SBG-Pool01.domain.com

                Autodiscover URL : Autodiscover.Domain.com

                Prerequisites

                1. For Default and Web Service Internal, Your Skype for Business Frontend Server/Pool must use a certificate that is generated from an internal CA which you can use later to generate Exchange’s IM Certificate.
                2. UCMA must be installed (Doesn’t matter if version 4 or 5) both are supposed to work with Exchange 2016.
                3. Local Certification Authority must already be deployed in the domain.

                Configuration Steps – Part 1

                1. On SfB: Set CsAuthConfiguration Autodiscover URL for Skype server to find Exchange Autodiscover
                2. On SfB: Get-CsSite to see what is the current site ID.
                3. On Exchange: Check AutodiscoverServiceInternalURI
                4. On SfB: Create new Partner
                5. On SfB: Create new Trusted Application Pool
                6. On SfB: Create new Trusted Application ID

                Configuration Steps – Part 2

                7. On Exchange: Enable OWA VD Instant Messaging
                8. On Exchange: Enable Messaging on OWA Policy
                9. On Exchange: Create Enterprise Application for Skype Pool.
                10. On Exchange: Create new SettingOverride for Skype for Business.
                11- Generate a new Certificate for Exchange IM
                12. Assign the newly imported certificate to IIS Exchange Back End site
                13. On Exchange: Restart the WebAppPool
                14. Log out and sign back in to OWA to Check
                15. Troubleshooting methods

                Prerequisites

                1- Update or Create Server Default and Web Service Internal Certificate for SfB Pool servers

                The certificate installed on the Skype for Business Pool Frontend servers must be generated from a local Certification Authority which can be trusted by Exchange Server services.

                The Certificate generated for Skype for Business pool as in the below screenshot is generated from my CA and includes the names of the servers:

                • Skype for Business Pool
                • Skype for Business Frontend FQDNs
                • Exchange Servers
                • Autodiscover FQDN
                • Lyncdiscover.domains.com
                • Lyncdiscoverinternal.domains.com
                • sip.domains.com
                • meet.domains.com
                • dialin.domain.com
                • External.domain.com

                image

                image

                2- UCMA must be installed

                On both Exchange and Skype for Business servers I already have UCMA 4.0 version installed, but if you don’t have it or have an older version then you can’t continue without it.

                image

                3- Make sure you have a Local Certification Authority deployed in your domain.

                Configuration Steps – Part 1

                1- On SfB: Set CsAuthConfiguration Autodiscover URL for Skype server to find Exchange Autodiscover

                For Skype for Business Server to find Exchange Autodiscover Service point and to be able to authenticate servers we’ll be using the below cmdlet

                This enables both servers to authenticate and share information when needed and without user’s interference.

                Set-CsOauthConfiguration -ExchangeAutodiscoverUrl https://autodiscover.domain.com/autodiscover/autodiscover.svc

                image

                image

                Ref:

                https://docs.microsoft.com/en-us/powershell/module/skype/set-csoauthconfiguration?view=skype-ps

                2- On SfB: Get-CsSite to see what is the current site ID.

                Getting a site ID will be useful for later use to setup the Trusted Application Pool.

                On Skype for Business Management shell. Type the following

                Get-CsSite

                So the Site ID is 1. I will keep this for later use

                image

                3- On Exchange: Check AutodiscoverServiceInternalURI

                Specify the AutodiscoverServiceInternalURI for internal Autodiscover service. Make sure it points to your public URL and certificate not the internal one otherwise your users will get a certificate error through Outlook and might cause IM chat not to work.

                The Cmdlet would be

                Get-ClientAccessService | Set-ClientAccessService –AutoDiscoverServiceInternalUri https://autodiscover.domain.com/autodiscover/autodiscover.xml

                image

                4- On SfB: Create new Partner Application

                On Skype for Business Server, Launch Management Shell and use this cmdlet to add Exchange as a trusted Application to the SfB topology.

                New-CsPartnerApplication -Identity Exchange -ApplicationTrustLevel Full -MetadataUrl “https://autodiscover.domain.com/autodiscover/metadata/json/1

                image

                5- On SfB: Create new Trusted Application Pool

                New-CsTrustedApplicationPool -Identity mail.domain.com -Registrar sbg-pool01.domain.com -Site 1 -RequiresReplication $false

                image

                6- On SfB: Create new Trusted Application ID

                From SfB Management Shell run the following cmdlet .

                New-CsTrustedApplication -ApplicationId OutlookWebAccess -TrustedApplicationPoolFqdn mail.domain.com -Port 5199

                image

                Finally

                clip_image001[4]

                Click on the link below for Part 2

                Skype for Business IM integration with Exchange 2016 OWA–Part 2

                an Exchange mailbox was mistakenly migrated over another user’s object used by another user

                The Story

                If you ever used Prepare moverequest command to migrate a user and forgot to use ADMT to rewrite user’s properties with the old attributes. You might have used ADMT again to rewrite the properties.

                If you use ADMT you will need to exclude all Exchange Attributes from the source since its already copied using Prepare-move request script however, in some cases some people do make mistakes and you might have came through the same mistake my colleague  have done during one of these extremely complicated Cross forest Migrations where you’d prepare a CSV files through PowerShell and names wouldn’t match Sam accounts.

                Don’t Panic

                If however, you forgot again to exclude the Exchange attributes while using ADMT then you most likely wont see the user in the Target forest which will cause to panic thinking the user is gone .. But no the user is not gone don’t panic.

                When you look for the user’s mailbox on the target forest after the move request is completed you’ll get an error reporting the user can’t be found

                image

                Solution

                To fix the problem you’ll need to change to attributes only for this migrated user. (In the target forest after user mailbox move is completed).

                The attributes are

                msExchRecipientDisplayType    1073741824
                msExchRecipientTypeDetails    128

                The wrong Attributes are as following.

                image

                You will need to fix them to look like the following

                image

                Once you apply the change you’ll need to wait for a minute or few depending on your AD replication speed.
                The problem will be then solved

                image

                Microsoft Exchange 2010 SP3 Link HACKED

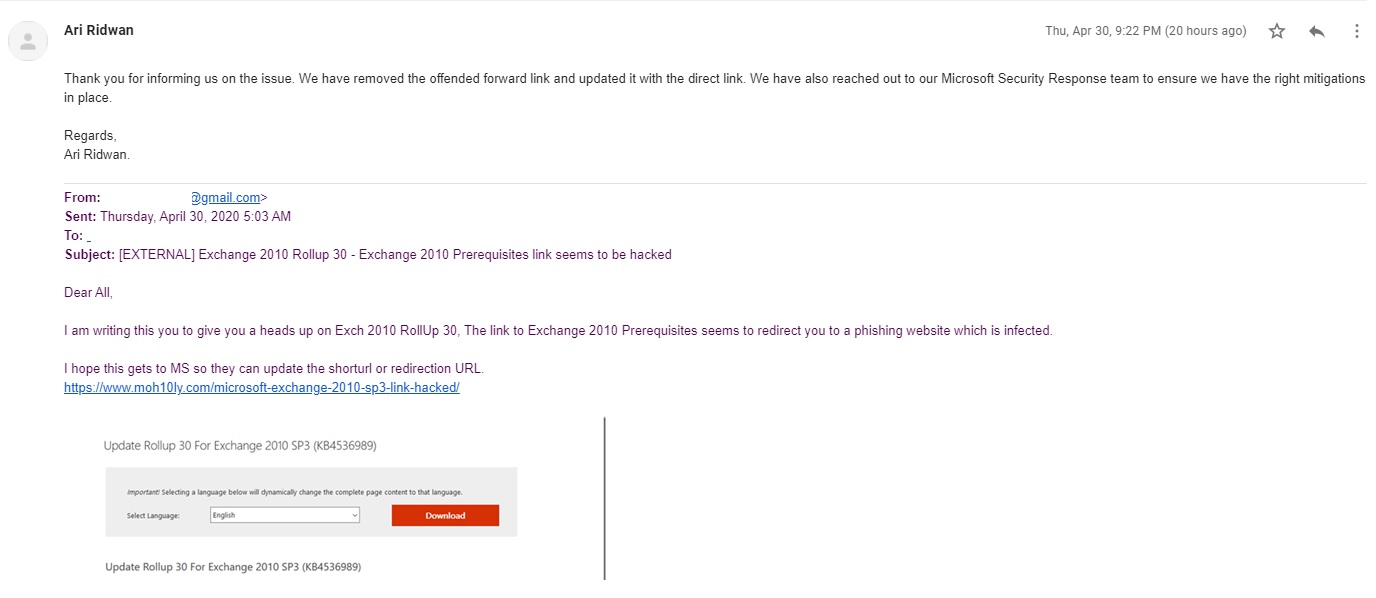
                Update: Microsoft replied to me and fixed the link. see screenshot below

                WATCH Microsoft Exchange URL Hacked

                If you have Exchange 2010 SP3 and planning to download the latest Rollup , Google will take you to the following link

                https://www.microsoft.com/en-us/download/details.aspx?id=100910

                Once you click on that link to download the RollUp update, You might want to check the system requirements links and that would list two main links

                image

                The Exchange 2010 Prerequisites link will first redirect you to this URL which has an expired certificate.

                http://www.microsoftpinpoint.com/

                And that will then redirect you to this link (Seems to be a Chinese website)

                http://123.wo80.com/

                Luckily the antivirus managed to catch and block this page however, on any server that’s not running any antivirus this would certainly infect the server.

                Phishing Alert!

                image

                image

                Video here

                Contacting Microsoft

                After I got in contact with Microsoft about the issue. Microsoft replied stating they have informed their security team and fixed the issue.

                Reset Azure VM Admin password with Domain Controller installed

                Active Directory Admin Password

                We had a security lab on Azure with 12 machines, It included 2 DCs and 10 other machines of different OS and had RDP closed on all the machines except one machine to use.

                The Password was set for something simple however it seems that someone has changed it and no one was able to access the domain controller anymore nor any of the machines.

                I had another user created for backup but it seems that user was also changed.

                The usual method of resetting Azure VM is going through portal or PowerShell

                Resetting Via Azure Portal

                When you try to reset the password from Azure Virtual machine itself. If the VM has Domain Controller it will fail to reset the password with the following error:

                Failed to reset RDP configuration

                VM has reported a failure when processing extension ‘enablevmaccess’. Error message: “VMAccess Extension does not support Domain Controller.” More information on troubleshooting is available at https://aka.ms/vmextensionwindowstroubleshoot

                image

                Through PowerShell

                To reset a password, we first need to define the VM we’re working with. To do this, we can use the Get-AzureRmVm cmdlet. I’ll go ahead and assign variables to both the VM name and the resource group since we’ll need to reference those later, as well.

                $vmName = 'YOURVMNAMEHERE'
                $resourceGroupName = 'YOURRGHERE'
                $vm = Get-AzureRmVm -Name $vmName -ResourceGroupName $resourceGroupName

                Next, we’ll need some way to pass the username and password into the script. A great way to do that is through the Get-Credential cmdlet.

                $credential = Get-Credential

                Once the credential is saved, we can then execute the command to actually make the password change using the variables we set earlier. Notice we had to use the GetNetworkCredential() method on the pscredential object. This method will not work if the credential is retrieved from another computer or from another user account. This shouldn’t be a problem, though, since you’re likely to execute this in a single script.

                $extensionParams = @{
                    'VMName' = $vmName
                    'Username' = $Credential.UserName
                    'Password' = $Credential.GetNetworkCredential().Password
                    'ResourceGroupName' = $resourceGroupName
                    'Name' = 'AdminPasswordReset'
                    'Location' = $vm.Location
                }
                
                $result = Set-AzureRmVMAccessExtension @extensionParams

                Once this completed (hopefully successfully), the VM will need to be rebooted. We can do that by using the Restart-AzureRmVm cmdlet.

                $vm | Restart-AzureRmVM

                While this PowerShell script might work with a normal VM, It will not work with a DC and would result in the same error as in the portal.

                Solution

                The solution is to write a script which would run through the CustomScriptExtension that you can deploy from the Azure Portal on the intended VM that has the Domain Controller Deployed on it.

                Once you get the script ready to change the administrator Password you can upload the script and deploy it.

                Let’s get the script ready and demonstrate these steps one by one.

                – On my Computer I will write a tiny script that will say

                Net User domainadmin Adm!nPassw0rd1

                image

                – Save the file on your desktop for later use. Go to Azure Portal, Virtual Machines and select your Domain Controller.

                – Go to Extensions.

                – Click on Add

                image

                – Select Custom script Extension

                image

                – Click Create

                – Browse the PowerShell script on your Desktop.

                – Select Storage Account

                – Select an existing container or create new one

                – Upload the file to the container

                image

                image

                image

                image

                image

                Result

                Once deployed, it’ll take few mins to reset the password and you don’t have to restart the server.

                Through PowerShell

                image

                After this I was able to access the machine again using the new password in the script.

                ref:

                https://docs.microsoft.com/en-us/azure/virtual-machines/extensions/features-windows#troubleshoot-vm-extensions

                https://docs.microsoft.com/en-us/azure/virtual-machines/windows/run-command

                https://mcpmag.com/articles/2017/12/13/azure-vm-password-with-powershell.aspx

                https://docs.microsoft.com/en-us/azure/virtual-machines/troubleshooting/reset-local-password-without-agent