Category Archives: Active Directory

Reset passwords for Active Directory Users

Reset and manage your Active Directory users' Passwords

Active Directory is one of the most esential and important tool in any company whether small or big. In most cases big companies have uncountable amount of tools to maintain and protect users and their credentials however almost most of those companies are not prepared to the time when their systems have been compromised or to say the least their servers have been hacked or encrypted by ransomware which is something we hear very often nowadays like the case with Louisiana Hospital that was attacked by Ransomware exposing the data of 270000 patients. 

Realistic scenario

What if your users passwords were compromised and you’re not sure who is still safe or not but you need to act as fast as possible? 

To act fast, I created a script that would generate a complex 32 Char long password with 4 different Non Alphanumeric Characters using the System.Web.Security.Membership  class. here’s an example of this password:

81Q:#_#E-QVZ-(1m&VS1LKpbzwR+8Em%

The script details

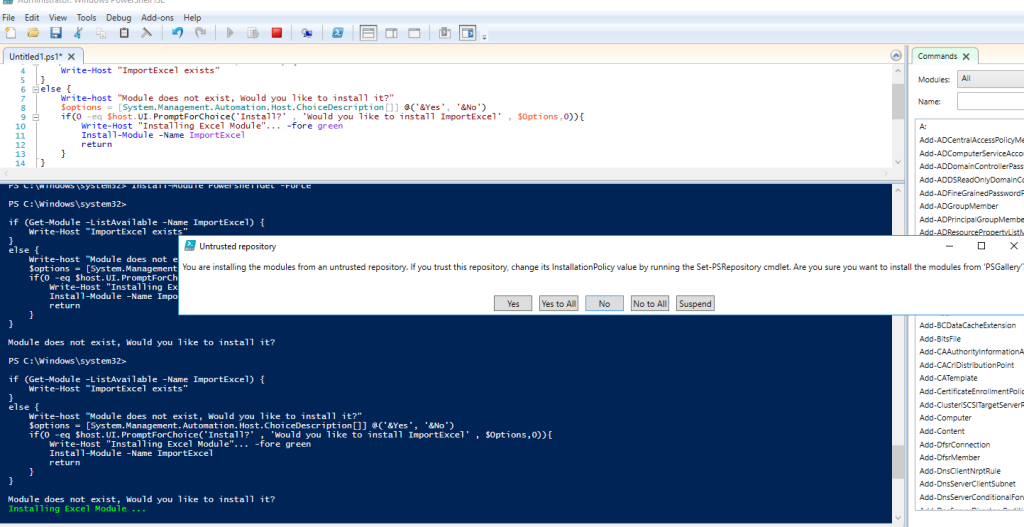
The script will first check if you have the Powershell Get and ImportExcel Module installed, if not it’ll ask you to install it or not. 

You will need to amend few things

1- The path to reflect where you want to save the Logs, CSV and Excel sheet. as of now it’s in c:\SyncReports. 

2- Importing users, In the script I am grabbing users directly from a specific OU in AD. so you’ll need to decide how you want to do it. I have added another line in case you’re planning to 

3- The password reset command is setup with -whatif parameter for you to test this before you run it. so just remember to remove it when you’re done with the changing and testing.

I have added mailbody and send-message command to send the excel as an attachment along with the excel password protection. 

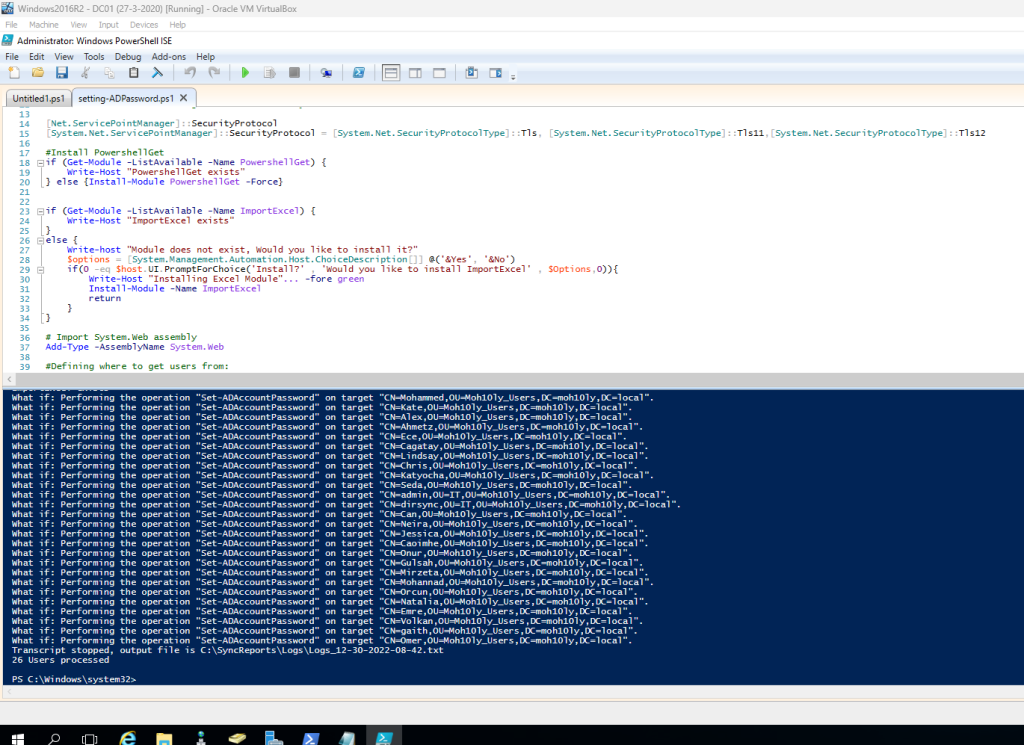
Running the script will result in the following

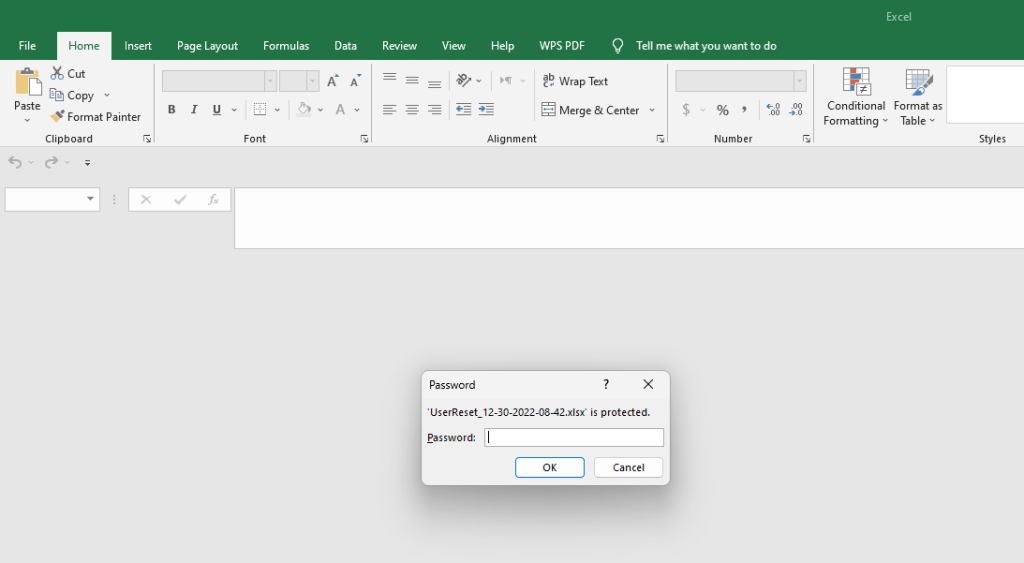
Once you get the Excel sheet and try to open it, you will realize that it’s password protected. The password should be in the email body that’s sent in the script.

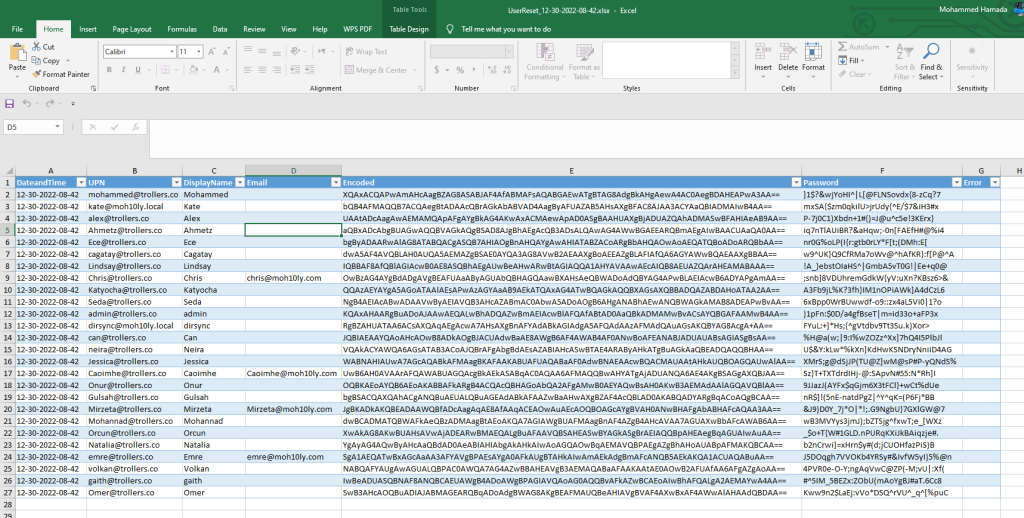
Excel sheet result will be looking as follows:

The script
The script 90%
#This script will generate randdom complex passwords for all AD users

#Using Time class and start reporting
$TimeStamp = [datetime]::Now.ToString(“MM-dd-yyyy-HH-mm”)
Start-Transcript -Path C:\SyncReports\Logs\Logs_$TimeStamp.txt -IncludeInvocationHeader

#Generate report
$Report = [System.Collections.Generic.List[Object]]::new()

#Check if Excel Module is installed, if not it’ll ask to install it

##Check Protocol and Setting Secure Connectivity

[Net.ServicePointManager]::SecurityProtocol
[System.Net.ServicePointManager]::SecurityProtocol = [System.Net.SecurityProtocolType]::Tls, [System.Net.SecurityProtocolType]::Tls11,[System.Net.SecurityProtocolType]::Tls12

#Install PowershellGet and ImportExcel Modules
if (Get-Module -ListAvailable -Name PowershellGet) {
    Write-Host “PowershellGet exists”
} else {Install-Module PowershellGet -Force}
if (Get-Module -ListAvailable -Name ImportExcel) {
    Write-Host “ImportExcel exists”
}
else {
    Write-host “Module does not exist, Would you like to install it?”
    $options = [System.Management.Automation.Host.ChoiceDescription[]] @(‘&Yes’, ‘&No’)
    if(0 -eq $host.UI.PromptForChoice(‘Install?’ , ‘Would you like to install ImportExcel’ , $Options,0)){
        Write-Host “Installing Excel Module”… -fore green
        Install-Module -Name ImportExcel
        return
    }
}

# Import System.Web assembly
Add-Type -AssemblyName System.Web

#Defining where to get users from:
$Users = Get-ADUser -SearchBase “OU=Moh10ly_Users,DC=moh10ly,DC=local” -Filter * -Properties *
#$Users = Import-Csv “C:\SyncReports\Users.csv”
foreach ($User in $Users){
       
        $UID = $User.UserPrincipalName
        $ObjectProp = Get-ADUser -Filter {(Mail -like $UID) -or (UserPrincipalName -like $UID)} -Properties *

        #Generate New Password
        $NewPassword=[System.Web.Security.Membership]::GeneratePassword(32,4)
        $Password= ConvertTo-SecureString $newPassword -AsPlainText -Force
        $TEXTO = “$newPassword”
        $ENCODED1 = [Convert]::ToBase64String([Text.Encoding]::Unicode.GetBytes($TEXTO))
       
        $Name = $ObjectProp.Name
        $SAM = $ObjectProp.SamAccountName

        if($SAM){
 
                   
                         $ReportLine = [PSCustomObject][Ordered]@{
                            DateandTime                 = $TimeStamp
                            UPN                         = $ObjectProp.UserPrincipalName
                            DisplayName                 = $ObjectProp.Displayname
                            Email                       = $ObjectProp.Mail
                            Encoded                     = $ENCODED1
                            Password                    = $newPassword
                            Error                       = $ObjectProp.Exception.Message
                            }
                           
                            $Report.Add($ReportLine)
           
            #Wait for Email to send
            #Start-Sleep -Seconds 15

            #Resetting user’s password
            Set-ADAccountPassword -Identity $User.SamAccountName -NewPassword $Password -WhatIf

        }
    else {$Error = Write-Host -f Red “$($User) Couldn’t be found”    
    #send-mailmessage -from “admin@skybirdtravel.com” -to “admin@skybirdtravel.com” -subject “Password reset didn’t work for $($User.UserprincipalName) on $TimeStamp” -body “$Error” -Priority High -smtpServer mailcleaner.cloudapphost.net}
    }
}
Stop-Transcript
Write-Host (“{0} Users processed” -f $Users.count)
#$Report | Out-GridView
$ExcelPassword =[System.Web.Security.Membership]::GeneratePassword(32,4)
$Report | Select-Object UPN,Displayname,Email,Encoded,Password | Export-Csv -NoTypeInformation “C:\SyncReports\UserReset_$TimeStamp.csv”
$Report | Export-Excel “C:\SyncReports\UserReset_$TimeStamp.xlsx” -WorksheetName Users -TableName Users -AutoSize -Password “$ExcelPassword”
$Exported = “C:\SyncReports\UserReset_$TimeStamp.xlsx”
$MailBody = “
            <html><body>
            <font color=’006400′> Dear Team, Please find attached the list of users and their passwords encoded … `
            The file is protected with password // $ExelPassword // If any issue you can send an email to support@domain.com .</font>
            <body><html>
            “
$CC = @(‘info@moh10ly.com’)

#Get-ChildItem $Exported | send-mailmessage -from “admin@domain.com” -to “report@domain.com” -Cc $CC -subject ” User Passwords List for the date $date” -body “$MailBody” -Priority High -smtpServer relay.domain.com -BodyAsHtml

Finally:

I have added this script to github, so feel free to comment or add your contribution if needed.

https://github.com/moh30ly/powershell/blob/main/ADPasswordChange
Get Report of Active Directory Locked Accounts and Machine they logged in from

Story:

I got some clients  that have reported some of their users being locked out and not able to discover how is this happening or which device its getting locked on.

Symptoms:

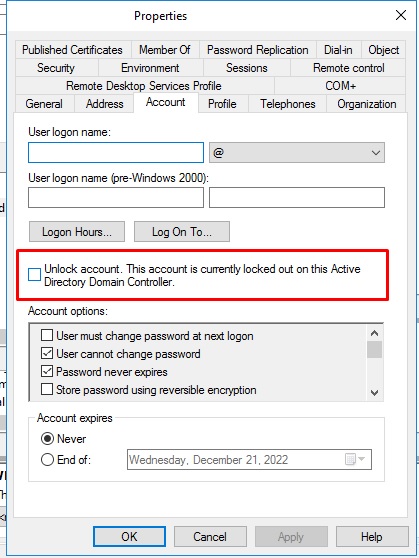
The user lock happens after you setup your GPO policy to get user locked after failing to login for X times with the correct password.

When user gets locked, they either can’t login or get prompted to re-enter their password in Outlook for example not knowing they have been locked. 

Hard to Find Out:

There’s no easy way to figure out what’s really happening and why the user got locked out specially if the account is being used on multiple devices e.g. (Phone, iPad, Desktop ..etc). Unless you have an auditing or an AD monitoring software that will log all auditing attempts to an external party and tell you where exactly the user is coming from, it’s a not an easy task to find out where is this taking place.  

Solution: 

1- Enabling Relevant Logs

In order for this to work, you’ll need to enable some Auditing logs on the Default Domain Controller Group Policy

Go to  >> Computer Configuration >> Windows Settings >> Security Settings >> Advanced Audit Policy Configuration >> Audit Policies >> Account Management >> Double Click on Audit User Account and enable both Success and Failure.

Once you applied this policy, you’ll need to force update your DCs , Sign out and back in and you’ll start noticing that in Event Viewer / Security the event 4740 and 4625 will start appearing .

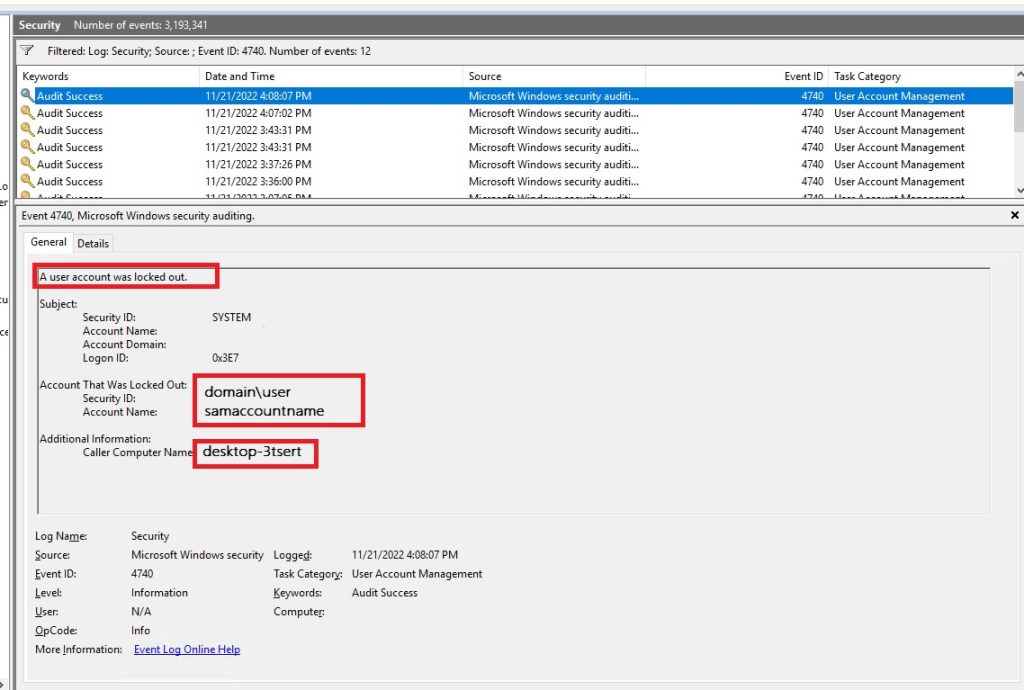
The event 4740 will show you the locked user and the machine it tried to login from. 

The event 4625 will show you the path to the process/application that tried to login with your account. 

So to make this more benefitial I ended up writing a script that will get triggered by Task Scheduler in the case of Event 4740 being reported.

The script will search AD for any locked account. will scan the Logs for the user’s event and find the machine the user tried to login from and generate a report with all these details then send it to a target email in Excel forma after converting it using ImportExcel module.

Note that you must have a local SMTP Server for the email to be sent. If not you can just get the CSV and send it manually. 


2- Finding the relevant event

3- Finally The script

The script is simple so feel free to modify it, improve it or share it with others. 

Almost done
Script below 80%

#Report NTLM Authentication Failure for users
$ReportTime = ([datetime]::Today).ToString(“MM-dd-yyyy”)

#Generate report
$Report = [System.Collections.Generic.List[Object]]::new()

$LockedAccount = (Search-ADAccount -LockedOut -UsersOnly)
$i = 0
foreach ($User in $LockedAccount){

$i ++
Write-Progress -Activity “Gathering Logon info” -Status “Checking Login info for: $($User.Name)” -PercentComplete (($i / ($LockedAccount | Measure-Object).Count) * 100)
if($User.LockedOut){

$Event = Get-WinEvent -FilterHashtable @{ logname = ‘Security’; id = 4740 } -MaxEvents 500 | Select-Object TimeCreated,
@{ Name=’TargetUserName’; Expression={$_.Properties[0].value}},
@{ Name=’LogonMachine’; Expression={$_.Properties[1].value}} | Where {$_.TargetUserName -eq $User.SamAccountName}
}

$ReportLine = [PSCustomObject][Ordered]@{
Count = $i
ReportedUser = $User.Name
UPN = $User.UserPrincipalName
UserIsLocked = $User.LockedOut
LastLogonDate = $user.Lastlogondate
MachineName = $Event.LogonMachine -join ‘,’
‘Access Failure Time’ = $Event.TimeCreated -join ‘,’
‘Report Date’ = $ReportTime
}
$Report.Add($ReportLine)
}

$MailBody = “
<html><body>
<font color=’006400′> Dear Team, `
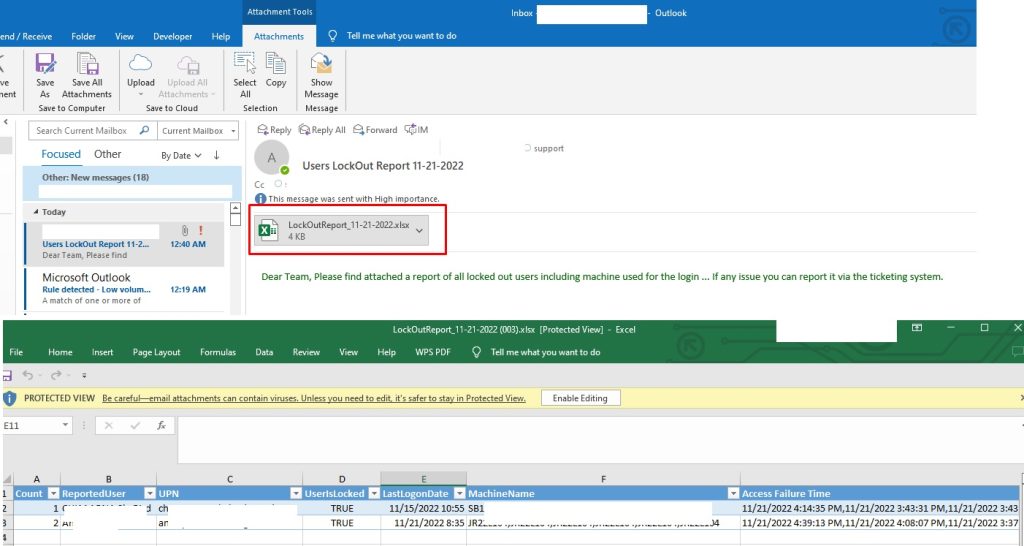
Please find attached a report of all locked out users including machine used for the login … `
If any issue you can report it via the ticketing system.</font>
<body><html>

#Eexport in CSV
$Report | Export-csv “C:\Reports\LockOutReport_$ReportTime.cscv” -NoTypeInformation

#Eexport in Excel Format
$Report | Export-Excel “C:\Reports\LockOutReport_$ReportTime.xlsx” -WorksheetName LogonFailure -TableName LogonFailure -AutoSize

$Exported = “C:\Reports\LockOutReport_$ReportTime.xlsx”

$CC = @(‘User2@domain.com’)
#
Get-ChildItem $Exported | send-mailmessage -from “system@domain.com” -to “user1@domain.com” -cc $cc -subject “Users LockOut Report $ReportTime” -body “$MailBody” -Priority High -smtpServer relay.domain.com -BodyAsHtml

Link to Github:


https://github.com/moh30ly/powershell/blob/main/ActiveDirectoryLockOutNotification

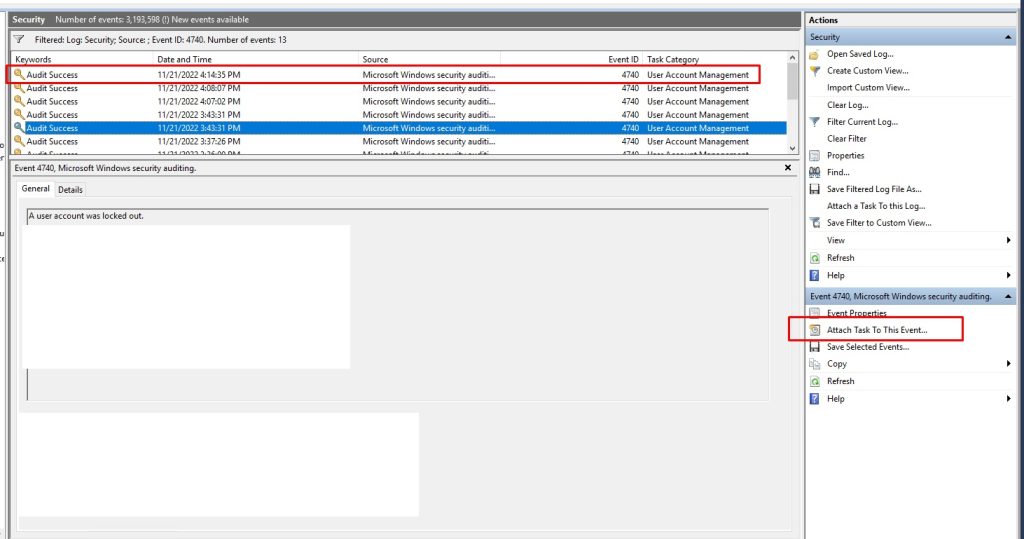
4- Attach Task to an Event

5- Get The Report

an Exchange mailbox was mistakenly migrated over another user’s object used by another user

The Story

If you ever used Prepare moverequest command to migrate a user and forgot to use ADMT to rewrite user’s properties with the old attributes. You might have used ADMT again to rewrite the properties.

If you use ADMT you will need to exclude all Exchange Attributes from the source since its already copied using Prepare-move request script however, in some cases some people do make mistakes and you might have came through the same mistake my colleague  have done during one of these extremely complicated Cross forest Migrations where you’d prepare a CSV files through PowerShell and names wouldn’t match Sam accounts.

Don’t Panic

If however, you forgot again to exclude the Exchange attributes while using ADMT then you most likely wont see the user in the Target forest which will cause to panic thinking the user is gone .. But no the user is not gone don’t panic.

When you look for the user’s mailbox on the target forest after the move request is completed you’ll get an error reporting the user can’t be found

image

Solution

To fix the problem you’ll need to change to attributes only for this migrated user. (In the target forest after user mailbox move is completed).

The attributes are

msExchRecipientDisplayType    1073741824
msExchRecipientTypeDetails    128

The wrong Attributes are as following.

image

You will need to fix them to look like the following

image

Once you apply the change you’ll need to wait for a minute or few depending on your AD replication speed.
The problem will be then solved

image

Reset Azure VM Admin password with Domain Controller installed

Active Directory Admin Password

We had a security lab on Azure with 12 machines, It included 2 DCs and 10 other machines of different OS and had RDP closed on all the machines except one machine to use.

The Password was set for something simple however it seems that someone has changed it and no one was able to access the domain controller anymore nor any of the machines.

I had another user created for backup but it seems that user was also changed.

The usual method of resetting Azure VM is going through portal or PowerShell

Resetting Via Azure Portal

When you try to reset the password from Azure Virtual machine itself. If the VM has Domain Controller it will fail to reset the password with the following error:

Failed to reset RDP configuration

VM has reported a failure when processing extension ‘enablevmaccess’. Error message: “VMAccess Extension does not support Domain Controller.” More information on troubleshooting is available at https://aka.ms/vmextensionwindowstroubleshoot

image

Through PowerShell

To reset a password, we first need to define the VM we’re working with. To do this, we can use the Get-AzureRmVm cmdlet. I’ll go ahead and assign variables to both the VM name and the resource group since we’ll need to reference those later, as well.

$vmName = 'YOURVMNAMEHERE'
$resourceGroupName = 'YOURRGHERE'
$vm = Get-AzureRmVm -Name $vmName -ResourceGroupName $resourceGroupName

Next, we’ll need some way to pass the username and password into the script. A great way to do that is through the Get-Credential cmdlet.

$credential = Get-Credential

Once the credential is saved, we can then execute the command to actually make the password change using the variables we set earlier. Notice we had to use the GetNetworkCredential() method on the pscredential object. This method will not work if the credential is retrieved from another computer or from another user account. This shouldn’t be a problem, though, since you’re likely to execute this in a single script.

$extensionParams = @{
    'VMName' = $vmName
    'Username' = $Credential.UserName
    'Password' = $Credential.GetNetworkCredential().Password
    'ResourceGroupName' = $resourceGroupName
    'Name' = 'AdminPasswordReset'
    'Location' = $vm.Location
}

$result = Set-AzureRmVMAccessExtension @extensionParams

Once this completed (hopefully successfully), the VM will need to be rebooted. We can do that by using the Restart-AzureRmVm cmdlet.

$vm | Restart-AzureRmVM

While this PowerShell script might work with a normal VM, It will not work with a DC and would result in the same error as in the portal.

Solution

The solution is to write a script which would run through the CustomScriptExtension that you can deploy from the Azure Portal on the intended VM that has the Domain Controller Deployed on it.

Once you get the script ready to change the administrator Password you can upload the script and deploy it.

Let’s get the script ready and demonstrate these steps one by one.

– On my Computer I will write a tiny script that will say

Net User domainadmin Adm!nPassw0rd1

image

– Save the file on your desktop for later use. Go to Azure Portal, Virtual Machines and select your Domain Controller.

– Go to Extensions.

– Click on Add

image

– Select Custom script Extension

image

– Click Create

– Browse the PowerShell script on your Desktop.

– Select Storage Account

– Select an existing container or create new one

– Upload the file to the container

image

image

image

image

image

Result

Once deployed, it’ll take few mins to reset the password and you don’t have to restart the server.

Through PowerShell

image

After this I was able to access the machine again using the new password in the script.

ref:

https://docs.microsoft.com/en-us/azure/virtual-machines/extensions/features-windows#troubleshoot-vm-extensions

https://docs.microsoft.com/en-us/azure/virtual-machines/windows/run-command

https://mcpmag.com/articles/2017/12/13/azure-vm-password-with-powershell.aspx

https://docs.microsoft.com/en-us/azure/virtual-machines/troubleshooting/reset-local-password-without-agent

Upgrade FRS (File Replication Service) to DFSR (Distributed File System Replication) Guide through

Upgrade FRS to DFSR:

You might be searching on how to do this due to many reasons, Migrating your DCs to Windows 2016 or Windows 2019, The steps to do this type of migration is pretty easy and straightforward.

First Let’s explain a bit about what does FRS and DFSR do and what is the difference?

Windows Server 2003 and 2003 R2 uses File Replication Service (FRS) to replicate SYSVOL folder content to other domain controllers.

SYSVOL is a folder shared by domain controller to hold its logon scripts, group policies and other items related to AD.

All the domain controllers in the network will replicate the content of SYSVOL folder. The default path for SYSVOL folder is %SystemRoot%\SYSVOL. This folder path can be defined when you install the active directory.

How does DFS Works?

In Windows server 2008 and later Active Directory uses Distributed File System (DFS) for the replication.  DFS Replication uses a compression algorithm known as remote differential compression (RDC). RDC detects changes to the data in a file and enables DFS Replication to replicate only the changed file blocks instead of the entire file.

Although FRS has been deprecated Since Windows server 2008 most people still looking to migrate to latest version.

Migration Starts Here

In this guide, I am going to explain how to do this kind of migration step by step.

I am going to run the migration on Windows 2008 R2 Servers. however the process is exactly the same on Windows 2012 R2.

To start, I need to check the service console to see which services are running the replication. From run type services.msc and enter

As you can see there, File Replication Service is running

clip_image001

In the same manner DFS service is also started and functioning, But that doesn’t mean that RFS is not being used.

clip_image002

Health Check

Before starting any migration, I prefer to do a check on Eventviewer just to make sure nothing critical is being reported. In the same way I would like to see if there any warning being reported.
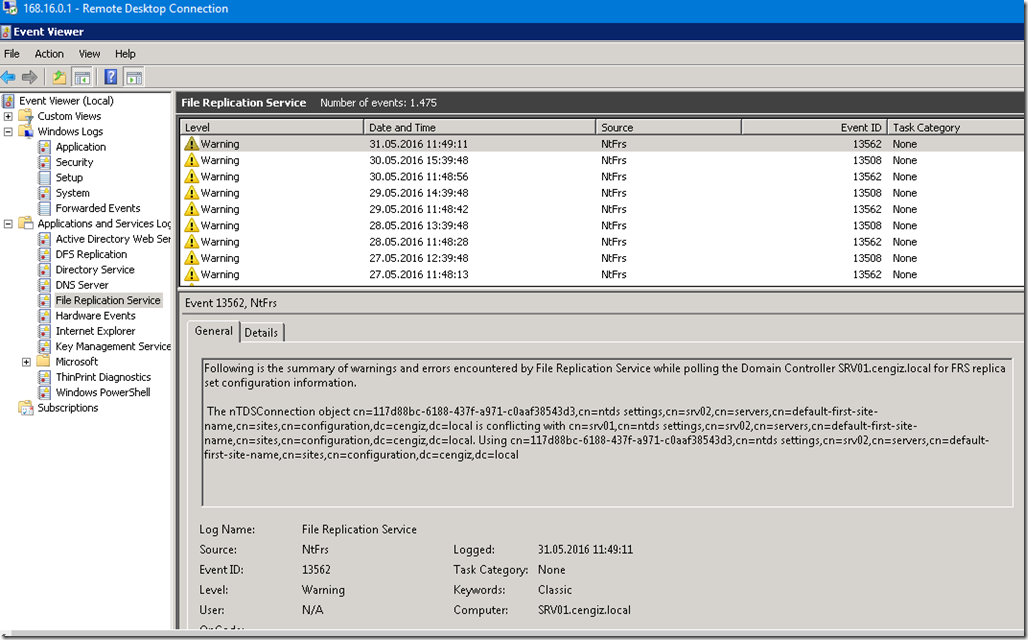
Below you can see errors are being reported from File Replication Service by the Domain Controller SRV01, So the time is convenient to start this kind of migration as this would fix the errors being reported.

clip_image003

Prerequirements:

The first part of the process for migrating SYSVOL replication from File Replication Service (FRS) to Distributed File System (DFS) Replication is to raise the functional level of the domain to Windows Server 2008 and to set the global migration state to Prepared.

Make sure your Domain Function Level is raised to 2008 at least for this process to work.

Migration:

To start migration, Run Powershell as an administrator from the DC And type the following command to prepare DCs for the migration.

dfsrmig /getglobalstate

clip_image004

Preparing to migrate

dfsrmig /setglobalstate 1

When this is done, you might have to wait sometime (5 mins or less for small environments). When done waiting type dfsrmig /getglobalstate to verify that the global migration state is Prepared. The following output appears if the global migration state is Prepared.

clip_image005

clip_image006

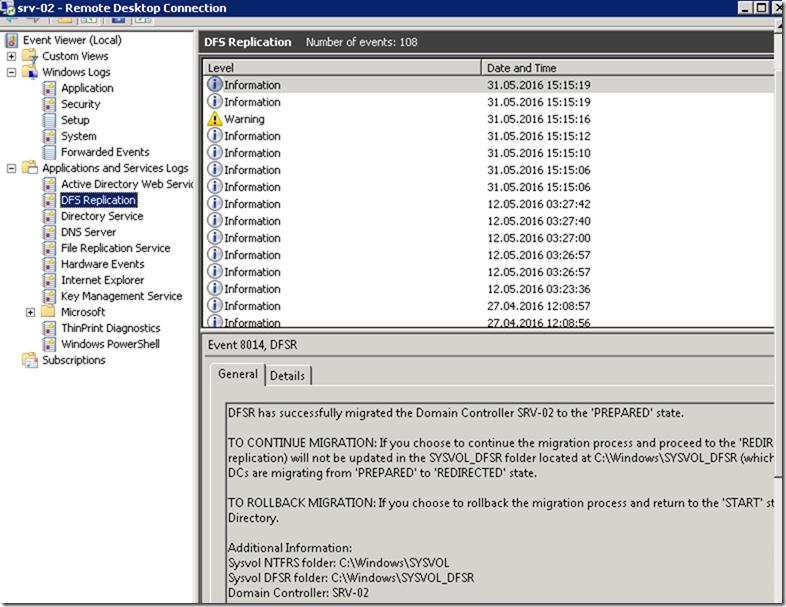
You will be able to see an event ID 8014 showing you the success of this command.  Which means you can move to the next stage.

clip_image007

clip_image008

Migrate the domain to the Redirected state

From a command prompt or PowerShell window on a writeable domain controller (not a read-only domain controller) in the domain that you want to migrate, type dfsrmig /setglobalstate 2 to set the global migration state to Redirected.

clip_image009

2. Type dfsrmig /getglobalstate to verify that the global migration state is Redirected. The following output appears if the global migration state is Redirected.

clip_image010

After doing this, Checking event viewer you can see event ID 8017 showing you the current state, in my case it’s showing DFSR has successfully Migrated the DC to “Redirected” state. so it means we are good to go to the next step.

clip_image011

clip_image012

Migrating to the Eliminated State

Log on to a writeable domain controller (if you are not logged on already).

Open a command prompt window and then type dfsrmig /setglobalstate 3 to set the global migration state to Eliminated.

clip_image013

2. At a command prompt, type dfsrmig /getmigrationstate to verify that all the domain controllers are at the Redirected state. The following output appears when all domain controllers are at the Redirected state.

clip_image014

In the event viewer you can see the state of the DCs reporting that DC will now migrate to the “Eliminated” state. with event ID 8018

clip_image015

clip_image016

Once everything is finished, You will be able to confirm by two things, First on the Service console the File Replication Service should be disabled since it’s no longer going to be used.

clip_image017

Second thing is by using Command line or Powershel, Type Net Share an you can see the new Shares being published with new names “Sysvol_DFSR”.

clip_image018

Ref:

https://docs.microsoft.com/en-us/windows-server/storage/dfs-replication/migrate-sysvol-to-dfsr

https://docs.microsoft.com/en-us/windows/win32/win7appqual/file-replication-service–frs–is-deprecated-in-windows-server-2008-r2

How to Sync Cloud User to On-premises AD ?

The Story:

I have got this client who constantly keeps on making the mistake of create user from Cloud and provision them with a license in an Exchange Hybrid environment.

Although this is not difficult to fix but it’s not the recommended approach when creating a new user especially in a Hybrid environment since Exchange on-premises won’t recognize this user and most likely will consider any incoming emails from it as spoof or spam.

How to Create a Cloud user from Exchange On-premises?

From Exchange on-premises ECP Admin panel you have the option to directly create user on-cloud which will also create a user object on on-premises AD.

image

Second option – Using Powershell

It’s not that much different than the Web UI option but it’s just for people who prefer using PowerShell than GUI

Enable-RemoteMailbox –Identity User –RemoteRoutingAddress user@yourTenant.mail.onmicrosoft.com

The reason to follow those two methods is due to the need of Exchange on-premises being aware of each of those users so mail flow between Exchange on-premises and Online would not get affected and route this users mail to the wrong place or flag it as spammed or spoof …etc.

The Real Question now is: How to Sync Cloud User to On-premises AD ?

If by mistake we created a user on Cloud (Office 365) and we forgot to create an AD User for this account, that user might already have started using his account on Office 365 (Sharepoint, Exchange, Teams) etc.

There also might be the intention of moving users from Cloud to On-premises Exchange in case the company wanted to decrease their spending on cloud users and in this case when Migrating a cloud user to on-premises you will get the following errors:

image

test3@domain.com

Status: Failed

test3@domain.com Skipped item details

User status

Data migrated:

Migration rate:

Last successful sync date:

Error: MigrationPermanentException: Cannot find a recipient that has mailbox GUID ‎’03c9764e-8b8e-4f33-94d1-ef098c4de656‎’. –> Cannot find a recipient that has mailbox GUID ‎’03c9764e-8b8e-4f33-94d1-ef098c4de656‎’.

So how do we overcome this situation since syncing a user might require you to delete the cloud user and recreate it on AD?

Solution:

To sync the user from the Cloud to on-premises you will need to follow these steps :

1- Create an on-premises Mailbox where the following attributes would be matching the cloud user

  • UserPrincipalname
  • ProxyAddresses
  • SamAccountName
  • Alias

2- The Location of the OU where the On-premises user is going to be created must be provisioned by ADConnect (Azure AD Connect)

You can look which of these OU are provisioned by Starting AD Connect Sync Manager

image

By verifying the user you created in the AD is in the right OU, You can now start AD Sync from PowerShell to speed up the process.

image

Below, You can see the user has been successfully synchronized to the cloud without any issue.

image

Now we’ll see it from the portal to confirm the user is synced with AD

image

Depending on the Source anchor being used in ADConnect there might be a GUID conflict or not, You will get an error similar to when trying to migrate the user in the beginning however you can solve this by replacing the cloud user’s GUID (ImmutableID) with the on-premises user which will force the user to merge with the On-prem user.

Let’s confirm in our case if the user on-cloud has a matching GUID with the one on-premises.

From AD run CMD or Powershell you can use the following command to get the user’s ImmutableID (ObjectGUID) .

ldifde -f c:\Test.txt -d “cn=Test3,DC=Domain,DC=com”

image

From Notepad checking the user we just exported you can see the Immutable ID on AD for the User test3 is IkTni9mw7Ee4YefeGpz7IA==

image

To be able to see the user on Office 365, We need to logon to MSOL through Exchange Online PowerShell

Connect to Exchange Online’s powershell using your Online ECP.

image

Once you click on Configure this should download an executable file that will launch PowerShell Online which allows you to use the Modern Authentication (MFA) to use PowerShell safely.

image

Connect-Msoluser will connect you to Office 365 and you’ll be able to get the user’s properties and see if the Immutable ID is matching to the user’s GUID.

Once you’re connect you can use the following cmdlet to get the user’s properties.

Get-MsolUser -UserPrincipalName test3@domain.com |fl DisplayName,ImmutableID

image

You can see they are matching each other, In case there’s a conflict then you can simply set the online user’s Immutable ID to match the on-premises user’s ImmutableID.

Once done, Go and force ADConnect to sync the user and you’ll see if the problem has been resolved. The command for changing the Immutableid is as follows:

Set-MsolUser -UserPrincipleName test3@domain.com -ImmutableID IkTni9mw7Ee4YefeGpz7IA==

Ref:

https://support.microsoft.com/en-us/help/2956029/migrationpermanentexception-cannot-find-a-recipient-that-has-mailbox-g

https://docs.microsoft.com/en-us/exchange/hybrid-deployment/create-cloud-based-archive

Powershell script to audit users who authenticated against DC servers

The story:

I have got a request from a client asking to find out which server(s) is using which domain admin or a highly privileged account as a service.

To find this I already wrote a powershell script that does this, Search the non standard/(Domain only users) and show the services and name of the servers where those accounts are configured on utilizing Remote powershell to do so and the use of a Domain Admin user.

You can refer to this link to see this article by clicking here

Creating the script process:

The same client wanted to also know which of those accounts did authenticate and wanted to know from which server/Computer did the request originate from and to which DC did it go.

I have started thinking of the process of doing so by again utilizing remote PowerShell to check against certain security events on AD to check which user among the Domain admin members did authenticate.

After sometime and with the help of some forums I managed to get script ready which looks in all Domain Controllers for users that are members of the Domain Admin groups who triggered an event ID 4624 and from which Computer did this request came from.

The Script :

# Get domain admin user list
$DomainAdminList = Get-ADGroupMember -Identity 'Domain Admins'
# Get all Domain Controller names
$DomainControllers = Get-ADDomainController -Filter * | Sort-Object HostName
# EventID
$EventID = '4624'
#
# Get only last 24hrs
$Date = (Get-Date).AddDays(-3)
# Limit log event search for testing as this will take a LONG time on most domains
# For normal running, this will have to be set to zero
$MaxEvent = 100

# Loop through Dcs
$DALogEvents = $DomainControllers | ForEach-Object {
    $CurDC = $_.HostName
    Write-Host "`nSearching $CurDC logs..."
    Get-WinEvent  -ComputerName $CurDC -FilterHashtable @{Logname='Security';ID=$EventID;StartTime = $Date} -MaxEvents $MaxEvent |`
    Where-Object { $_.Properties[5].Value -in $DomainAdminList.SamAccountName } |`
    ForEach-Object {
        [pscustomobject]@{SourceIP = $_.Properties[18].Value; SamAccountName = $_.Properties[5].Value;Time = $_.TimeCreated;LogonEventLocation = $CurDC}
    }
}
$DALogEvents

How to run:

The Script must be run on DC with a privileged account in order to get the write results, The default time interval is set to 3 days but you can choose to increase that.

You can also change the default group where you want to search for members by changing Domain Admin groups to something else.

Screenshot of the result

HOW TO GET ALL DOMAIN JOINED SERVER SERVICES THAT USING A UNIQUE OR DOMAIN USER

The Story (Finding Domain Joined Servers Services users)

If you’re wondering which of your servers are using domain joined account or a non regular account like network service or system. You will need to go through every server’s service console and check that one by one but thanks to PowerShell this job was made like a piece of cake.

Requirement

The requirement to run this script is a domain admin account since the PowerShell will require access to other servers using Remote PowerShell using Invoke command and run a Get-WMIObject script to find out those details. So in short I will write the required things for this to work

1- Logged in to Active Directory (In order for AD PowerShell module to run and find computers).

2- Domain admin account (To run the remote PowerShell on other servers and get service details)

3- Firewall for domain joined computers is open (To allow remote PowerShell to work) or have remote PowerShell enabled via GPO.

The Script will also show you the offline (inaccessible servers) and will state those servers as down as you can see in the screenshot below.

The script will also prompt you for a path to save the output. You can enter something like C:\Services.csv  as soon as you type the file path and extension it’ll be opened using Notepad.

image

#Check servers down and get services from the responsive servers

$Computers = Get-ADComputer -Filter { OperatingSystem -Like ‘*Windows Server*’}

$Input = ForEach ($computer in $computers){

$comp = $Computer.DNSHostName

$dist = $Computer.DistinguishedName

if (Test-Connection -Computername $comp -count 2 -Quiet )

{

Invoke-Command -ComputerName $comp -ScriptBlock {Get-WmiObject win32_service | where {$_.StartName -notlike “*LocalSystem*” -and $_.StartName -notlike “*LocalService*” -and $_.StartName -notlike “*NetworkService*” -and $_.StartName -notlike “*System*”} | select DisplayName,StartName,State }}

else{ Write-host $comp is down -foregroundColor red -BackGroundColor black

}

}

$Output = Read-Host “Enter File path and Name to save output to”

Out-File -FilePath $Output -InputObject $Input -Encoding ascii

Notepad $Output


image

image

Migrating DFS from 2000 Mode to 2008 step by step

The Story

Few months ago I have got a request from one of my clients regarding migrating DFS from 2012R2 to 2016.

2012R2 was migrated from 2008r2 and was based on 2000 Mode. To do this you’ve got a list of requirements as it can be migrated but certain features won’t be supported if you continue to use the 2000 Mode in DFS on Windows 2016 server.

How to Start

In this tutorial I will explain how to do this migration by doing a demo step by step and guide you through this Migration with screenshots and the required commands.

I have added a tiny comparison also to make it clear why are we going to use this particular method of migrating DFS mode and Server.

clip_image001[4]

To migrate a domain-based namespace to Windows Server 2008 mode

  1. Open a Command Prompt window and type the following command to export the namespace to a file, where \\ domain \ namespace is the name of the appropriate domain and namespace and path\filename is the path and file name of the export file:
On the source DC/DFS Server

Dfsutil root export \\domain\namespace C:\filename.xml

clip_image002[4]

clip_image003[4]

  1. Write down the path (\\ server \ share ) for each namespace server. You must manually add namespace servers to the recreated namespace because Dfsutil cannot import namespace servers.

clip_image004[4]

clip_image005[4]

  1. In DFS Management, right-click the namespace and then click Delete , or type the following command at a command prompt, where \\ domain \ namespace is the name of the appropriate domain and namespace:
    Copy
    Dfsutil root remove \\domain\namespace

clip_image006[4]

Let’s go refresh the console and see if it’s deleted there

clip_image007[4]

clip_image008[4]

Next remove

clip_image009[4]

clip_image010[4]

I will remove the rest of the name spaces

clip_image011[4]

All have been removed, Now lets remove the name spaces from the display and observe what happens to the replication groups

clip_image012[4]

NOTE:

Replication groups didn’t get affected

clip_image013[4]

  1. In DFS Management, recreate the namespace with the same name, but use the Windows Server 2008 mode, or type the following command at a command prompt, where \\ server \ namespace is the name of the appropriate server and share for the namespace root:
    Dfsutil root adddom \\server\namespace v2
I will use the UI instead of the command

clip_image014[4]

Although we raised the forest and domain function forest but still the 2008 is still greyed out. Lets try to restart the DFS services on the FSMO server

clip_image015[4]

clip_image016[4]

After restarting

clip_image017[4]

clip_image018[4]

Next, I will copy all the xml files to the new server and import them there

My new server is 2016

clip_image019[4]

  1. To import the namespace from the export file, type the following command at a command prompt, where \\ domain \ namespace is the name of the appropriate domain and namespace and path\filename is the path and file name of the file to import:
    Dfsutil root import merge path\filename.xml \\domain\namespace

clip_image020[4]

After the Import

clip_image021[4]

clip_image022[4]

I will continue to import the rest of the namespaces

First we need to create them with their matching namespaces from the GUI

clip_image023[4]

clip_image024[4]

Now I will import and merge the xml file

clip_image025[4]

clip_image026[4]

After adding the NEW folder which has replicating group existing already from the previous mode. First it didn’t show up

clip_image027[4]

but after navigating to the NewFolder and clicking on Replication tab then Navigate to the replication group showed the replication group underneath the Replication

clip_image028[4]

What has changed?

The only noticeable thing which has changed is the NameSpace Servers everything else like ( Folder targets still the same, replication is identical to previous settings)

See this screenshot

clip_image029[4]

Let’s check the access to the new namespace

clip_image030[4]

Finally, Let’s import the latest namespace and its configuration (PublicFolder)

clip_image031[4]

clip_image032[4]

Let’s check the result on GUI

clip_image033[4]

Notice the replication group for the PF didn’t come, so let’s do as we have explained before to show the replication group

Here we go

clip_image034[4]

Right after this process finishes, the command creates some kind of a report with time, importing status and other related settings such as site cost, timeout.. Etc

clip_image035[7]

Note

To minimize the time that is required to import a large namespace, run the Dfsutil root import command locally on a namespace server.

Add any remaining namespace servers to the recreated namespace by right-clicking the namespace in DFS Management and then clicking Add Namespace Server , or by typing the following command at a command prompt, where \\ server \ share is the name of the appropriate server and share for the namespace root:
Copy
Dfsutil target add \\server\share

Note

You can add namespace servers before importing the namespace, but doing so causes the namespace servers to incrementally download the metadata for the namespace instead of immediately downloading the entire namespace after being added as a namespace server.

Ref:

https://docs.microsoft.com/en-us/previous-versions/windows/it-pro/windows-server-2008-R2-and-2008/cc753875(v=ws.11)

Pfsense and Active Directory Integration

In this tutorial. I will integrate my Active directory with Pfsense in order to authenticate Users from Active directory instead of using Pfsense’s User manager.

The process will give you more options and will make managing users much easier. so in order to do that follow the following steps.

First open your Pfsense Web UI and click on System – > user manager

Next go to Servers Tab

Click + in the right corner

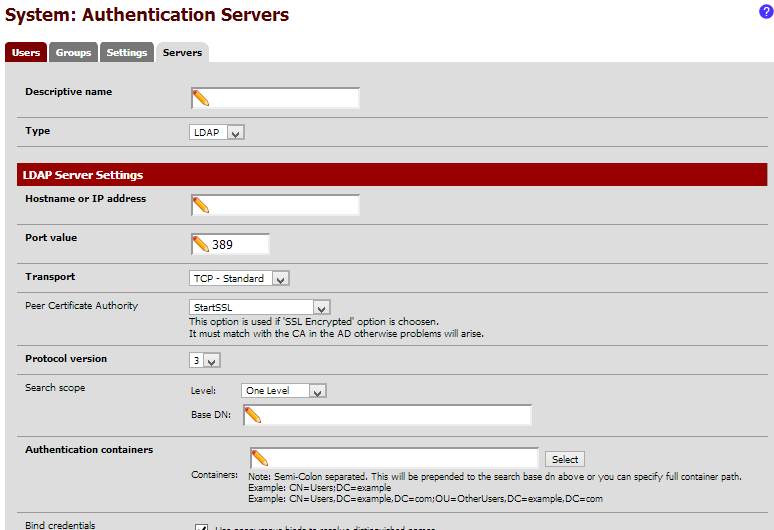
After you click on the + icon you will get the following page.

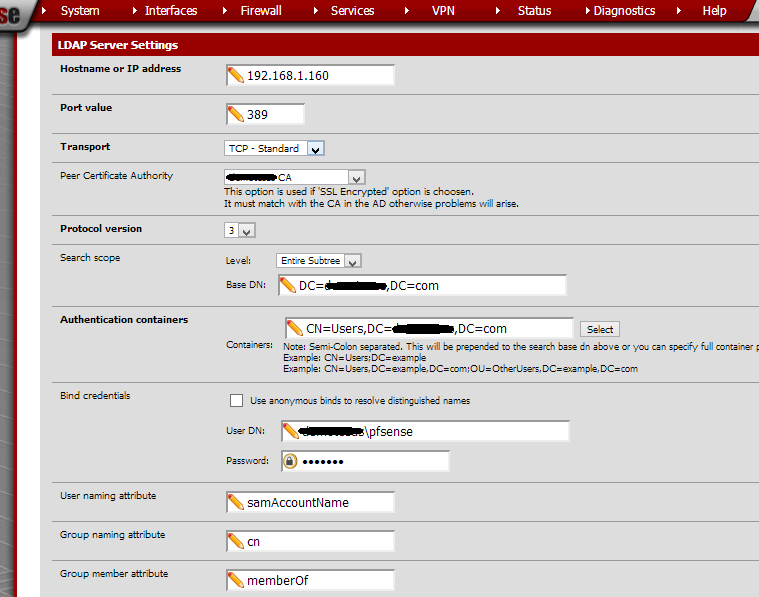
Fill these details accordingly, for help on how to fill these in check the below snapshot

Note: Make sure that your password is simple and contains only letters, no numbers or special characters e.g. Pfsense

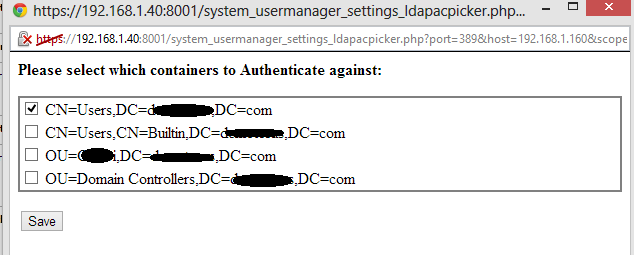
When done click on Select and the result will be that you will be able to view the following OU/CN.

Now create a group on AD e.g. “PF” and create the same identical group name on Pfsense. On AD add any user to this group.

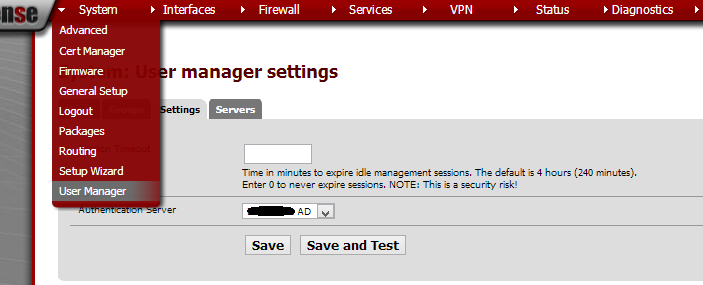
Then go back to pfsense – > system – > user manager -> goto Settings Tab – > from Authentication server select your AD and save

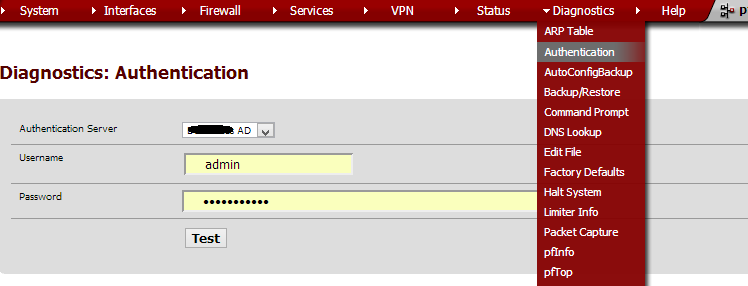
Now click on Diagnostic -> Authentication -> select your AD server

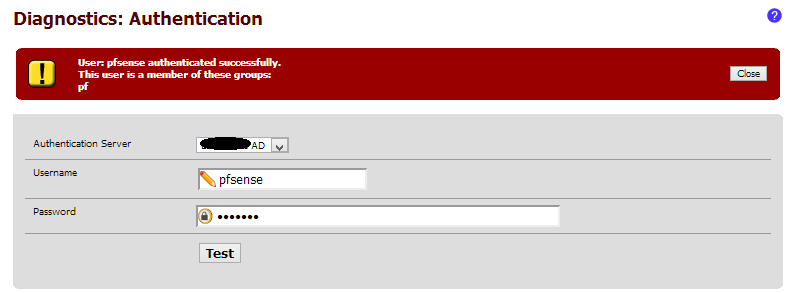
Type in your username and password for the user which you have added to the group pf in the AD and click test then you will see the result on top. “User: Pfsense authenticated successfully. this user is a member of these groups: pf

Hope this will help you find your way through Pfsense. 🙂