Category Archives: Microsoft

Messaging and Collaboration, Sharepoint.. etc

Reset passwords for Active Directory Users

Reset and manage your Active Directory users' Passwords

Active Directory is one of the most esential and important tool in any company whether small or big. In most cases big companies have uncountable amount of tools to maintain and protect users and their credentials however almost most of those companies are not prepared to the time when their systems have been compromised or to say the least their servers have been hacked or encrypted by ransomware which is something we hear very often nowadays like the case with Louisiana Hospital that was attacked by Ransomware exposing the data of 270000 patients. 

Realistic scenario

What if your users passwords were compromised and you’re not sure who is still safe or not but you need to act as fast as possible? 

To act fast, I created a script that would generate a complex 32 Char long password with 4 different Non Alphanumeric Characters using the System.Web.Security.Membership  class. here’s an example of this password:

81Q:#_#E-QVZ-(1m&VS1LKpbzwR+8Em%

The script details

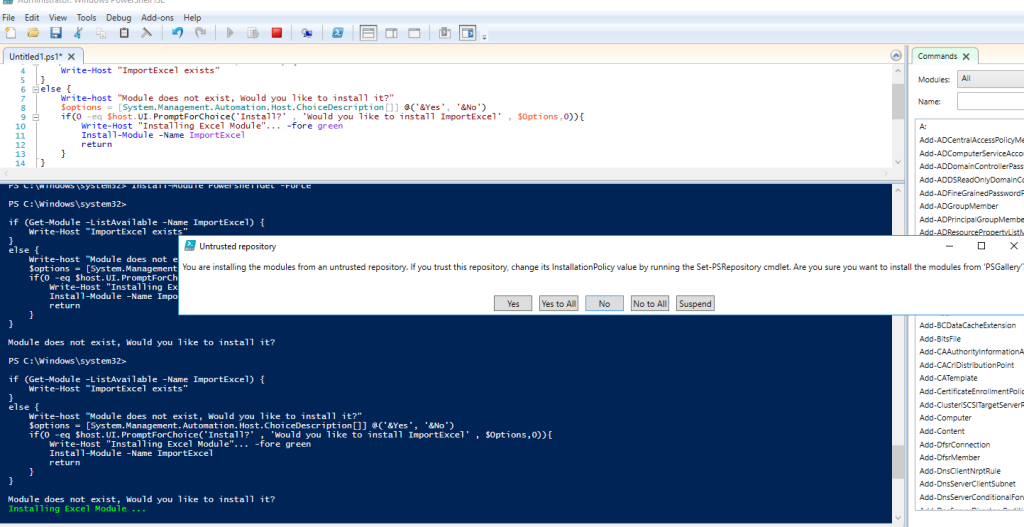
The script will first check if you have the Powershell Get and ImportExcel Module installed, if not it’ll ask you to install it or not. 

You will need to amend few things

1- The path to reflect where you want to save the Logs, CSV and Excel sheet. as of now it’s in c:\SyncReports. 

2- Importing users, In the script I am grabbing users directly from a specific OU in AD. so you’ll need to decide how you want to do it. I have added another line in case you’re planning to 

3- The password reset command is setup with -whatif parameter for you to test this before you run it. so just remember to remove it when you’re done with the changing and testing.

I have added mailbody and send-message command to send the excel as an attachment along with the excel password protection. 

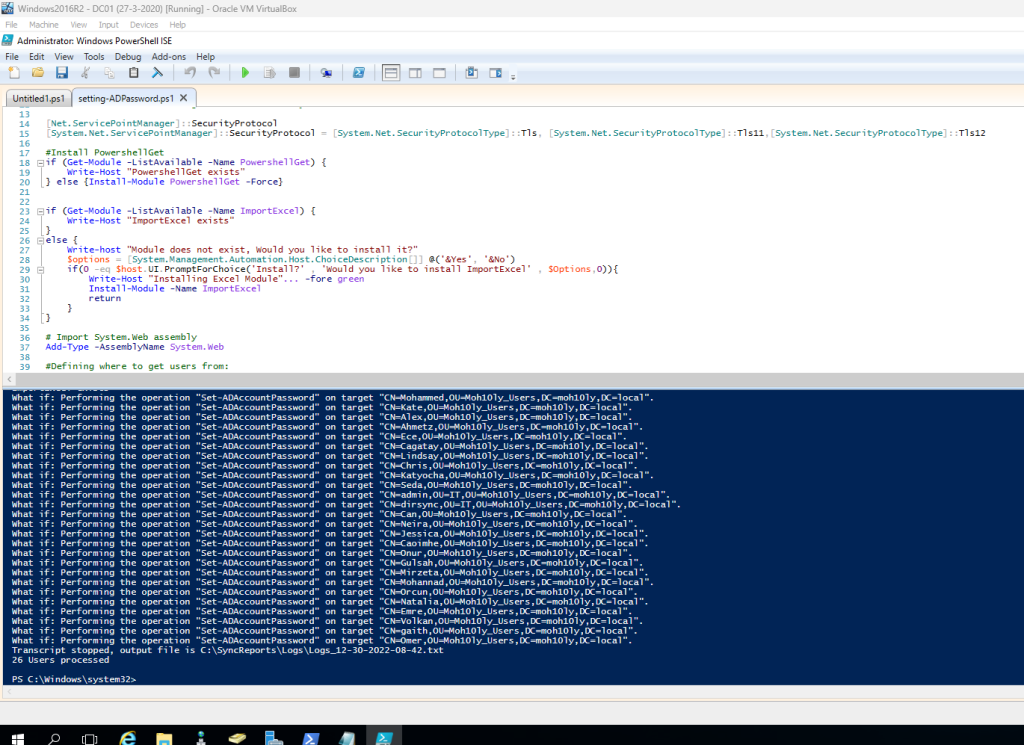
Running the script will result in the following

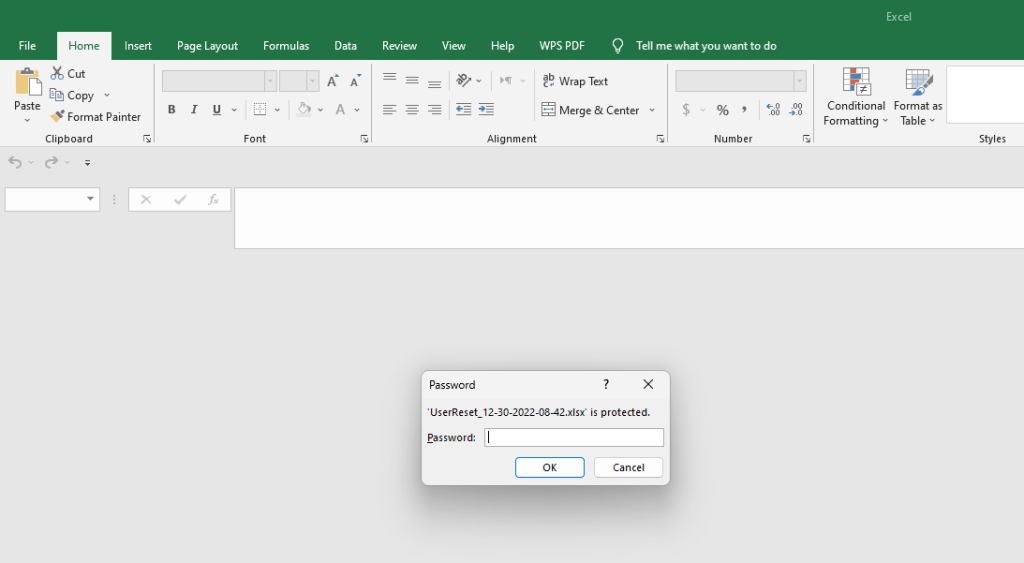
Once you get the Excel sheet and try to open it, you will realize that it’s password protected. The password should be in the email body that’s sent in the script.

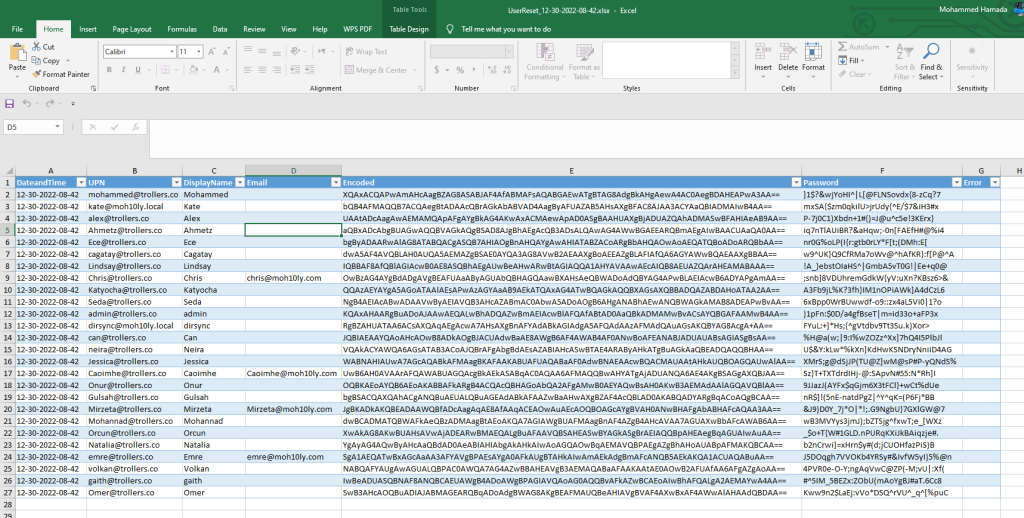
Excel sheet result will be looking as follows:

The script
The script 90%
#This script will generate randdom complex passwords for all AD users

#Using Time class and start reporting
$TimeStamp = [datetime]::Now.ToString(“MM-dd-yyyy-HH-mm”)
Start-Transcript -Path C:\SyncReports\Logs\Logs_$TimeStamp.txt -IncludeInvocationHeader

#Generate report
$Report = [System.Collections.Generic.List[Object]]::new()

#Check if Excel Module is installed, if not it’ll ask to install it

##Check Protocol and Setting Secure Connectivity

[Net.ServicePointManager]::SecurityProtocol
[System.Net.ServicePointManager]::SecurityProtocol = [System.Net.SecurityProtocolType]::Tls, [System.Net.SecurityProtocolType]::Tls11,[System.Net.SecurityProtocolType]::Tls12

#Install PowershellGet and ImportExcel Modules
if (Get-Module -ListAvailable -Name PowershellGet) {
    Write-Host “PowershellGet exists”
} else {Install-Module PowershellGet -Force}
if (Get-Module -ListAvailable -Name ImportExcel) {
    Write-Host “ImportExcel exists”
}
else {
    Write-host “Module does not exist, Would you like to install it?”
    $options = [System.Management.Automation.Host.ChoiceDescription[]] @(‘&Yes’, ‘&No’)
    if(0 -eq $host.UI.PromptForChoice(‘Install?’ , ‘Would you like to install ImportExcel’ , $Options,0)){
        Write-Host “Installing Excel Module”… -fore green
        Install-Module -Name ImportExcel
        return
    }
}

# Import System.Web assembly
Add-Type -AssemblyName System.Web

#Defining where to get users from:
$Users = Get-ADUser -SearchBase “OU=Moh10ly_Users,DC=moh10ly,DC=local” -Filter * -Properties *
#$Users = Import-Csv “C:\SyncReports\Users.csv”
foreach ($User in $Users){
       
        $UID = $User.UserPrincipalName
        $ObjectProp = Get-ADUser -Filter {(Mail -like $UID) -or (UserPrincipalName -like $UID)} -Properties *

        #Generate New Password
        $NewPassword=[System.Web.Security.Membership]::GeneratePassword(32,4)
        $Password= ConvertTo-SecureString $newPassword -AsPlainText -Force
        $TEXTO = “$newPassword”
        $ENCODED1 = [Convert]::ToBase64String([Text.Encoding]::Unicode.GetBytes($TEXTO))
       
        $Name = $ObjectProp.Name
        $SAM = $ObjectProp.SamAccountName

        if($SAM){
 
                   
                         $ReportLine = [PSCustomObject][Ordered]@{
                            DateandTime                 = $TimeStamp
                            UPN                         = $ObjectProp.UserPrincipalName
                            DisplayName                 = $ObjectProp.Displayname
                            Email                       = $ObjectProp.Mail
                            Encoded                     = $ENCODED1
                            Password                    = $newPassword
                            Error                       = $ObjectProp.Exception.Message
                            }
                           
                            $Report.Add($ReportLine)
           
            #Wait for Email to send
            #Start-Sleep -Seconds 15

            #Resetting user’s password
            Set-ADAccountPassword -Identity $User.SamAccountName -NewPassword $Password -WhatIf

        }
    else {$Error = Write-Host -f Red “$($User) Couldn’t be found”    
    #send-mailmessage -from “admin@skybirdtravel.com” -to “admin@skybirdtravel.com” -subject “Password reset didn’t work for $($User.UserprincipalName) on $TimeStamp” -body “$Error” -Priority High -smtpServer mailcleaner.cloudapphost.net}
    }
}
Stop-Transcript
Write-Host (“{0} Users processed” -f $Users.count)
#$Report | Out-GridView
$ExcelPassword =[System.Web.Security.Membership]::GeneratePassword(32,4)
$Report | Select-Object UPN,Displayname,Email,Encoded,Password | Export-Csv -NoTypeInformation “C:\SyncReports\UserReset_$TimeStamp.csv”
$Report | Export-Excel “C:\SyncReports\UserReset_$TimeStamp.xlsx” -WorksheetName Users -TableName Users -AutoSize -Password “$ExcelPassword”
$Exported = “C:\SyncReports\UserReset_$TimeStamp.xlsx”
$MailBody = “
            <html><body>
            <font color=’006400′> Dear Team, Please find attached the list of users and their passwords encoded … `
            The file is protected with password // $ExelPassword // If any issue you can send an email to support@domain.com .</font>
            <body><html>
            “
$CC = @(‘info@moh10ly.com’)

#Get-ChildItem $Exported | send-mailmessage -from “admin@domain.com” -to “report@domain.com” -Cc $CC -subject ” User Passwords List for the date $date” -body “$MailBody” -Priority High -smtpServer relay.domain.com -BodyAsHtml

Finally:

I have added this script to github, so feel free to comment or add your contribution if needed.

https://github.com/moh30ly/powershell/blob/main/ADPasswordChange

Finding Exchange Database hidden mailboxes. ​

Finding Exchange Database hidden mailboxes.

Story:

Maybe you have been in this situation before, trying to delete an Exchange database after moving all of its mailboxes, arbitration or archives to another server or database but it didn’t work and said that there is still something in the database? 

Now I am in a similar situation however I checked nothing in the database as you can see in the below screenshot. 

I have noticed that these issues could happen when an Exchange server gets broken or forcefully deleted from AD without properlty uninstalling it. some traces of system mailboxes might remain there with database attributes pointing to the database. 

Solution:

Add-PSSnapin Microsoft.Exchange.Management.PowerShell.Snapin
Function Get-HiddenMailbox
{
    [CmdletBinding()]
    Param(
    [Parameter(Mandatory=$True)][string]$Path,
    [Parameter(Mandatory=$True)][string]$Database
    )
<#Check for any remaining mailboxes in a database that you can’t delete.


[PS] C:\Program Files\Microsoft\Exchange Server\V15\scripts>Remove-MailboxDatabase a-sb-com-udb1-v1
This mailbox database contains one or more mailboxes, mailbox plans, archive mailboxes, public folder mailboxes or
arbitration mailboxes, Audit mailboxes. To get a list of all mailboxes in this database, run the command Get-Mailbox
-Database <Database ID>. To get a list of all mailbox plans in this database, run the command Get-MailboxPlan. To get
a list of archive mailboxes in this database, run the command Get-Mailbox -Database <Database ID> -Archive. To get a
list of all public folder mailboxes in this database, run the command Get-Mailbox -Database <Database ID>
-PublicFolder. To get a list of all arbitration mailboxes in this database, run the command Get-Mailbox -Database
<Database ID> -Arbitration. To get a list of all Audit mailboxes in this database, run the command Get-Mailbox
-Database <Database ID> -AuditLog. To disable a non-arbitration mailbox so that you can delete the mailbox database,
run the command Disable-Mailbox <Mailbox ID>. To disable an archive mailbox so you can delete the mailbox database,
run the command Disable-Mailbox <Mailbox ID> -Archive. To disable a public folder mailbox so that you can delete the
mailbox database, run the command Disable-Mailbox <Mailbox ID> -PublicFolder. To disable a Audit mailbox so that you
can delete the mailbox database, run the command Get-Mailbox -AuditLog | Disable-Mailbox. Arbitration mailboxes should
be moved to another server; to do this, run the command New-MoveRequest <parameters>. If this is the last server in
the organization, run the command Disable-Mailbox <Mailbox ID> -Arbitration -DisableLastArbitrationMailboxAllowed to
disable the arbitration mailbox. Mailbox plans should be moved to another server; to do this, run the command
Set-MailboxPlan <MailboxPlan ID> -Database <Database ID>.
    + CategoryInfo          : InvalidOperation: (a-sb-com-udb1-v1:DatabaseIdParameter) [Remove-MailboxDatabase], Assoc
   iatedUserMailboxExistException
    + FullyQualifiedErrorId : [Server=SBG-MX03,RequestId=480ce97d-8492-41a9-82fa-93ed30efe652,TimeStamp=6/28/2022 9:04
   :09 AM] [FailureCategory=Cmdlet-AssociatedUserMailboxExistException] 45D30D02,Microsoft.Exchange.Management.System
  ConfigurationTasks.RemoveMailboxDatabase
    + PSComputerName        : server.domain.local
#>


#Fist get DB’s HomeMDB value


#Write-host ‘Enter your Database Name’ -ForegroundColor Red -BackgroundColor Black


$DN = (Get-MailboxDatabase $Database).distinguishedName
$Date = (Get-date).ToString(“MM-dd-yyyy”)


$Mailboxes = Get-ADObject -filter {(HomeMDB -eq $DN)}


$QueryResult = $Mailboxes.count
$CurrentCount = 0


foreach ($Mailbox in $Mailboxes){


     try{
         $ObjectProps = [Ordered]@{ ‘DisplayName’ = $Null; ‘UserPrincipalName’ = $Null; ‘Database’ = $Null; ‘Mailbox’ = $Null; ‘Arbitration’ = $Null; ‘Archive’ = $Null; ‘Audit’ = $Null; ‘Monitoring’ = $Null; ‘ErrorResponse’ = $Null}
 
         $MBX = $Mailbox.name
         $CurrentCount ++


         Write-Progress -Activity “Checking Hidden Mailboxes in the database $DB $CurrentCount of $QueryResult -Status “Fetching $MBX -PercentComplete (($CurrentCount / $QueryResult) * 100)
 
         $Result = New-Object -TypeName PSObject -Property $ObjectProps


         $MailboxResult = Get-mailbox -Identity $MBX -ErrorAction SilentlyContinue
         if ($MailboxResult){Write-Host “User $MBX. is a Mailbox” -ForegroundColor Green  }
 
            $ArbResult = get-mailbox -Identity $MBX -Arbitration -ErrorAction SilentlyContinue
            if($ArbResult){Write-host “User $MBX. is an Arbitration Mailbox” -ForegroundColor White }


                 $ArchiveResult = get-mailbox -Identity $MBX -Archive -ErrorAction SilentlyContinue
                    if($ArchiveResult){Write-host “User $MBX. is a Archive” -ForegroundColor Red}
 
                                $AuditResult = get-mailbox -Identity $MBX -AuditLog -ErrorAction SilentlyContinue
                                   if($AuditResult){Write-host “User $MBX. is a Audit Mailbox” -ForegroundColor DarkRed}
 
                                        $Monitoring =  get-mailbox -Identity $MBX -Monitoring -ErrorAction SilentlyContinue
                                            if ($Monitoring){Write-host “User $MBX. is a monitoring Mailbox” -ForegroundColor Yellow }


            $Result.DisplayName = $MBX
            $Result.UserPrincipalName = (Get-ADUser -Identity $Mailbox.DistinguishedName).UserprincipalName
            $Result.Database = $DB
            $Result.Mailbox = $MailboxResult
            $Result.Arbitration = $ArbResult
            $Result.Archive = $ArchiveResult
            $Result.Audit = $AuditResult
            $Result.Monitoring = $Monitoring
            $Result.ErrorResponse = ‘#N/A’
            $NewPath = $path.Split(‘.’)[0] + ‘_’ + $date + ‘.csv’


            $Result | export-csv -path $NewPath -Delimiter ‘;’ -NoTypeInformation -NoClobber -Append -Encoding utf8
 
 
            }
 
                Catch{
 
                Write-Warning $_.Exception.Message}


                $Result | export-csv -path $NewPath -Delimiter ‘;’ -NoTypeInformation -NoClobber -Append -Encoding utf8
 
       }
}
Prerequisites:

– You will have to run this script from Exchange Server.

– An account that can connect to Active Directory with at least read permission and Exchange admin read role. 

The script will utilize Active Directory and Exchange to get the Database’s distinguished name and scan any AD User Object that has this DB’s DN and post it to you as an output. 

Example:

Get-HiddenMailbox -Path ‘C:\example.csv’ -database ‘Affected Database’

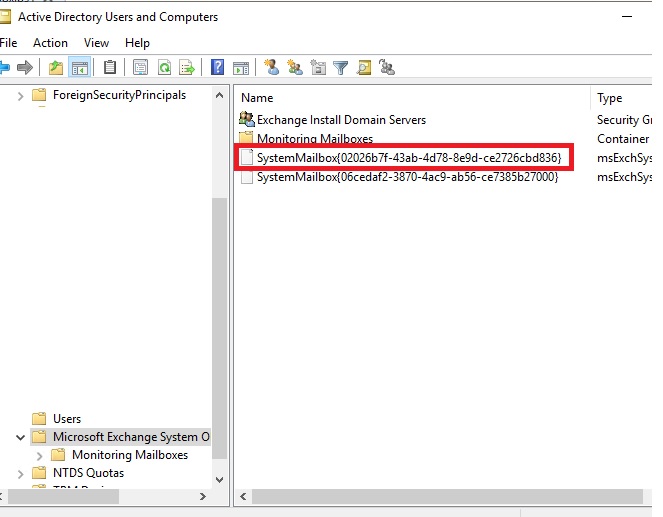
As you can see in the below screenshot, I got mostly health mailboxes which should not really be a problme in case you’re deleting database, however I got one system mailbox that is still there and pointing to this Database however, I already have scanned the database for any arbitration mailboxes but Exchange CMDlet showed none. 

Now that I know which user it is, the solution for me to be able to remove/delete this database which I no longer need is to delete this AD user object since its no longer in use by Exchange. 

You won’t be able to get this mailbox through get-mailbox cmdlet because its not an active mailbox. however you will find it in AD. 

So I deleted the mailbox mentioned below and next I am going to try and delete the mailbox database in question. 

Result

Here’s the result after deleting the user in Question.

Setting up ADConnect and PTA (Password auth through) servers agents behind proxy

If you’re using a Proxy server in your firewall or in your network and have AD Connect or/and Pass Through Auth agents installed on any of your servers, you will need to configure those agents to make sure they can see the proxy because setting up the proxy in your Internet Explorer or in your WinHTTP settings is not enough.

Azure AD Connect

For ADConnect to work behind Proxy better to use this miiservers.exe.config file which is located in

You will have to add the Proxy config in the last section of the File like in this screenshot

setting up proxy on Azure AD Connect and Pass Through Auth

For PTA: you have to update this file

After setting up the Proxy on both servers/agents, You might have to restart the server as sometimes restarting services is not enough.

Please let me know if you have any issues or addition to the article.

Get Report of Active Directory Locked Accounts and Machine they logged in from

Story:

I got some clients  that have reported some of their users being locked out and not able to discover how is this happening or which device its getting locked on.

Symptoms:

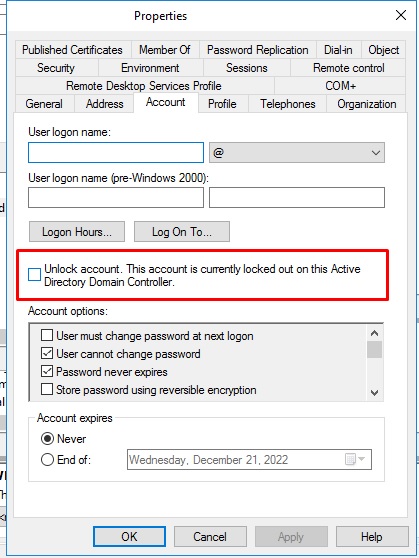
The user lock happens after you setup your GPO policy to get user locked after failing to login for X times with the correct password.

When user gets locked, they either can’t login or get prompted to re-enter their password in Outlook for example not knowing they have been locked. 

Hard to Find Out:

There’s no easy way to figure out what’s really happening and why the user got locked out specially if the account is being used on multiple devices e.g. (Phone, iPad, Desktop ..etc). Unless you have an auditing or an AD monitoring software that will log all auditing attempts to an external party and tell you where exactly the user is coming from, it’s a not an easy task to find out where is this taking place.  

Solution: 

1- Enabling Relevant Logs

In order for this to work, you’ll need to enable some Auditing logs on the Default Domain Controller Group Policy

Go to  >> Computer Configuration >> Windows Settings >> Security Settings >> Advanced Audit Policy Configuration >> Audit Policies >> Account Management >> Double Click on Audit User Account and enable both Success and Failure.

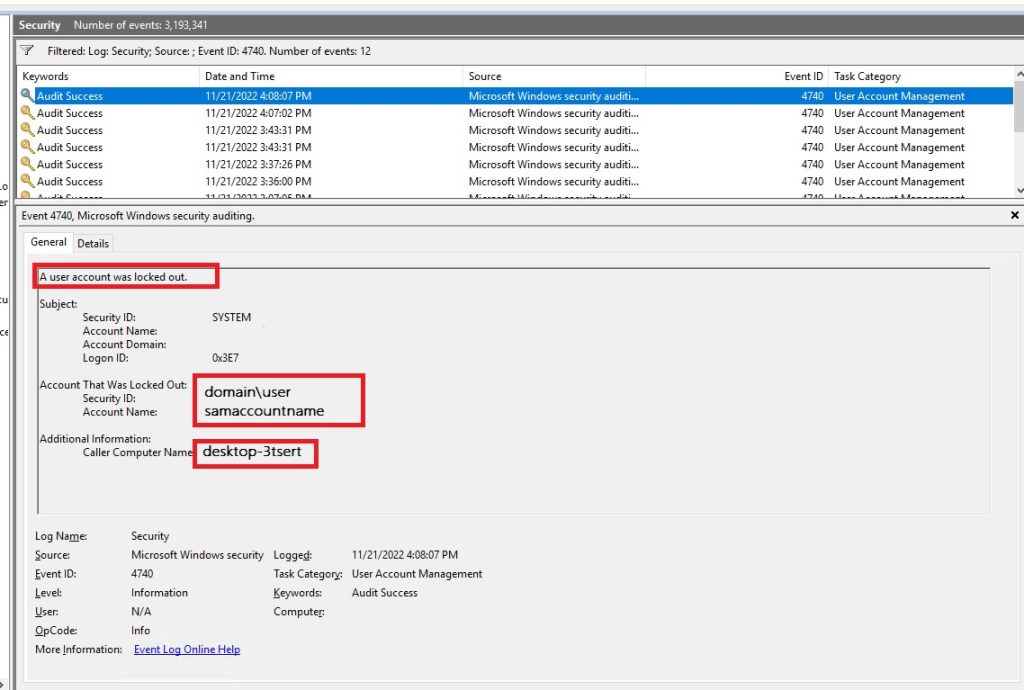
Once you applied this policy, you’ll need to force update your DCs , Sign out and back in and you’ll start noticing that in Event Viewer / Security the event 4740 and 4625 will start appearing .

The event 4740 will show you the locked user and the machine it tried to login from. 

The event 4625 will show you the path to the process/application that tried to login with your account. 

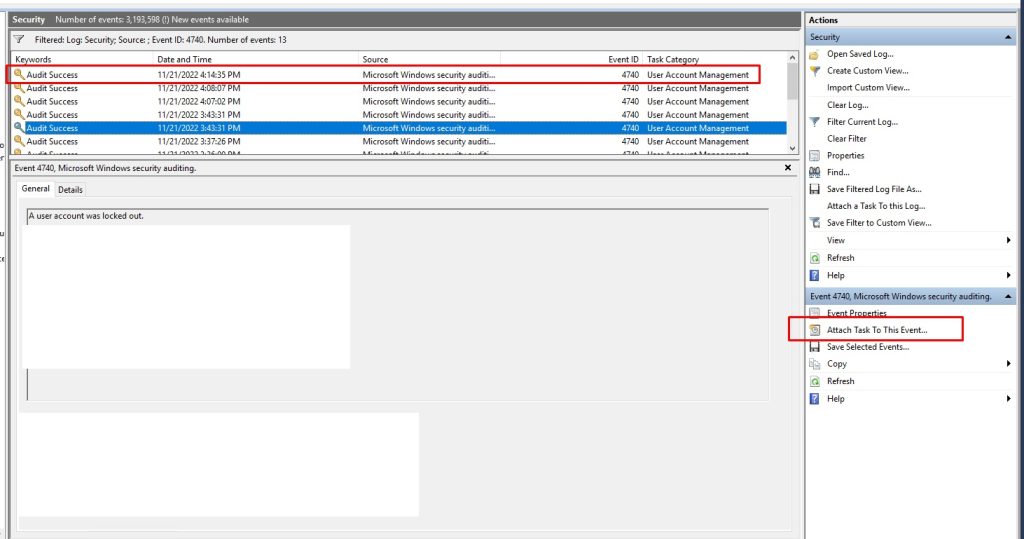
So to make this more benefitial I ended up writing a script that will get triggered by Task Scheduler in the case of Event 4740 being reported.

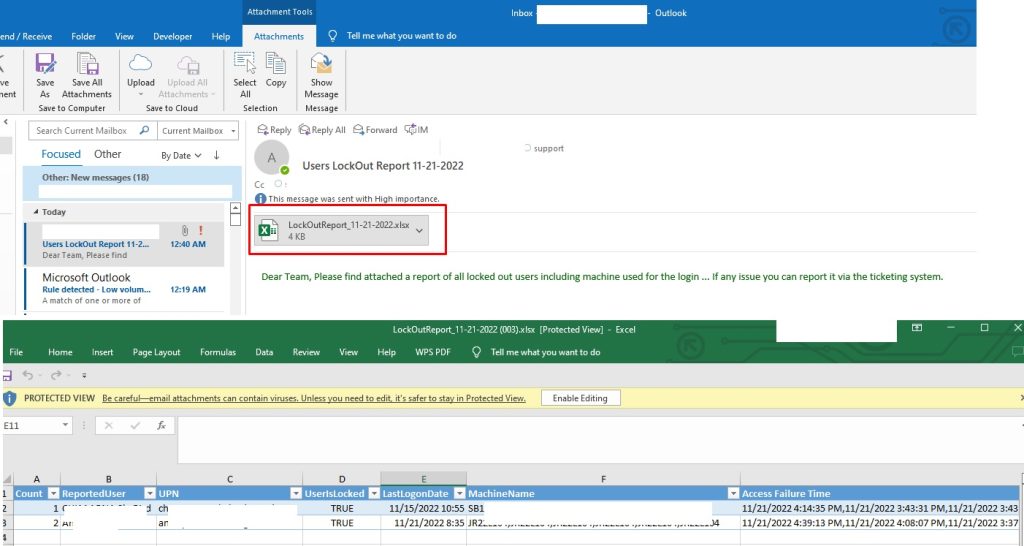
The script will search AD for any locked account. will scan the Logs for the user’s event and find the machine the user tried to login from and generate a report with all these details then send it to a target email in Excel forma after converting it using ImportExcel module.

Note that you must have a local SMTP Server for the email to be sent. If not you can just get the CSV and send it manually. 


2- Finding the relevant event

3- Finally The script

The script is simple so feel free to modify it, improve it or share it with others. 

Almost done
Script below 80%

#Report NTLM Authentication Failure for users
$ReportTime = ([datetime]::Today).ToString(“MM-dd-yyyy”)

#Generate report
$Report = [System.Collections.Generic.List[Object]]::new()

$LockedAccount = (Search-ADAccount -LockedOut -UsersOnly)
$i = 0
foreach ($User in $LockedAccount){

$i ++
Write-Progress -Activity “Gathering Logon info” -Status “Checking Login info for: $($User.Name)” -PercentComplete (($i / ($LockedAccount | Measure-Object).Count) * 100)
if($User.LockedOut){

$Event = Get-WinEvent -FilterHashtable @{ logname = ‘Security’; id = 4740 } -MaxEvents 500 | Select-Object TimeCreated,
@{ Name=’TargetUserName’; Expression={$_.Properties[0].value}},
@{ Name=’LogonMachine’; Expression={$_.Properties[1].value}} | Where {$_.TargetUserName -eq $User.SamAccountName}
}

$ReportLine = [PSCustomObject][Ordered]@{
Count = $i
ReportedUser = $User.Name
UPN = $User.UserPrincipalName
UserIsLocked = $User.LockedOut
LastLogonDate = $user.Lastlogondate
MachineName = $Event.LogonMachine -join ‘,’
‘Access Failure Time’ = $Event.TimeCreated -join ‘,’
‘Report Date’ = $ReportTime
}
$Report.Add($ReportLine)
}

$MailBody = “
<html><body>
<font color=’006400′> Dear Team, `
Please find attached a report of all locked out users including machine used for the login … `
If any issue you can report it via the ticketing system.</font>
<body><html>

#Eexport in CSV
$Report | Export-csv “C:\Reports\LockOutReport_$ReportTime.cscv” -NoTypeInformation

#Eexport in Excel Format
$Report | Export-Excel “C:\Reports\LockOutReport_$ReportTime.xlsx” -WorksheetName LogonFailure -TableName LogonFailure -AutoSize

$Exported = “C:\Reports\LockOutReport_$ReportTime.xlsx”

$CC = @(‘User2@domain.com’)
#
Get-ChildItem $Exported | send-mailmessage -from “system@domain.com” -to “user1@domain.com” -cc $cc -subject “Users LockOut Report $ReportTime” -body “$MailBody” -Priority High -smtpServer relay.domain.com -BodyAsHtml

Link to Github:


https://github.com/moh30ly/powershell/blob/main/ActiveDirectoryLockOutNotification

4- Attach Task to an Event

5- Get The Report

Checking and Providing Full and SendAs delegate access on O365 Exchange Online

Delegate Permissions

This is a code that I have wrote recently to check if an account have Full and SendAs access on target mailboxes in CSV and give the option to choose whether to provide this access or not.

Checking First:

You’ll need to provide two things to get this code working, First the Source account that will need access to the mailboxes. in this case referred to as “ServiceAccount”.

CSV List of Mailbxoes:

You’ll need to provide list of Mailboxes of the users you’d like to provide access to, the List must be user’s Identity either UPN or SMTP would be fine.

The Service account’s Identity must be the UPN attribute.

If you would like to improve this code please do comment or get in touch directly

Thanks

#Connect to Exchange
#Connect & Login to ExchangeOnline (MFA)

try
{
    Get-Clutter -Identity user@domain.com -ErrorAction Stop > $null
}
catch 
{
Connect-ExchangeOnline
}

    $Users = import-csv 'C:\CSV\MailboxListIsHere.csv'
    $ServiceAccount = 'Your Account that will access other Mailboxes' #// Please change the SVC account before running the code
    

        foreach ($User in $users)
        {
            $Mailbox = $User.Identity
            
            #Checking Full Access
            $Full = Get-MailboxPermission -Identity $Mailbox -User $ServiceAccount
            If ($Full.AccessRights -eq "FullAccess")
            {
                Write-Host -f Green $($ServiceAccount) "Already has Full access to $Mailbox."}
            
                    Else
                    {
                        $Answer1 = Read-Host "Do you want to assign $($ServiceAccount) Full access to $Mailbox (Yes or No)"
                        If ($Answer1 -eq "Yes")
                            {
                                Try{
                                    Add-MailboxPermission -Identity $Mailbox -User $ServiceAccount -AccessRights FullAccess
                                    Write-Host -f DarkGreen $($ServiceAccount) "Send-as access has been added to $Mailbox"
                                    }
                           
                            Catch{ ($Full.AccessRights -eq "FullAccess")}
                            
                        }
                        
                    }
                
                $SendAs = Get-RecipientPermission -Identity $Mailbox -Trustee $ServiceAccount -AccessRights SendAs
                if($SendAs.AccessRights -eq "SendAs") {
                    Write-Host -f Green $($ServiceAccount) "Already has SendAs access to $Mailbox."
                    }
                    Else
                    {
                        $Answer2 = Read-Host "Do you want to assign $($ServiceAccount) Send-as access to $Mailbox (Yes or No)"
                        If ($Answer2 -eq "Yes")
                            {
                                Try{
                                    Add-RecipientPermission -Identity $Mailbox -AccessRights SendAs -Trustee $ServiceAccount
                                    Write-Host -f Green $($ServiceAccount) "has Send-as access on $Mailbox"
                                }
                            Catch{($SendAs.AccessRights -eq "Sendas")}}
                            else{Exit}
                        }
                    }
        }


Retrieving attachments from Exchange mailbox using python

Story:

I got a request from a client who constantly gets CVs and have to download them for the hiring managers to review them and wanted to get some way an automated mechanism of downloading all those emails.

Googling lead me to the exchangelib project which is a great python source for such a purpose. I built my local lab of the following servers to test it

  1. AD 2016 moh10ly.local
  2. Exchange 2016 = exch01.moh10ly.local
  3. AAD = Another 2016 server to test from

I built my local Certification authority and made sure that all servers has the CA installed to avoid any issues on python.

If you are going to use this on your production environment you can basically install Python anywhere even on your own computer and it should work if EWS is exposed and Autodiscover is configured propely and have a valid and trusted 3rd party Certificate.

However, If you would like to schedule this to work on a daily basis and let it download attachments from mailbox then you’ll need a server or at least a computer to rely on that it would be on when the scheduled task works.

Prerequisites :

Windows Server 2016:

  • Download and install latest version of Python 3.10
  • From CMD run the following cmd
    • Pip install exchangelib
    • Pip install exchangelib[kerberos]
    • Pip install exchangelib[sspi]
  • Download and install MIT Kerberos MSI from https://web.mit.edu/KERBEROS/dist 64bit version
  • If you’re doing this on a local Lab without a trusted 3rd certificate you’ll need to make sure to export your certificatation Authority Certificate in CER format, copy the cert and add it to the end of Python root PEM.

Testing Scenario

  • I created two mailboxes on my local Exchange server lab
  • I have sent myself an email to info@moh10ly.com with 3 attachments in it as you can see.
  • Setup a server to use to download all attachments from the mailbox.

Prepare your Python Script

  • Import Packages in order to use them.

from exchangelib import DELEGATE, IMPERSONATION, Account, Credentials, EWSDateTime, EWSTimeZone, Configuration, NTLM, GSSAPI, CalendarItem, Message, Mailbox, Attendee, Q, ExtendedProperty, FileAttachment, ItemAttachment, HTMLBody, Build, Version, FolderCollection
  • Prepare Credentials of the user you would like to retrieve the attachments from.
credentials = Credentials(username='moh10ly\info', password='Bc12345$')
  • Enter your Exchange server configuration. Since autodiscover didn’t work for me as I don’t have a public certifiate so I went ahead and placed the server configuration.
ews_url = 'https://mail.moh10ly.com/EWS/exchange.asmx'
ews_auth_type = 'NTLM'
primary_smtp_address = 'info@moh10ly.com'
config = Configuration(service_endpoint=ews_url, credentials=credentials, auth_type=ews_auth_type)
  • Place the account type and configuration
account = Account(
primary_smtp_address=primary_smtp_address,
config=config, autodiscover=False,
access_type=DELEGATE)
  • Configure the local path of where you want to save attachments to on the server where this code is going to be launched from. in my code example I have created a folder called “Temp” on the C root drive and that’s what I will use.
  • You can pickup a different local path by changing the /temp path in the line “local_path = os.path.join(‘/temp‘, attachment.name)”
import os.path
from exchangelib import Account, FileAttachment, ItemAttachment, Message

some_folder = account.inbox 
for item in some_folder.all():
    for attachment in item.attachments:
        if isinstance(attachment, FileAttachment):
            local_path = os.path.join('/temp', attachment.name)
            with open(local_path, 'wb') as f:
                f.write(attachment.content)

This by now should be working fine and you should see that it is saving all your mailbox attachments to the folder that you have configured in the path section of the code.

Complete code to run

Working config


from exchangelib import DELEGATE, IMPERSONATION, Account, Credentials, EWSDateTime, EWSTimeZone, Configuration, NTLM, GSSAPI, CalendarItem, Message, Mailbox, Attendee, Q, ExtendedProperty, FileAttachment, ItemAttachment, HTMLBody, Build, Version, FolderCollection


credentials = Credentials(username='moh10ly\info', password='Bc12345$')

ews_url = 'https://mail.moh10ly.com/EWS/exchange.asmx'
ews_auth_type = 'NTLM'
primary_smtp_address = 'info@moh10ly.com'
config = Configuration(service_endpoint=ews_url, credentials=credentials, auth_type=ews_auth_type)


account = Account(
primary_smtp_address=primary_smtp_address,
config=config, autodiscover=False,
access_type=DELEGATE)

import os.path
from exchangelib import Account, FileAttachment, ItemAttachment, Message

some_folder = account.inbox 
for item in some_folder.all():
    for attachment in item.attachments:
        if isinstance(attachment, FileAttachment):
            local_path = os.path.join('/temp', attachment.name)
            with open(local_path, 'wb') as f:
                f.write(attachment.content)


-----------------

#To download all attachments in the inbox:

for item in account.inbox.all():
    for attachment in item.attachments:
        if isinstance(attachment, FileAttachment):
            local_path = os.path.join('/sky', attachment.name)
            with open(local_path, 'wb') as f, attachment.fp as fp:
                buffer = fp.read(1024)
                while buffer:
                    f.write(buffer)
                    buffer = fp.read(1024)
            print('Saved attachment to', local_path)

Hope this have helped you

References:

https://towardsdatascience.com/download-email-attachment-from-microsoft-exchange-web-services-automatically-9e20770f90ea

Check under attachments:

https://ecederstrand.github.io/exchangelib/

https://pypi.org/project/exchangelib/

Troubleshoot cert issue

https://stackoverflow.com/questions/51925384/unable-to-get-local-issuer-certificate-when-using-requests-in-python

With graph

https://techcommunity.microsoft.com/t5/identity-authentication/what-oauth-permissions-needed-for-exchangelib/m-p/2858179

Testing Office 365 SMTP relay

In order to test Office 365 SMTP relay you will have to create a user with an Exchange online license. After the email is activated for this user you can test this user for relay with the following powershell.

First connect to Microsoft Online service with this user that you’ll be using for relaying.

$msolcred = Get-Credential

Next edit the following powershell with the user’s e-mail and the recipient’s too

Send-MailMessage -From Office365User@Domain.com -To info@moh10ly.com -Subject “Test Email” -Body “Test SMTP Relay Service” -SmtpServer smtp.office365.com -Credential $msolcred -UseSsl -Port 587

clip_image001
clip_image002

https://technet.microsoft.com/en-us/library/dn554323(v=exchg.150).aspx

This test is known as Client SMTP submission you can also use a different method for multiple devices where you can configure them all to point to a single server (IIS) in a method known as IIS for relay with Office 365 however, all the methods what involve office 365 (Only) for relay will require a user with Exchange online license assigned to it.

https://technet.microsoft.com/en-us/library/dn592151%28v=exchg.150%29.aspx

Note:

The use of this command is not recommended for security reasons in particular for not supporting the modern protocols. use it on your own risk and make sure the user assigned to this service has no privilege’s or not any Office 365 feature admin or power user.

Securing and Testing your Exchange Server with Pfsense HAProxy

– Using the CVE-2021-26855 Payload

After the recent vulnerabilities that hit Exchange Servers On-premises I found sometime to install KaliLinux and try to check what kind of information would I get from the patched servers.

I downloaded the payloads and tried to run it against couple of clients that I have patched the servers for luckily no authentication was made.

image

– Using Nikto scanner

By using Nikto command from Kali Linux I could see what  Information could Exchange expose using

The command line is nikto –h mail.domain.com and the result of the scan would be exposing the Server’s name, local IP address, OWA Version,  ASP Net platform and version.

image

Since I have my Exchange Server published via HAProxy 1.8 on Pfsense then I had to tweak HAProxy to strengthen the ciphers, make sure that HSTS is in place and deny the headers that expose the server’s sensitive information.

The result is pretty good as it also has affected the server’s score on ssllabs.com

Prior to the tweaking  my owa scan result on SSL Labs would get an A

image

– Pfsense’s HAProxy Settings before

Before upgrading Pfsense to the latest version HAProxy was on 1.6 and the ssl/tls settings were also different as they were setup through the Advanced SSL options on the frontend however, now this is no longer supported and you’ll have to remove that and set it up on the “Global Advanced pass thru” in the General setting page.

ssl-default-bind-options ssl-min-ver TLSv1.2

tune.ssl.default-dh-param 2048

ssl-default-bind-ciphers ECDHE-RSA-AES128-GCM-SHA256:ECDHE-ECDSA-AES128-GCM-SHA256:ECDHE-RSA-AES256-GCM-SHA384:ECDHE-ECDSA-AES256-GCM-SHA384:DHE-RSA-AES128-GCM-SHA256:DHE-DSS-AES128-GCM-SHA256:kEDH+AESGCM:ECDHE-RSA-AES128-SHA256:ECDHE-ECDSA-AES128-SHA256:ECDHE-RSA-AES128-SHA:ECDHE-ECDSA-AES128-SHA:ECDHE-RSA-AES256-SHA384:ECDHE-ECDSA-AES256-SHA384:ECDHE-RSA-AES256-SHA:ECDHE-ECDSA-AES256-SHA:DHE-RSA-AES128-SHA256:DHE-RSA-AES128-SHA:DHE-DSS-AES128-SHA256:DHE-RSA-AES256-SHA256:DHE-DSS-AES256-SHA:DHE-RSA-AES256-SHA:!aNULL:!eNULL:!EXPORT:!DES:!RC4:!3DES:!MD5:!PSK

image

Right after you save this, you will still need to change another settings on the Frontend to protect your server’s information from being exposed.

In the HAProxy settings Go to Frontend > Scroll down all the way to “Advanced pass thru” and paste the following:

image

# Remove headers that expose security-sensitive information.

rspadd X-Frame-Options:\ SAMEORIGIN
rspidel X-FeServer:.*$
rspidel ^Server:.*$
rspidel ^X-Powered-By:.*$
rspidel ^X-AspNet-Version:.*$
rspidel X-WsSecurity-Enabled:.*$
rspidel X-WsSecurity-For:.*$
rspidel X-OAuth-Enabled:.*$
rspadd X-Xss-Protection:\ 1;\ mode=block
rspadd Strict-Transport-Security:\ max-age=31536000;includeSubDomains;preload
rspadd Referrer-Policy:\ no-referrer-when-downgrade
rspidel Request-Id:.*$
rspidel X-RequestId:.*$
rspadd X-Content-Type-Options:\ nosniff


In the below result, I have got almost everything protected well except for the OWA version which can be a bit problematic. In the next article I am going to try and mitigate this so the server can be protected in the expected manner.

image

image

– The Result

Now the server is showing a totally different result and the Nikto scan is not revealing anything anymore.

SSLabs

image

https://securityheaders.com/

The reason why I got B on security headers is due to the fact that Content-Security-Policy header will malfunction the ECP and OWA Login pages. Permission Policy is new feature and I couldn’t find anything about it on HAProxy.

image

I hope this helps

Refences:

https://securityheaders.com/

https://www.ssllabs.com/

https://www.haproxy.com/documentation/aloha/12-0/traffic-management/lb-layer7/http-rewrite/

https://www.net7.be/blog/article/xss_csrf_http_security.html

Exchange Server backdoor investigation tools

The Story

After the disastrous exploit that was found in Microsoft Exchange Servers lots of corporations started immediately patching their servers with the latest Cumulative update and Security patches. The question is would those patches be enough if the server is already hacked or have a backdoor installed already?

image

What are those 0-day exploits ?

The vulnerabilities recently being exploited were CVE-2021-26855, CVE-2021-26857, CVE-2021-26858, and CVE-2021-27065 which are part of alleged “State-sponsored Chinese group” according to Microsoft.

Let’s get into details of those exploits one by one:

CVE-2021-26855 is a server-side request forgery (SSRF) vulnerability in Exchange which allowed the attacker to send arbitrary HTTP requests and authenticate as the Exchange server.

CVE-2021-26857 is an insecure deserialization vulnerability in the Unified Messaging service. Insecure deserialization is where untrusted user-controllable data is deserialized by a program. Exploiting this vulnerability gave HAFNIUM the ability to run code as SYSTEM on the Exchange server. This requires administrator permission or another vulnerability to exploit.

CVE-2021-26858 is a post-authentication arbitrary file write vulnerability in Exchange. If HAFNIUM could authenticate with the Exchange server then they could use this vulnerability to write a file to any path on the server. They could authenticate by exploiting the CVE-2021-26855 SSRF vulnerability or by compromising a legitimate admin’s credentials.

CVE-2021-27065 is a post-authentication arbitrary file write vulnerability in Exchange. If HAFNIUM could authenticate with the Exchange server then they could use this vulnerability to write a file to any path on the server. They could authenticate by exploiting the CVE-2021-26855 SSRF vulnerability or by compromising a legitimate admin’s credentials.

How to proceed ?

Microsoft released couple of tools that could diagnose your servers and check if you already have been infected with a backdoor or any of these nasty malware and also remove those infected files or clean them and ask you for a restart if it’s required.

Tools:

  1. MSERT (Microsoft Safety Scanner) detects web shells, Download here .
  2. Health Checker (Scans your server for any vulnerabilities and whether you have updated Server CU and installed patches). Download here
  3. Exchange WebShell Detection (A simple PowerShell that is fast and checks if your IIS or Exchange directory has been exploited). Download here
  4. Scan your exchange server for proxy logon:
    https://github.com/microsoft/CSS-Exchange/tree/main/Security
  5. Microsoft very recently created a mitigation tool for Exchange on-premises that would rewrite url for the infected servers and recover the files that were changed. You can download the tools from this github link.

    https://github.com/microsoft/CSS-Exchange/tree/main/Security

    Copy the Test-ProxyLogon code into Notepad
    Save As “Test-ProxyLogon.ps1” with the quotes in your C:\Temp folder
    Run in Exchange Management Shell: .\Test-ProxyLogon.ps1 -OutPath C:\Temp

Scan Result

Scan result should show you the following if your servers has been exploited already.

This will remove the infections and asks for a restart.

clip_image001

References:

https://www.microsoft.com/security/blog/2021/03/02/hafnium-targeting-exchange-servers/

https://www.bleepingcomputer.com/news/security/microsoft-exchange-updates-can-install-without-fixing-vulnerabilities/

https://github.com/dpaulson45/HealthChecker?mkt_tok=eyJpIjoiTURRMk5HRTFaV1V6TkRrMCIsInQiOiJcL3ZOTkRUVzdXdkJmTm5ibUIzTExKTDVxXC9ObFAxTmZLanFRZ0xpcDkxMW5raVE0dlRwV2FhVFFmWlVUVFZaZUdFM1NlcEFNTEZ6dTh5aWlqcVBpV3J2R2IxbGJxMmNUZ1ppYjJyZklnMjZFZngrM2tBUnNsM1JKcHJsSU1ib3BTIn0%3D#download

Secure Your DNS Traffic with the outside world

DoH in Microsoft Windows OS

Until this moment Microsoft Windows OS doesn’t support DNS over HTTPS, The feature will most likely be implemented in future builds but no body knows when is that however, You can still take a peak into the feature which is in preview mode/

No alt text provided for this image

Benefit of using DoH on an OS level

The benefit of using DoH on an Operating System level would provide more certainty that your DNS queries leave your computer without being read by any other party even if that is your ISP.

A simple DNS nslookup query using Wireshark on your computer would show you how serious this topic is. After installing Wireshark you’ll be able to see that all of your dns queries are in clear text and can be read by anyone until it gets to the destination website/server.

Demonstration of DNS lookup without DoH

After installing Wireshark, I fire up Powershell or CMD and try to nslookup google.com and it’ll show what I just queried for.

No alt text provided for this image

So how to make sure that your DNS queries don’t leave your computer in clear text format? and since Microsoft OS is not DoH ready yet what can you do?

In my case, I am already using encrypted DNS on firewall level as I have Pfsense acting as a router and it already supports DoH but still not pretty satisfied :).

DNSCrypt as a solution

Since the foundation of DoH I have been looking for a solution that would work on Microsoft Windows OS and luckily someone already created this great project called Simple DNSCrypt which not just enables the encryption of DNS queries on your OS but also enables this to work as a service.

No alt text provided for this image

Installing DNSCrypt would create a Windows based Service which would start automatically when your OS boots and logs into Windows.

The service is called DNSCrypt Client Proxy

Add alt textNo alt text provided for this image

DNSCrypt has a simple interface, You can pick up the DNS Server where to forward queries to and it works with proof.

Right after the installation of this tiny app, launch it as an administrator and configure it as in the below screenshot. You can choose to install the service or not.

Add alt textNo alt text provided for this image

Right after you enable it (By clicking on your Network Card box) that will start protecting your DNS queries. Let’s go ahead with a little demo

I am going to start Wireshark after enabling DnsCrypt and do a google dns lookup , As you can see below on wireshark it’s not returning any dns queries.

No alt text provided for this image

When you install Simple DNSCrypt it changes your Preferred DNS configuration to localhost so that all queries is passed through the app in DNS over HTTPS which doesn’t allow even Wireshark to see it as DNS.

So that makes it pretty secure and not even your firewall will see it.

If you have any question please don’t hesitate to ask me

Official DNScrypt website https://simplednscrypt.org/

Support the project founder https://github.com/bitbeans/SimpleDnsCrypt