Secure Zammad with LetsEncrypt Certıfıcate on Ubuntu 20.4 Apache

The Story

after installing Zammad ticketing system I tried to implement Let’sEncrypt certificate to secure the system but there was nothing available on the internet except an old article about implementing this on Ubuntu 16 with Nginx (see article here).

In my case I was using apache and no Nginx in place, and after installing Zammad it was using pretty fine on Http but needed to redirect http to HTTPS after implementing the certificate.

Zammad: Intuitive Service Desk with connection to i-doit | i-doit

Solution:

I first Installed Certbot for apache and then I took a backup of all my Zammad configuration and made sure not to alter the default Zammad directory.

So I created a dummy folder called /var/www/support and a file called /var/www/support/index.html within that folder and provided them the appropriate permissions.

sudo apt install certbot python3-certbot-apache

 sudo mkdir /var/www/support

sudo chown -R $USER:$USER /var/www/support

sudo chmod -R 755 /var/www/support

sudo nano /var/www/support/index.html


Edit the index.html file with the following to make sure that it works

<html>
             <head>
                         <title>Welcome to Your_domain!</title>
             </head>
             <body>
                       <h1>Success! The your_domain virtual host is working!</h1>
           </body>
</html>

image

image

Edit Zammad’s Default Config File

Please make sure you take a move the original copy of Zammad file to another location using the following command

sudo mv /etc/apache2/sites-enabled/zammad.conf /etc/apache2/sites-enabled/zammad.bak

Then we’ll replace the file with this configuration but since we moved the original file to .bak then we’ll have to recreate it with our intended configuration.

Edit a new zammad.conf file and copy the configuration below

sudo vi /etc/apache2/sites-enabled/zammad.conf

Configuration starts below this:

#

# this is the apache config for zammad

#

# security – prevent information disclosure about server version

#ServerTokens Prod

<VirtualHost *:8080> # I changed the default port of Zammad to 8080 to allow Letsencrypt to connect on 80 and create the certificate

# replace ‘localhost’ with your fqdn if you want to use zammad from remote

ServerName localhost:8080

## don’t loose time with IP address lookups

HostnameLookups Off

## needed for named virtual hosts

UseCanonicalName Off

## configures the footer on server-generated documents

ServerSignature Off

ProxyRequests Off

ProxyPreserveHost On

<Proxy 127.0.0.1:3000>

Require local

</Proxy>

ProxyPass /assets !

ProxyPass /favicon.ico !

ProxyPass /apple-touch-icon.png !

ProxyPass /robots.txt !

ProxyPass /ws ws://127.0.0.1:6042/

ProxyPass / http://127.0.0.1:3000/

— INSERT — 10,38 Top

DocumentRoot “/opt/zammad/public”

<Directory />

Options FollowSymLinks

AllowOverride None

</Directory>

<Directory “/opt/zammad/public”>

Options FollowSymLinks

Require all granted

</Directory>

</VirtualHost>

<VirtualHost *:80>

ServerName support.cloud-net.tech

DocumentRoot /var/www/support

ErrorLog ${APACHE_LOG_DIR}/error.log

CustomLog ${APACHE_LOG_DIR}/access.log combined

</VirtualHost>

– ————————-

In the above configuration we did two things:

1- Replacing the original Zammad listening port instead of 80 to 8080

2- Created a new virtual host that points to our dummy folder /var/www/support

Save the file and exit from vi

Make sure you restart Apache after this

sudo systemctl restart apache2

Enable the new site configuration

sudo a2ensite zammad.conf

Lets create the certificate

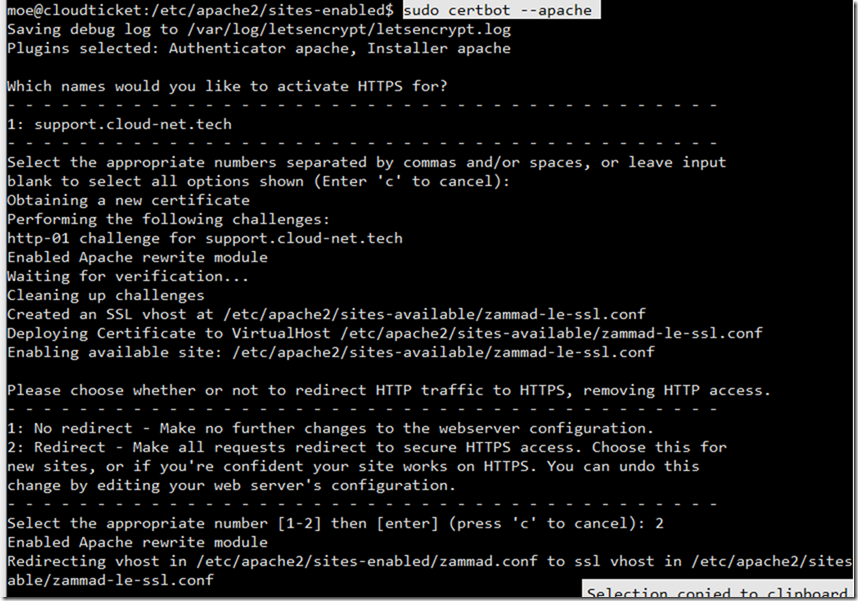
In the below commands , the first one will drive you through the process of getting the certificate.

The second checks the status of the configuration of the auto renewal script certbot and third command tests the renewal of the certificate.

1- sudo certbot –apache

2- sudo systemctl status certbot.timer

3- sudo certbot renew –dry-run

As you can see in the below screenshot the command also asks you if you’d like to redirect all http traffic to HTTPS. You should want to say Y to that.

clip_image001

clip_image001[4]

When you accept creating Redirection rule from HTTP to HTTPs the main Zammad config will get that configuration which wont work in that case because we already changed the default zammad port to 8080.

So you’ll need to get into that zammad.conf that you created again and enter the redirection portion

image

# this is the apache config for zammad
#


# security – prevent information disclosure about server version
#ServerTokens Prod


<VirtualHost *:8080>
     # replace ‘localhost’ with your fqdn if you want to use zammad from remote
     ServerName support.cloud-net.tech:8080


    ## don’t loose time with IP address lookups
     HostnameLookups Off


    ## needed for named virtual hosts
     UseCanonicalName Off


    ## configures the footer on server-generated documents
     ServerSignature Off


    ProxyRequests Off
     ProxyPreserveHost On


    <Proxy 127.0.0.1:3000>
         Require local
     </Proxy>


    ProxyPass /assets !
     ProxyPass /favicon.ico !
     ProxyPass /apple-touch-icon.png !
     ProxyPass /robots.txt !
     ProxyPass /ws ws://127.0.0.1:6042/
     ProxyPass /
http://127.0.0.1:3000/


    # change this line in an SSO setup
     RequestHeader unset X-Forwarded-User


     DocumentRoot “/opt/zammad/public”


    <Directory />
         Options FollowSymLinks
         AllowOverride None
     </Directory>


    <Directory “/opt/zammad/public”>
         Options FollowSymLinks
         Require all granted
     </Directory>


RewriteEngine on
RewriteCond %{SERVER_NAME} =support.cloud-net.tech
RewriteRule ^
https://%{SERVER_NAME}%{REQUEST_URI} [END,NE,R=permanent]

<VirtualHost *:80>
     ServerName support.cloud-net.tech
RewriteEngine on
RewriteCond %{SERVER_NAME} =support.cloud-net.tech
RewriteRule ^
https://%{SERVER_NAME}%{REQUEST_URI} [END,NE,R=permanent]
</VirtualHost>

image

Note:

You need to make sure that you have enabled port 443 on your Firewall and changed the main protocol of Zammad to HTTPs

To do so you’ll need to get into the Zammad portal > Settings > System > Http Type and change that to HTTPS.

image

That’s it, my example here worked as expected and now my traffic is automatically getting redirected to https.

image

Hope this helps anyone looking for such configuration.

Please consider donating to this Bitcoin account if you like this article or website.

image

Secure Your DNS Traffic with the outside world

DoH in Microsoft Windows OS

Until this moment Microsoft Windows OS doesn’t support DNS over HTTPS, The feature will most likely be implemented in future builds but no body knows when is that however, You can still take a peak into the feature which is in preview mode/

No alt text provided for this image

Benefit of using DoH on an OS level

The benefit of using DoH on an Operating System level would provide more certainty that your DNS queries leave your computer without being read by any other party even if that is your ISP.

A simple DNS nslookup query using Wireshark on your computer would show you how serious this topic is. After installing Wireshark you’ll be able to see that all of your dns queries are in clear text and can be read by anyone until it gets to the destination website/server.

Demonstration of DNS lookup without DoH

After installing Wireshark, I fire up Powershell or CMD and try to nslookup google.com and it’ll show what I just queried for.

No alt text provided for this image

So how to make sure that your DNS queries don’t leave your computer in clear text format? and since Microsoft OS is not DoH ready yet what can you do?

In my case, I am already using encrypted DNS on firewall level as I have Pfsense acting as a router and it already supports DoH but still not pretty satisfied :).

DNSCrypt as a solution

Since the foundation of DoH I have been looking for a solution that would work on Microsoft Windows OS and luckily someone already created this great project called Simple DNSCrypt which not just enables the encryption of DNS queries on your OS but also enables this to work as a service.

No alt text provided for this image

Installing DNSCrypt would create a Windows based Service which would start automatically when your OS boots and logs into Windows.

The service is called DNSCrypt Client Proxy

Add alt textNo alt text provided for this image

DNSCrypt has a simple interface, You can pick up the DNS Server where to forward queries to and it works with proof.

Right after the installation of this tiny app, launch it as an administrator and configure it as in the below screenshot. You can choose to install the service or not.

Add alt textNo alt text provided for this image

Right after you enable it (By clicking on your Network Card box) that will start protecting your DNS queries. Let’s go ahead with a little demo

I am going to start Wireshark after enabling DnsCrypt and do a google dns lookup , As you can see below on wireshark it’s not returning any dns queries.

No alt text provided for this image

When you install Simple DNSCrypt it changes your Preferred DNS configuration to localhost so that all queries is passed through the app in DNS over HTTPS which doesn’t allow even Wireshark to see it as DNS.

So that makes it pretty secure and not even your firewall will see it.

If you have any question please don’t hesitate to ask me

Official DNScrypt website https://simplednscrypt.org/

Support the project founder https://github.com/bitbeans/SimpleDnsCrypt

Mimecast trust cert hacked in Microsoft supply chain

image

The Threatpost.com and other cyber security news published articles claiming that A Mimecast-issued certificate used to authenticate some of the company’s products to Microsoft 365 Exchange Web Services has been “compromised by a sophisticated threat actor,” the company has announced.

Office 365 Products and Services Explained

Mimecast provides email security services that customers can apply to their Microsoft 365 accounts by establishing a connection to Mimecast’s servers. The certificate in question is used to verify and authenticate those connections made to Mimecast’s Sync and Recover (backups for mailbox folder structure, calendar content and contacts from Exchange On-Premises or Microsoft 365 mailboxes), Continuity Monitor (looks for disruptions in email traffic) and Internal Email Protect (IEP) (inspects internally generated emails for malicious links, attachments or for sensitive content).

A compromise means that cyberattackers could take over the connection, though which inbound and outbound mail flows, researchers said. It would be possible to intercept that traffic, or possibly to infiltrate customers’ Microsoft 365 Exchange Web Services and steal information.

Reference:

https://threatpost.com/mimecast-certificate-microsoft-supply-chain-attack/162965/

https://www.crn.com/news/security/hackers-compromise-mimecast-certificate-for-microsoft-authentication

3- Migrate Users from Skype for Business 2015 to Teams


Hybrid Integration

In my last post about Skype for Business / Office 365 Skype for Business Online/Teams migration article I discussed the steps of how to create a hybrid environment between Skype for Business on-premises and went through the troubleshooting of each issue I have been through. In this article I am going to discuss the migration of users from on-premises to the cloud through UI and PowerShell.

Migrating users

This article will assume that you are planning to migrate users from Skype for Business Frontend 2015 Server and that you already have a hybrid configuration in place. If so then you’re going to fulfill the following prerequisites:

To check the currently installed PowerShell run the following cmdlet

$PSVersionTable

clip_image001

After you Download and install PowerShell 5.1 you might need to restart the server. In which case the PowerShell will show that it is updated to the required version.

image

After Installing the Skype Online Connector Module, We will be able to connect right after launching PowerShell

To do so type:

Import-Module SkypeOnlineConnector

image

Connecting to Office 365 (Teams Online or Skype for Business Online)

The process of connecting to Office 365 Online PowerShell sounds easy but with MFA enforced in your environment you’ll have a nightmare mix of errors when you try so.

I have came through a lot of errors trying to force the use of PowerShell with MFA user authentication but eventually came to realize that Microsoft still does not support MFA for some cmdlets like Move-CsUser for instance.

So In short, to connect you’ll need to have a global or Teams admin user with MFA disabled to do so.

To create a new Skype Online Session enter:

– Make sure you start the regular PowerShell as admin and not Skype for Business Management Shell.

If you run these commands from SfB Management Shell you’ll get an error

image

So first, We will import the Skype Online connector Module

Import-Module SkypeOnlineConnector

image

Then get the OverRidePowershell URI using the command:

Get-CsOnlinePowerShellEndPoint

image


Next, We will connect and authenticate to our tenant using the following cmdlet

$sfbsess = New-CsOnlineSession -Username User@domain.onmicrosoft.com -OverRidePowerShellUri https://admin4a.online.lync.com/OcsPowershellOAuth –Verbose

image

Moving Users to Teams

To Move users to Office 365, You need to first provide credentials of the User with MFA disabled and then use the command Move-CsUser

An Example:

$Creds = Get-Credential

image

Moving User

Move-CsUser –Identity user@domain.com –target “sipfed.online.lync.com” –hostedMigrationOverRideUri https://admin4a.online.lync.com/HostedMigration/hostedmigrationservice.svc –ProxyPool “YourFEPool.Domain.local” –Credential $Creds

image

Let’s check the status of the migrated user, The hosting provider attribute is what we care about as it tells us where the user is homed at.

image


Checking the user from Teams Portal

Users seems to be licensed, online and can now login using the Microsoft Teams app.

image

Bulk Enable Users and assign Tel URI numbers to them

In case you have a big number of users that you want to enable them online

# Please provide your O365 admin credential

$creds = Get-Credential

-PSSession (New-CsOnlineSession $cred) -AllowClobber

$csv = Import-csv “C:\Users\Mohammed\users.csv”

ForEach ($user in $csv) {

Write-host now enabling $user.alias

Move-CsUser –Identity $user.alias –target “sipfed.online.lync.com” –hostedMigrationOverRideUri https://admin4a.online.lync.com/HostedMigration/hostedmigrationservice.svc –ProxyPool “YourFEPool.Domain.local” –Credential $creds

}

The CSV File will look like this

Alias

user@domain.com

user2@domain.com


Moving User back to On-premises (From Office 365 to SfB 2015 )

On Frontend Server Launch PowerShell as Administrator then:

A- Import-Module MicrosoftTeams

B- Connect-MicrosoftTeams

After you connect you’ll get the following result:

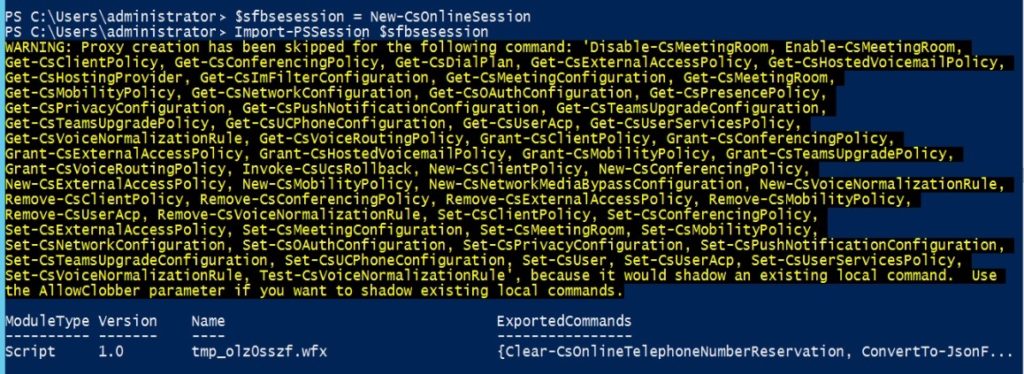
Now that you’re connected to your tenant, Try to create a Skype for Business session with the following commands

C- $sfbsession = New-CsOnlineSession

D- Import-PsSession $Sfbsession

You should get the following result

Type the following command to move the user back to On-premises environment:

Now last and most important note is that since I am using Skype for Business 2015 Server, I have to use the parameter -UseOAuth which uses modern authentication.

Move-csuser -Identity User@domain.com -target PoolHostname.Domain.Local -UseOAuth -Verbose

This should get it to work finally


Errors you might face

Error 1:

When you have your on-premises user enabled for dialin you will probably get the following error if you try to migrate them to Skype for Business online or teams.

Move-Csuser :: HostedMisrat ion fault: Error=(511), Description=(The user could not be moved because he or she is enabled for dial-in conferencing on-premises, but has not been an assigned an Audio Conferencing license in Office 365. Users must be licensed before they can be moved to Teams or Skype for Business Online.)

If you are sure do want to use migrate this user without an Audio Conferencing license, specify the

“BypassAudioConferencingCheck” switch. ) At line: 1 char: 1

clip_image001[4]

The Solution is to either provide an audio conferencing license  or as it is showing in the error itself as it says use the switch -BypassAudioConferencingCheck to ignore that.

Error 2:

When trying to import the session, I got the following error

the runspace state is not valid for this operation for PowerShell Online.

clip_image001[6]

Solution: To overcome this problem you’ll need to use the overridePowershellUri Parameter in the New-CsOnlineSession in order to connect to Skype online powershell.

To get your tenant’s PowerShell URI use the cmdlet Get-CsOnlinePowerShellEndPoint

What you need to use is the AbsoluteUri

clip_image001[8]

Error 3:

When you try to import the SkypeOnlineConnector module and then run the New-CsOnlineSession cmdlet from Skype for Business Management Shell you’ll get the following error after authenticating.

Sign in

Sorry, but we’re having trouble signing you in.

AADSTS50011: The reply URL specified in the request does not match the reply URLs configured for the application: ‘7716031e-6f8b-45a4-b82b-922b1af0fbb4’. More details: Reply address did not match because of case sensitivity.

Troubleshooting details

If you contact your administrator, send this info to them.
Copy info to clipboard  
  
Request Id:  f0f97265-4669-4e4f-bcf7-609469e92f00
 
Correlation Id:  829c8a2b-f697-416f-bfa6-4a794a229a13

Timestamp:  2021-01-10T23:00:10Z
 
Message:  AADSTS50011: The reply URL specified in the request does not match the reply URLs configured for the application: ‘7716031e-6f8b-45a4-b82b-922b1af0fbb4’. More details: Reply address did not match because of case sensitivity.
     

Advanced diagnostics: Disable
  
If you plan on getting support for an issue, turn this on and try to reproduce the error. This will collect additional information that will help troubleshoot the issue.

image

Solution:

Run the cmdlets from Windows PowerShell as admin not Skype for Business Management shell.

Error 4 

Get-CsOnlinePowerShellAccessInformation : Unable to get response from https://admin4a.online.lync.com/OcsPowershellOAuth.
At C:\Program Files\Common Files\Skype for Business Online\Modules\SkypeOnlineConnector\SkypeOnlineConnectorStartup.psm1:160 char:20
+ … pAuthInfo = Get-CsOnlinePowerShellAccessInformation -PowerShellEndpoi …
+ ~~~~~~~~~~~~~~~~~~~~~~~~~~~~~~~~~~~~~~~~~~~~~~~~~~~~~~~~~
+ CategoryInfo : NotSpecified: (:) [Get-CsOnlinePowerShellAccessInformation], Exception
+ FullyQualifiedErrorId : System.Exception,Microsoft.Rtc.Management.OnlineConnector.GetPowerShellAccessInformationCmdlet

Error 5

Move-CsUser
[Y] Yes [A] Yes to All [N] No [L] No to All [S] Suspend [?] Help (default is “Y”): y
move-csuser : The underlying connection was closed: An unexpected error occurred on a send.
At line:1 char:1
+ move-csuser -identity user@domain.com -target D2-POOL01.clou …
+ ~~~~~~~~~~~~~~~~~~~~~~~~~~~~~~~~~~~~~~~~~~~~~~~~~~~~~~~~~~~~~~~~~~~~~
+ CategoryInfo : InvalidOperation: (CN=user …domain,DC=net:OCSADUser) [Move-CsUser], WebException
+ FullyQualifiedErrorId : MoveError,Microsoft.Rtc.Management.AD.Cmdlets.MoveOcsUserCmdlet

Solution:

1- Make sure you have the proper Powershell version.

2- Make sure you enable TLS1.2 as default, for a quick solution use this PowerShell script 

[System.Net.ServicePointManager]::SecurityProtocol = [System.Net.SecurityProtocolType]::Tls12;

3- Use MFA enabled account by following these steps to login and move user.

A- Import-Module MicrosoftTeams

B- Connect-MicrosoftTeams

After you connect you’ll get the following result:

Now that you’re connected to your tenant, Try to create a Skype for Business session with the following commands

C- $sfbsession = New-CsOnlineSession

D- Import-PsSession $Sfbsession

You should get the following result

Now last and most important note is that since I am using Skype for Business 2015 Server, I have to use the parameter -UseOAuth which uses modern authentication.

This should get it to work finally

References:

https://docs.microsoft.com/en-us/microsoftteams/upgrade-to-teams-on-prem-overview

https://social.technet.microsoft.com/wiki/contents/articles/34339.skype-for-business-online-enable-your-tenant-for-modern-authentication.aspx

https://docs.microsoft.com/en-us/skypeforbusiness/hybrid/move-users-from-on-premises-to-skype-for-business-online

https://docs.microsoft.com/en-us/microsoftteams/teams-powershell-install

https://docs.microsoft.com/en-us/skypeforbusiness/troubleshoot/hybrid-move-sfb-online/move-csuser-hostedmigration-fault-507

https://docs.microsoft.com/en-us/powershell/module/skype/move-csuser?view=skype-ps

error when Installing Nuget module for Microsoft Teams integration

Story

I got a client requesting to integrate Skype for Business 2015 with Microsoft Teams. Skype for Business 2015 is installed on Windows Server 2012 R2 which has PowerShell 4.0

I already installed PowerShell 5.1 and restarted the server in question.

When I tried to install the Microsoft Teams PowerShell Module to integrate Skype for Business with Teams I got the following error:

image

Error

PS C:\Users\Admin> Install-Module MicrosoftTeams

NuGet provider is required to continue
PowerShellGet requires NuGet provider version ‘2.8.5.201’ or newer to interact with NuGet-based repositories. The NuGet
  provider must be available in ‘C:\Program Files\PackageManagement\ProviderAssemblies’ or
‘C:\Users\Admin\AppData\Local\PackageManagement\ProviderAssemblies’
. You can also install the
NuGet provider by running ‘Install-PackageProvider -Name NuGet -MinimumVersion 2.8.5.201 -Force’. Do you want
PowerShellGet to install and import the NuGet provider now?
[Y] Yes  [N] No  [S] Suspend  [?] Help (default is “Y”): y
WARNING: Unable to download from URI ‘https://go.microsoft.com/fwlink/?LinkID=627338&clcid=0x409′ to ”.
WARNING: Unable to download the list of available providers. Check your internet connection.
PackageManagement\Install-PackageProvider : No match was found for the specified search criteria for the provider
‘NuGet’. The package provider requires ‘PackageManagement’ and ‘Provider’ tags. Please check if the specified package
has the tags.
At C:\Program Files\WindowsPowerShell\Modules\PowerShellGet\1.0.0.1\PSModule.psm1:7405 char:21
+ …     $null = PackageManagement\Install-PackageProvider -Name $script:N …
+   ~~~~~~~~~~~~~~~~~~~~~~~~~~~~~~~~~~~~~~~~~~~~~~~
     + CategoryInfo          : InvalidArgument: (Microsoft.Power…PackageProvider:InstallPackageProvider) [Install-Pac
    kageProvider], Exception
     + FullyQualifiedErrorId : NoMatchFoundForProvider,Microsoft.PowerShell.PackageManagement.Cmdlets.InstallPackagePro
    vider

PackageManagement\Import-PackageProvider : No match was found for the specified search criteria and provider name
‘NuGet’. Try ‘Get-PackageProvider -ListAvailable’ to see if the provider exists on the system.
At C:\Program Files\WindowsPowerShell\Modules\PowerShellGet\1.0.0.1\PSModule.psm1:7411 char:21
+ …     $null = PackageManagement\Import-PackageProvider -Name $script:Nu …
+   ~~~~~~~~~~~~~~~~~~~~~~~~~~~~~~~~~~~~~~~~~~~~~~~~
     + CategoryInfo          : InvalidData: (NuGet:String) [Import-PackageProvider], Exception
     + FullyQualifiedErrorId : NoMatchFoundForCriteria,Microsoft.PowerShell.PackageManagement.Cmdlets.ImportPackageProv
    ider

More Details:

Although I have PowerShell 5.1 module installed but still it seems problems wont go away. It’s part of Microsoft’s main requirement to have Windows PowerShell 5.1 and to import the Microsoft Teams Module for an easy installation and integration with Teams as it leverages the Module MicrosoftTeams to make things easy.

When looking at the details of the error, it seems as if PowerShell is trying to connect to a particular link to download and install the NuGet Provider which is part of installing the MicrosoftTeams Module.

The error below can be noticed to be the cause.

image

Resolution:

After doing some digging it turns out that since April 2020 Microsoft has disabled the use of TLS Version 1.0 and 1.1 so people who are working on old Windows Server edition or any application servers that utilize these protocols will now have to force PowerShell or any other app to use the TLS 1.2 Version.

In order to fix this, You will need to run the following Script on your PowerShell as an Admin

[Net.ServicePointManager]::SecurityProtocol = [Net.SecurityProtocolType]::Tls12

See the announcement here:

https://docs.microsoft.com/en-us/powershell/scripting/gallery/installing-psget?view=powershell-7.1

After running this script, I was able to install NuGet and run the installation of MicrosoftTeams PowerShell Module

image

Hope this helps